Printing Payment Forms and Cheques
It is often necessary to print certain documents associated with the Payment. These may be remittance advices, cheques or documents used to gain internal authorisation for the Payment.
If you want to print a remittance advice and a cheque together, you can do so, providing some set-up work has been carried out in advance. Follow this procedure:
- Using the Form register in the System module, design the remittance advice and the cheque and name them "REM_ADVICE" and "CHEQUE". Use the 'Properties' function on the Operations menu to assign a Document Type of "Payment" (in the former case) and "Payment Cheques". A sample "REM_ADVICE" is supplied with FirstOffice: this can be modified to suit your requirements. Full instructions for using the Form register can be found here.
- Select the Purchase Ledger using the [Select Module] button in the Master Control panel or the Ctrl-0 (Windows and Linux) or ⌘-0 (Macintosh) keyboard shortcut.
- Click [Documents] in the Master Control panel. The 'Documents' list window is opened showing a list of available documents. Highlight 'Payment Forms'.
- Select 'Define Document' from the Operations menu.
- Use the Sequence column in the subsequent window to determine the order in which the Forms will be printed. If, for example, you need a remittance advice to be printed first, on the first line enter "1" as the Sequence Number and "REM_ADVICE" as the Form (you can use 'Paste Special' from the Form field to ensure the spelling is correct). On the second line, enter "2" as the Sequence Number and "CHEQUE" as the Form. You can, of course, specify on a third line that an internal authorisation document is also to be printed.
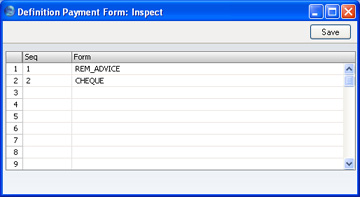
- Click [Save] to save the Payment Form definition. From now on, whenever the Payment Form is printed, the remittance advice and the cheque will be printed.
Note that following steps 3-6 will ensure that the same Form is used for Payments of all Payment Modes. However, if you have assigned a Form to a particular Payment Mode (in the Document field on
flip B of the Payment Mode window), that Form will take precedence. It is therefore possible to assign different Forms to different Payment Modes, but with the disadvantage that it is not possible to attach sequences of Forms to each Payment Mode, as described in step 5 above.
You can print the Payment Form using one of three methods:
- When viewing an individual Payment record, by selecting 'Print Form' from the Operations menu.
- When viewing an individual Payment record, by clicking the Printer icon. If you want to print to screen, click the Preview icon.
- By selecting 'Documents' from the File menu or by clicking the [Documents] button in the Master Control panel and selecting 'Payment Forms' in the subsequent list.
In the case of a Payment record containing payments to more than one Supplier, separate payment forms will be printed for each Supplier.
If you are not using the No Test Printout option in the Configuration setting in the System module, an unordered Payment will be printed with the phrase "Test Printout" diagonally across the page as a watermark.