Calculation Formulae
You can use this setting to define formulae that you can then use in
Autotransactions.
Entering a Calculation Formula
Double-click 'Calculation Formulae' in the 'Settings' list. A list of existing Calculation Formulae appears. Click [New] in the Button Bar to enter a new record, or [Duplicate] to create a new record that is based on an existing one. When you have entered the Formula, save it using the [Save] button and close the window by clicking the close box. Then, close the browse window using the close box again.
To enter a Calculation Formula, follow these steps:
- Enter a unique Code by which the Formula can be identified. This can consist of up to 12 alphanumeric characters. Do not use a code that could be mistaken for a formula (e.g. do not use a code of a number followed by a % sign such as "10%" or "+10%").
- Assign a descriptive name to the Formula, to be shown in the 'Calculation Formulae: Browse' window.
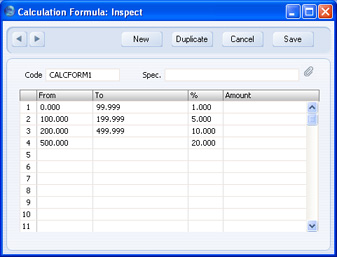
- Use the grid area to draw up the Formula. This can use any combination of percentages (entered in the % column) and fixed values (entered in the Amount column).
The example in the illustration above takes an amount and calculates from it a figure based on a graduated percentage scale, in a similar manner to income tax calculations. It functions by adding the following figures together:
- 1% of the first 99.999 of any amount
- 5% of the next 99.999
- 10% of the next 299.999
- 20% of any remaining amount.
For example, applying the formula to the figure 5,000 produces 936.00 (1% from the first 99.999 = 1, 5% from the range 100-199.999 = 5.00, 10% from the range 200-499.999 = 30.00 and 20% on the rest = 900.00).
It is recommended that the number ranges of the different rows of the Formula (the From and To columns) are defined to two decimal places or are almost made to overlap. For example, ranges of 0-99.999 and 100-199.999 (or even 0-100 and 100-200) will produce a more accurate result than 0-100 and 101-200.
Using a Calculation Formula in an Autotransaction
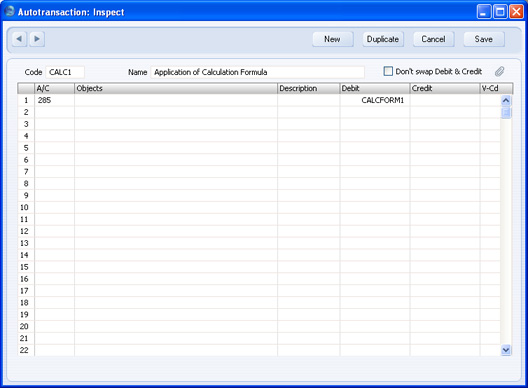
You should attach a Calculation Formula to the Debit or Credit fields of an Autotransaction as follows. If you attach it to the Debit field of the Autotransaction, the Formula will be applied to the value entered in the previous row of the Transaction and the result placed in the Debit field of the Transaction. If you enter the Formula in the Credit field of the Autotransaction, the result will be placed in the Credit field of the transaction.
In the illustration below, the code of the example Formula shown above has been entered to the Debit field of an Autotransaction:
In Use
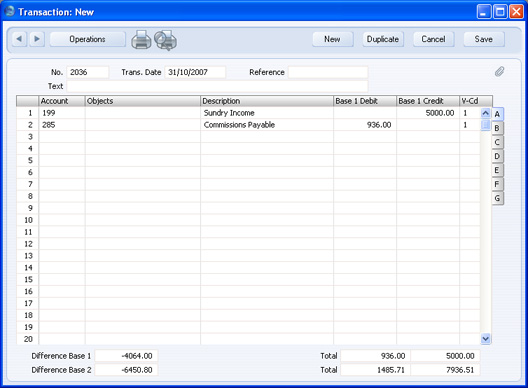
When you enter a Transaction, begin by entering the Account code for the relevant expense category, and the amount. On the second row, enter the code of the Autotransaction in the Account field.
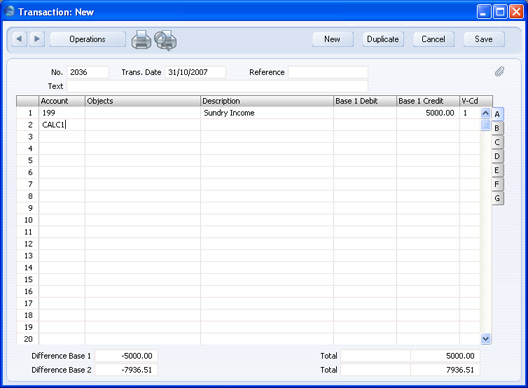
Press Return. The Autotransaction is applied to the first row of the Transaction, and the amounts are recalculated as follows: