Creating a New Database - Client
Having configured the server as described
here, you can now configure Standard ERP on each client computer. The server should be running while you are doing this.
- Working on a client computer, ensure there is no database file with the name "HANSA.HDB" in the folder containing the Standard ERP application, then start it by double-clicking the application icon.
The "DBDEF.TXT" and "DEFAULT.TXT" text files must be present in the same folder as the application when you create a new database. Standard ERP will use these files to set some initial preferences in the new database.
The first window to appear will ask how you want to use the application:
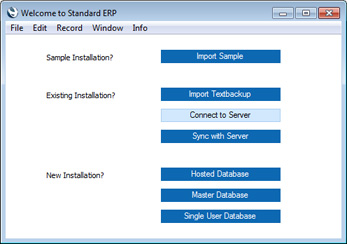
- Click the [Connect to Server] button. The 'Server Address: Inspect' window will appear, listing the available servers in the same subnet as your client computer:
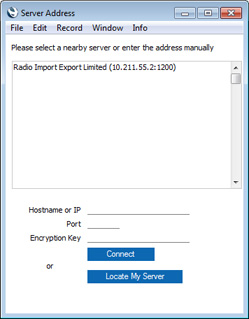
Double-click the server in the list that you want to log in to, or click once and then click the [Connect] button.
If the server is not listed, the probable reasons are:
- The server is in the same subnet as your client machine but it is not discoverable by the client using the Bonjour service discovery protocol. In this case, enter the IP address of the server and port in the Hardware or IP and Port fields. The Port will be 1200 unless you changed it as described in step 11 on the Creating a New Database - Server page.
- The server is not in the same subnet as your client machine. In this case, first make sure you have ticked the Wide Area Network box in the Configuration setting on the server (as described here) and then proceed as described in step i immediately above.
If you do not know the IP address and Port, you can use the [Locate My Server] feature. This feature requires you to have registered your server database as described on the Enabler Key page and so it can't be used with a brand new server database. Click the [Locate My Server] button to open the following window:
Enter the Company Code and Name, your VAT registration number and your country of registration. In the last case, press Ctrl-Enter (Windows) or ⌘-Enter (Mac OS X) to choose from a list of options. Then, click the [Save] button.
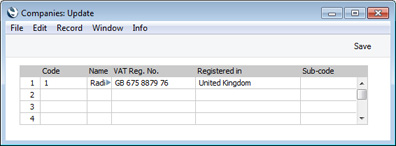
In all cases, the server details will be saved in the Company register in the Standard ERP client database.
- The 'Select Company' window will appear, containing your company name, as specified in step 4 on the Creating a New Database - Server' section page:
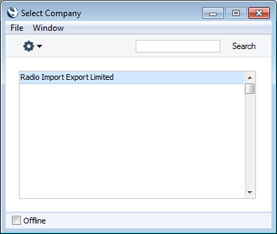
Double-click the company name, or highlight it and press the Enter key on your keyboard.
If the 'Select Company' window does not appear and instead your client is unable to connect to the server, this will be because the "DBDEF.TXT" and "DEFAULT.TXT" files were missing when you created the database. Please refer to page. An early indication of this problem will be the server not appearing in the list of available servers in the previous step.
- The login window will appear:
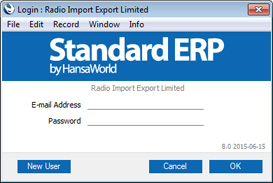
Enter the User Name and the Password and click [OK].
- If you specified an Email Address, a message will appear informing you that an email address validation mail has been sent to that address. If you did not specify an Email Address, you will now be asked to do so:
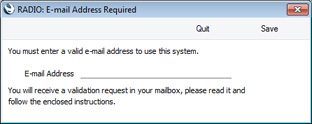
Enter an Email Address and click the [Save] button. An email address validation mail will be sent to the address that you specify.
When the person receives the email address validation mail, they should click the link in the mail or copy it to a browser window to confirm that the email address is valid.
- If you specified a Password in step 6, you will be asked if you want Standard ERP to remember the Signature and Password, so that the person will not have to enter them themselves each time they log in using the particular client computer.
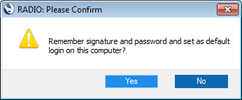
Bearing in mind that the Password is a security feature, it is recommended that you only click the [Yes] button if you are absolutely sure no-one other than yourself will have access to your computer. If you click the [Yes] button and then change your mind, you can turn off the feature by choosing 'Stop Auto Login' from the File menu.
- The Navigation Centre will appear, with your name shown in the title bar. This is illustrated on the Work Area page.
- If the computer is connected to the internet, a window will open reminding you that you need to register. If you click the [Register this Product] button, the 'Choose Your Country: Inspect' window will open. This window is the first step in the Registration Wizard: please refer to the Enabler Key page for more details about registering.
- Repeat the sequence for Standard ERP on each client computer, creating User Accounts for each person that will use Standard ERP. In step, you can log in as each person and specify a Passwords for them. Each user will be able to change their password later. If you are installing Standard ERP on a new client computer and do not need to create a new User Account, log in as an existing user in step 4 to proceed to the Navigation Centre.
- If you will be carrying out the configuration work described in this manual working on a client machine, you can now record your full company details, enter extra Companies if you need them, import set-up data and apply for an Enabler Key.
---
Go back to: