Creating a New Database - Multi-user Sample
The Standard ERP installation package includes a set of sample data that you can use to create a sample database. This will allow you to test new or unfamiliar Standard ERP features before using them in your "live" database. A sample database is fully functional with the exception that Cloud Services are disabled. You can use a sample database for 30 days, after which it will go into restricted mode. From that time onwards, you will only be able to print reports and documents to screen, not to a printer, to file or to any other medium. Exporting from a sample database and importing to a new database before the 30-day point will cause the new database to go to restricted mode immediately.
In this section, we describe configuring a multi-user Standard ERP sample database in which the server and client application both reside on the same machine. This configuration is for trial and demonstration purposes only and is not supported for "live" databases. Follow these steps:
- Referring to the Multi-user Installation page, download the server and client applications that are appropriate for your test machine.
- Install the server application as follows:
- If you are using a Windows machine, install the service version by running the server installer (named "standarderp.x32.server.msi" (32-bit version) or "standarderp.x64.server.msi" (64-bit version)). The default installation path is C:\Program Files (x86)\HansaWorld\Standard ERP Server\ (32-bit) or C:\Program Files\HansaWorld\Standard ERP Server\ (64-bit).
- If you are using Mac OS X, open the server .dmg file (named "standarderp.server.dmg") by double-clicking, and then copy the folder it contains to the 'Applications' folder.
- If you are using Linux, expand the server .tgz file (named "standarderp.server.tgz") by double-clicking, and then copy the folder it contains to the 'Applications' folder.
- If you are using a Windows machine, start the server application as follows:
- Use Notepad or a similar text-editing program to create a text file named "parameters.txt". Save this file in the "Standard ERP Server" directory, on the same level as the server application. The file should contain a single line of text:
- Sample/GBR-Sample.TXT
For reference, the "parameters.txt" file can contain the name of any .txt file containing data that you want to import.
- Start the server application. To do this, restart the machine: the service will be launched automatically. If you do not want to restart, open the Control Panel and double-click 'Administrative Tools' and then 'Services'. Find and select 'Standard ERP Server (32-bit)' or 'Standard ERP Server (64-bit)' in the list and choose to start the service. (The name will vary slightly, depending on the precise version of Standard ERP you are using.) When it starts, it will obey the instruction in the "parameters.txt" file and import sample data from the "GBR-Sample.TXT" file.
- When the import finishes, for security reasons the service will quit (you may need to monitor the log file (named "hansa.log") to see when the service quits). Empty or rename the "parameters.txt" file and then restart the application as described in (ii) above (if you do not empty or rename the "parameters.txt" file, the sample data will be imported again).
- If you are using a Mac OS X or Linux machine, start the server application as follows:
- Launch the Terminal application using the Terminal icon in the Panel or Dock (or from the "Utilities" folder in the "Applications" folder).
- Change to the "StandardERPServer" directory by typing:
- cd /Applications/StandardERPServer
- Type:
- ./StandardERPServer Sample/GBR-Sample.TXT (Linux 32-bit)
- ./StandardERPServer64 Sample/GBR-Sample.TXT (Linux 64-bit) or
- ./StandardERPServer Sample/GBR-Sample.TXT (Mac OS X)
This instruction will launch the server application and cause it to import demonstration data from the "GBR-Sample.TXT" file. As described in point 4 i above, you can include in this instruction the name and path of any .txt file containing data that you want to import.
- When the import finishes, for security reasons the application will quit. You will be informed when this happens in the Terminal window. Restart the application by typing:
- ./StandardERPServer (Linux 32-bit)
- ./StandardERPServer64 (Linux 64-bit) or
- ./StandardERPServer
- Locate the client installer that you downloaded in step 1, and install it. In the case of Windows, run the installer application. In the case of Mac OS X and Linux, open the .dmg file or expand the .tgz archive. In all cases, it is recommended that you install the client in a folder or directory named "Standard ERP Client" in your "Program Files" directory or "Applications" folder.
- Start the Standard ERP client application by double-clicking the application icon. The first window to appear will ask how you want to use the application:
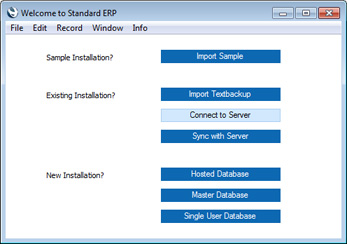
- Click the [Connect to Server] button. The 'Server Address: Inspect' window will appear, listing the available servers in the same subnet as your client computer:
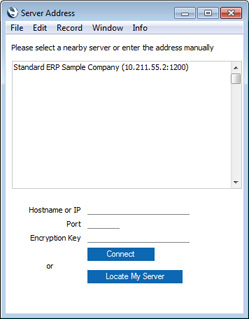
- Double-click the server in the list that you want to log in to, or click once and then click the [Connect] button.
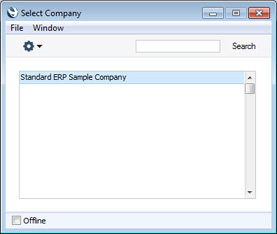
- The 'Select Company' window appears: select the single option by double-clicking:
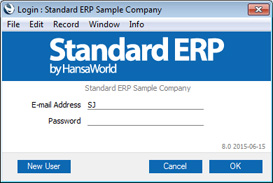
- Log in as SJ with no password:
- After logging in, the Navigation Centre will appear, as illustrated below on the Work Area page but with one difference. The window title of the Navigation Centre will contain the phrase "(SAMPLE)" as a suffix. This is to remind you that you have logged in to a sample database that you should use for testing only and not for real data.
- Immediately after the Navigation Centre appears, a 'Task Manager' window will also open. This window opens because you have been logged in to the sample database as a user who has some scheduled tasks that are still outstanding. If you need to close the 'Task Manager' window, click the close box. Otherwise, please refer to the Task Manager page for more details.
- If you are logged in to Skype, Skype may now ask you if you will allow Standard ERP to use Skype. Please refer to the Interaction with Skype page for details.
---
Go back to: