Remote Back-ups
The
timed back-up feature in Standard ERP means that a database text back-up file will be created automatically every day. The remote back-up feature provides additional security by ensuring an extra copy of each daily back-up file will be stored off-site on a remote server. It is always recommended that you store back-up files on more than one hard disk and in more than one location. While you can use the remote back-ups feature as a tool to help with this, you should of course keep your own copies of your back-up files and not rely solely on the remote server.
The remote back-ups feature is a chargeable cloud service provided by HansaWorld. Please refer to your local HansaWorld representative for information about pricing and for details about registering for the service.
To start using remote back-ups, follow these steps:
- Follow the instructions on the Automatic Timed Back-ups page to set up the timed back-up feature. This is necessary because whenever a back-up file is created using the timed back-up feature, it will be copied automatically to the remote server. Back-up files created using the 'Database Text Backup' option will not be copied to the remote server. In any case, the 'Database Text Backup' option cannot be used from a client machine in a multi-user system.
- Select 'System' using the [Switch Module] button in the Navigation Centre or the Ctrl-0 (zero) (Windows) or ⌘-0 (Mac OS X) keyboard shortcut.
- Click the [Settings] button in the Navigation Centre or use the Ctrl-S or ⌘-S keyboard shortcut. Double-click 'Backup Settings'. The following window appears:
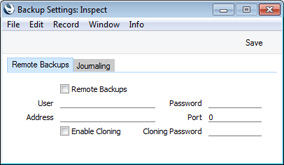
- When you register for the remote back-ups service, you will be provided with User, Password, Address and Port information. Enter that information here and tick the Remote Backups box.
- Click the [Save] button in the Button Bar to save the back-up specifications.
- In a single-user system, close your Standard ERP database and restart. If you are working on a client in a multi-user system, ignore this step.
- After you have followed the steps above, each time a timed back-up file is created, it will first be saved on your hard disk and then uploaded to the remote server. The Job Status setting in the System module will show you the progress of the upload.
- If you need to retrieve a back-up file from the remote server, you must use a single-user database. You cannot do so from a client in a multi-user system. It is assumed that you need to retrieve the back-up file because your main system has become damaged or lost.
To create a new single-user database, place your Standard ERP application and "hob" folder in a new folder together with the "dbdef.txt" and "default.txt" files and launch the application. When the 'Welcome to Standard ERP' window appears, click the [Single User Database] button and follow the instructions on the Creating a New Database - Single-user page.
- Enter your details in the Backup Settings setting as described in steps 4-6 above.
- Open the Remote Backups setting in the System module. The 'Remote Backups' window will open, listing the back-up files that are on the remote server:
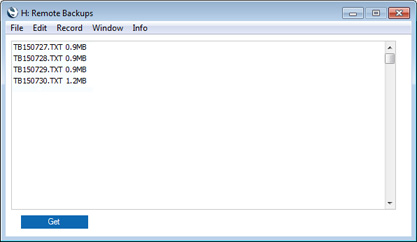
- Click on the most recent back-up file (or the most recent back-up file that you know is undamaged) and click the [Get] button. The back-up file will be downloaded to your computer, to a folder named "Downloads" that will be inside the folder or directory containing your Standard ERP application. You can monitor the progress of the download using the Job Status setting, as mentioned in step 7.
- Please refer to the Restoring from a Back-up page for details about recreating your database from the back-up file.
---
In this chapter:
Go back to: