Placing Buttons, Tools and Functions in the POS Invoice Window
This page describes in outline the placing of buttons, tools and functions in the POS Invoice window. For detailed descriptions about each function, please refer
here. If you will need cashiers to be able to activate some tasks and functions using keyboard commands, please refer
here for details about configuring these commands.
---
Illustrated below is the POS Invoice window as it will appear in a new installation of Standard ERP:
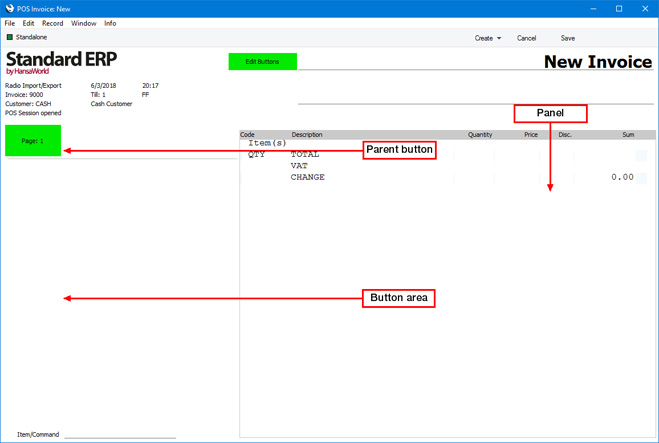
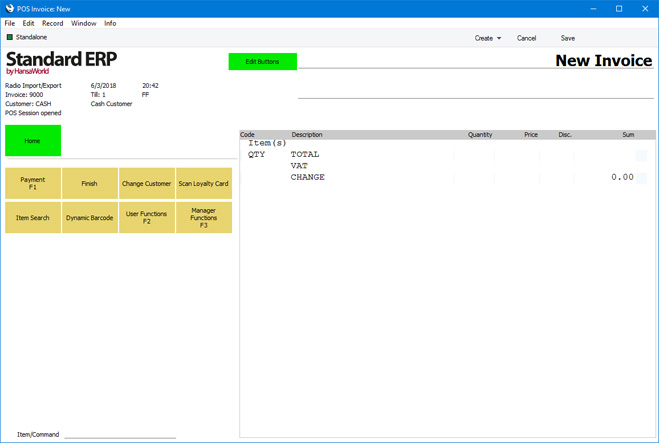
As shown in the illustration, only one button, a "parent button" (marked “Page 1”), is visible. At the moment there is no function attached to this button. Below this button, there is an empty area that is termed the "button area" in this documentation. This is where you will place the buttons that cashiers will use to process each POS Invoice. An example is shown below:
If you need more buttons than will fit in this area, you can create a second set of buttons. Each button can therefore perform one of two operations:
- It can activate a particular function; or
- It can replace the set of buttons that is currently visible with a different set.
You should spend some time planning the structure of your sets of buttons. When a cashier creates a new POS Invoice, that cashier will need buttons representing the most important and commonly-used tools and functions to be visible immediately. For example, you might need buttons to activate cash and credit card payments always to be available. But, if cashiers will add Items to POS Invoices by scanning the Items' barcodes, then buttons that they can use to find Items by Item Number or Name will be less necessary and won't need to be visible immediately. As an absolute minimum, you will need a button to register payment, a "Finish" button and, if you are using
work sessions, buttons to open and close work sessions.
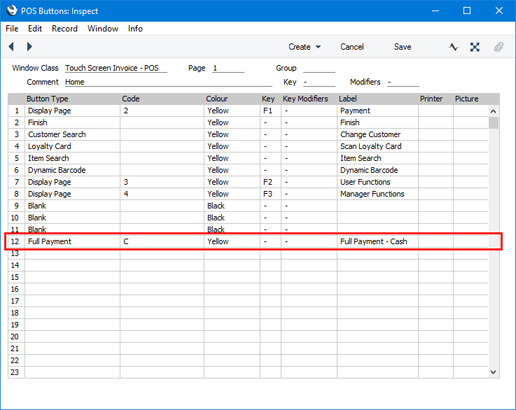
An example button structure is illustrated below:
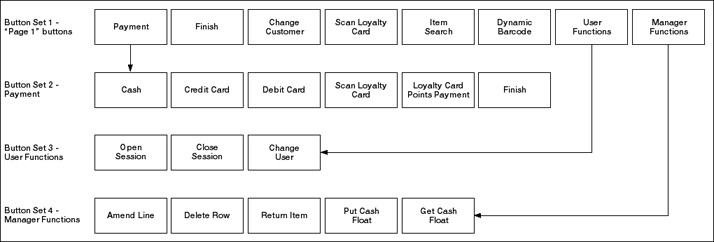
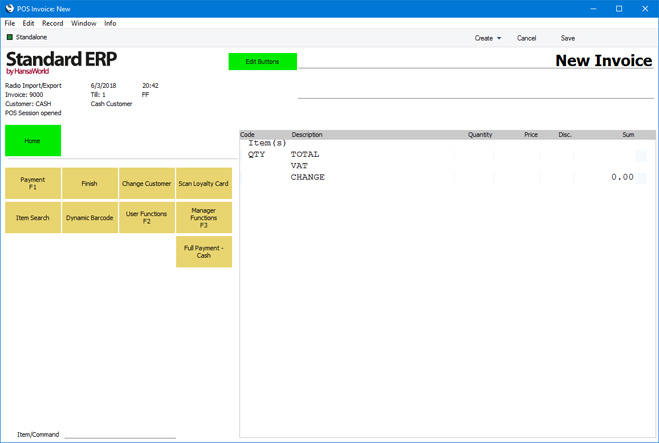
In this example, the buttons in the first row will be visible in each new POS Invoice. A cashier can touch or click the buttons marked "Payment", "User Functions" or "Manager Functions" if they need to see a different set of buttons. For example, the "User Functions" button will cause the initial set of buttons to be removed, to be replaced by the buttons in the third row in the illustration. A second parent button will also be added to the POS Invoice, to remind the cashier where they are in the structure. This is illustrated below:

If the cashier needs to get back to the initial set of buttons, they should touch or click the first parent button (marked "Home" in the illustration above).
You can include a button more than once in the structure (in the example, this has been done with the "Finish" and "Scan Loyalty Card" buttons).
There are two methods that you can use to place buttons in the POS Invoice window:
- Use the POS Buttons setting in the Point of Sales and Restaurant modules.
- You can add buttons directly to the POS Invoice window using the [Edit Buttons] button.
These two methods are now described in detail.
The POS Buttons Setting
Button definitions for the POS Invoice window are stored in the POS Buttons setting in the Point of Sales and Restaurant modules. Each record in this setting represents a separate set of buttons.
- Window Class
- Paste Special
Choice of possible entries
- Using 'Paste Special', specify the window in which the set of buttons will be used. The following options are available:
- Touch Screen Invoice - POS
- The set of buttons will be used in POS Invoices.
- Bar Tab
- The set of buttons will be used in Bar Tabs in the Restaurant module.
The remainder of this page will assume you have chosen "Touch Screen Invoice - POS" as the Window Class.
- Page
- Use this field to assign a unique identifying code to the POS Button record.
- In most cases, you can use an arbitrary code. However, you must have one POS Button record in which the Page is "1" as shown in the illustration (described as a "Page 1" record in this documentation). This record will contain the buttons that will be displayed in new POS Invoices.
- Group
- Paste Special
POS Button Groups setting, Point of Sales/Restaurant module
- Use this field to assign a POS Button record to a Button Group.
- Button Groups allow you to use different sets of Buttons in different circumstances. For example in a restaurant you might need different sets of buttons to appear on the tills in the food area compared to the tills in the bar. In this case, you would create one POS Button Group for the food area and one for the bar. Then, create the POS Button records that you need, assigning them each to the relevant Button Group (i.e. use this field to assign each POS Button record to the food area or to the bar). Then, assign each till to a Button Group using the POS Button Group field in the Local Machine setting in the User Settings module (or, if a till has a live-sync connection to the server, in the record for the till in the Local Settings setting in the Technics module). Buttons designed for the food area will not be used on tills in the bar and vice versa.
- If you are using Button Groups, you must have a "Page 1" record for each Button Group. Continuing the example, the "Page 1" record for the food area will contain the buttons that will be displayed in new POS Invoices created on tills in the food area, while the "Page 1" record for the bar will contain the buttons that will be displayed in new POS Invoices created in the bar.
- Comment
- This Comment will be used as the button label for the button above the button area (i.e. as the button label for the parent button). In the example illustrated above, "Home" will replace the default label, "Page 1".
- Key, Modifiers
- Paste Special
Choice of possible entries
- As an option, use the Key field to specify a Function Key that a cashier can use to activate the set of buttons. In practice, it is only useful to do this for the set of buttons attached to the parent ("Page 1") button, because this button is always visible above the button area and therefore the Function Key will always be active.
Be sure to choose a Function Key that isn't already used by the operating system. If necessary, add a Modifier to the Function Key (e.g. Ctrl or Shift).
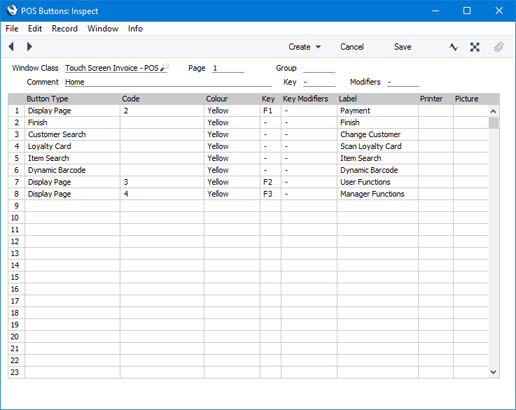
Use the matrix that takes up the majority of the 'POS Button: New' window to list the buttons that you want to be included in the set of buttons. In the "Page 1" POS Button record, these are the buttons that will be shown each time on opening a new POS Invoice.
The buttons will be shown in the POS Invoice in the order in which you list them in the POS Button record. The first four buttons in the list in the POS Button record will appear in the first row of buttons in the POS Invoice, and so on.
Each row in the matrix represents a single button, with the following attributes:
- Button Type
- Paste Special
Choice of possible entries
- Use 'Paste Special' to specify the task or function that should be carried out when the cashier touches or presses the button. Please refer to the 'POS Button Types’ page for descriptions of each option.
- Code
- Paste Special
Depends on Button Type
- Depending on the Button Type you have chosen in the field to the left, you may need to make an entry in this field. For example, if the Button Type is "Display Page", use this field to specify the Page that is to be displayed when the cashier touches or presses the button. If the Button Type is "Cash", "Credit Card" or "Loyalty Points Payment", use 'Paste Special' to choose a Payment Mode for the payment. Please refer to the descriptions of the individual Button Types (index here) for more details about using this field with specific Button Types.
- Colour
- Paste Special
Choice of possible entries
- Choose a colour for the button, to be used in the POS Invoice window.
- Key, Key Modifiers
- Paste Special
Choice of possible entries
- As an option, use the Key field to specify a Function Key that a cashier can use instead of pressing the button.
- Be sure to choose a Function Key that isn't already used by the operating system. If necessary, add a Modifier to the Function Key (e.g. Ctrl or Shift).
- Label
- Enter the name of the button, as it will appear in the POS Invoice window.
- Printer
- Paste Special
Printers setting, System module
- This field will only be used if the Window Class in the header is "Bar Tab" and if the Button Type is "Display Page" or "Item". When a waiter prints a Bar Tab, you can use this field to specify that specific Items on the Bar Tab will be printed on particular printers in the kitchen. You can do this for an individual Item (by specifying a Printer in a row in which the Button Type is "Item"), or you can do this for a selection of Items (by specifying a Printer in a row in which the Button Type is "Display Page").
- Picture
- Paste Special
POS Button Pictures setting, Point of Sales module
- If you need a picture or image to appear in a button instead of a Label, choose a record in the POS Button Pictures setting here. You should have attached the picture or image to that POS Button Picture record, as described here. The image can be a JPG or PNG file (BMP is also supported on Windows clients only, but using BMP files is not recommended because their size can have a detrimental effect on the speed with which the button will be drawn). If you need to use POS Button Pictures, you should also select the Enable Pictures on Buttons option on the 'POS Appearance’ card in the Local Machine setting in the User Settings module. You may also want to change the default button size, which you can do using the Button Width and Button Height fields in the same setting. As the Local Machine setting is stored separately in each client database, you will need to make these changes on each till or cash machine.
The example POS Button record illustrated above will mean that each new POS Invoice will contain the following buttons:

The advantage of using the POS Buttons setting to add buttons to the POS Invoice window is that the matrix in a POS Button record makes it easy to add many buttons in one go. It is also easy to create several sets of buttons and to connect them together.
The disadvantage is that you need to quit and restart to see any changes in the POS Invoice window. This is because POS Buttons are loaded into memory when you start a client, which makes the buttons are quicker to draw when you open a new POS Invoice. Alternatively, if you would like to see the changes immediately, use the [Edit Buttons] button in the POS Invoice window, as described immediately below.
The [Edit Buttons] Button in the POS Invoice Window
At any time while entering or viewing a POS Invoice, you can add or change the buttons in the window. The results will be visible and useable immediately. To do this, click or touch the [Edit Buttons] button:
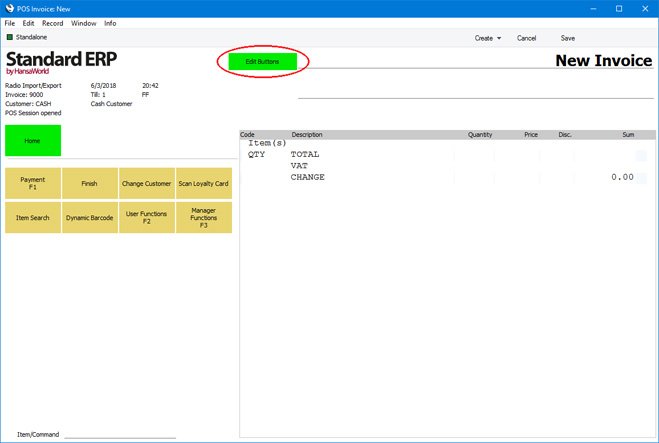
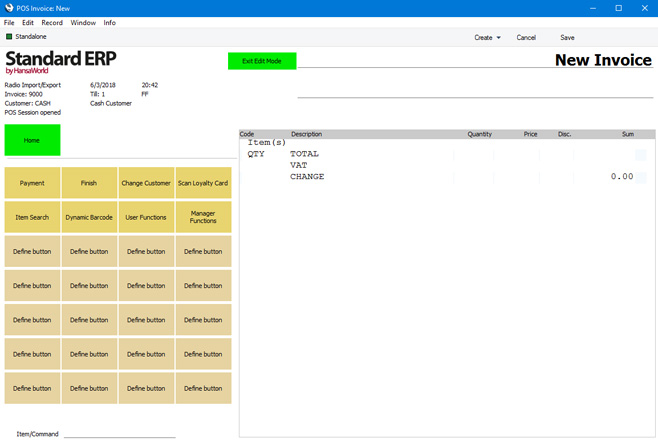
The button area will be filled with placeholder buttons labelled "Define button". Any existing buttons will remain. The name of the [Edit Buttons] button will change to [Exit Edit Mode]:
To add a new button, click or touch the button marked "Define Button" that is in the position where you need the new button to appear. To edit an existing button, click or touch that button. In both cases, a 'Define button' window will open:
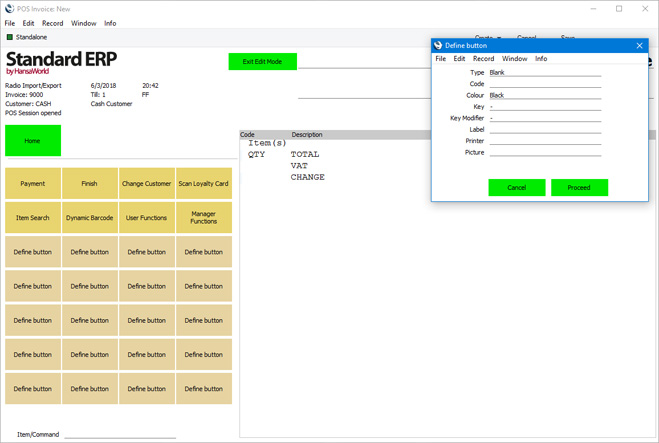
In effect, this window provides an alternative view of a single row in a POS Button record. Please refer to the previous section for descriptions of each field. If you need to remove an existing button, set the Type to "Blank".

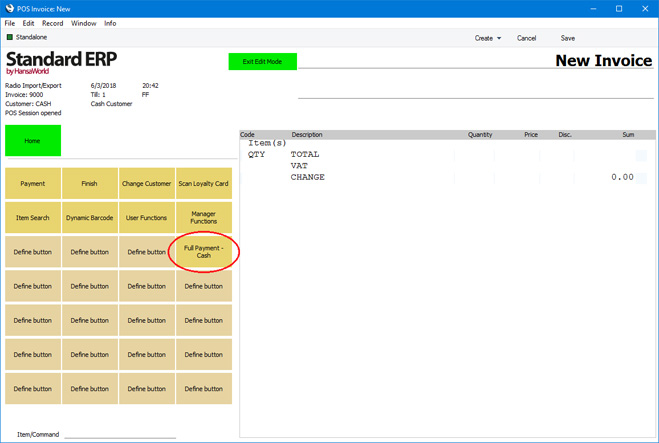
When the window is complete, click or touch the [Proceed] button. The new button will be added to the POS Invoice window:
Behind the scenes, the relevant row in the POS Button record will have been updated:
If there were previously no buttons in the POS Invoice window (i.e. there was no record in the POS Buttons setting), a new POS Button record will be created automatically,
When you have finished editing buttons, click or touch the [Exit Edit Mode] button. You can now continue processing the POS Invoice, and you will be able to use the new button(s) immediately. Colleagues on other client machines will need to quit and restart Standard ERP in order to see the new button(s) (they can also click or touch [Edit Buttons] and the [Exit Edit Mode] in the POS Invoice window.
To add a second set of buttons, press [Edit Buttons] and then add a
"Display Page" button. Specify a Code, which should not be 1 and should not be one that has already been used. Press [Proceed] to save the new button and then exit editing mode. Click or touch the new "Display Page" button, and then go into editing mode once again to add buttons to the new page.
If the [Edit Buttons] button is not visible in the POS Invoice window, the probable reasons are:
- You have logged in as a user whose Access Group denies you access to the POS Buttons setting.
- You are working on a till or client machine that has a live-sync connection with the server. It is not possible to edit any settings on live-sync tills.
---
Configuring the POS Invoice WIndow:
Go back to: