Cash Events
This page describes Cash Events, a setting in the Point of Sales module and a register in the Restaurant module. This description focuses on its use in the Point of Sales module: please refer
here if you need a description focusing on the use of Cash Events in the Restaurant module.
—
At any time during the working day, you may need to place cash in or remove it from a Till Drawer. Examples include placing a cash float into a Till Drawer, and removing cash and other takings from the Till Drawer to the back office when they reach a certain level. You should use the Cash Events setting in the Point of Sales module to record these cash movements. Cash sales are not Cash Events for this purpose. If you are using work sessions, you should ensure that a Till Drawer is in open session when recording Cash Events for it (if you are using the Require Open Session option in the POS Settings setting, you won't be able to save a Cash Event if the Till Drawer you are using is not in open session).
Cash Events are not recorded in the Nominal Ledger immediately. This will be done later, when you create a POS Balance record and save it after marking it as OK. You can do this yourself or it will be done automatically the next time you run the 'Cash Up' Maintenance function.
You can record Cash Events for a particular Till Drawer using the following methods:
- Cashiers can record Cash Events on the till or cash machine itself, working directly in the Cash Events setting.
- Administrators can record Cash Events separately for each till remotely from a desktop client, again working directly in the Cash Events setting.
You can use this method for tills with live connections to the server and for tills with live-sync connections. However, if you are using work sessions, you should be careful when using this method for live-sync tills. Work sessions cannot be opened remotely for live-sync tills, they can only be opened from the tills themselves. So, if you record a Cash Event remotely for a live-sync till, you must make sure that a work session has been opened on that till first. Using the Require Open Session option will give you a measure of protection. When tills are connected to the server, the POS Session records from those tills will have been synchronised, so the Require Open Session option will be controlled by up-to-date session information. But when tills are not connected to the server, the session information on the server that controls the Require Open Session option may not be up-to-date. In this situation, you should not try to open a session for a till remotely, because any Cash Events that you then enter may not be caught by the cash up routines.
- Cashiers can record Cash Events directly from POS Invoices. To enable this feature, you must add "Put Cash Float" and "Get Cash Float" buttons to the POS Invoice window. The "Put Cash Float" button will move cash and other monies into a till from the back office, while the "Get Cash Float" will move takings from a till to the back office.
The "Put Cash Float" and "Get Cash Float" buttons will cause simpler versions of the 'Cash Event: New' window illustrated below to open, entitled 'Cash In: New' and 'Cash Out: New' respectively. The simpler nature of these windows will make them easier to use on tills that may not have keyboards.
- When you run the 'Cash Up' Maintenance function for a particular Till/Drawer combination, the function will assume that the contents (cash and other takings) of the specified Drawer have been physically removed to the back office or bank. If you have not already created a Cash Event recording this movement yourself, the 'Cash Up' function will create the Cash Event automatically. If you created a Cashier Count record prior to running the 'Cash Up' function and the value of that Cashier Count is different to the value that should be in the Drawer, the function will create a second Cash Event, writing off the difference (again, assuming you have not already created this Cash Event yourself).
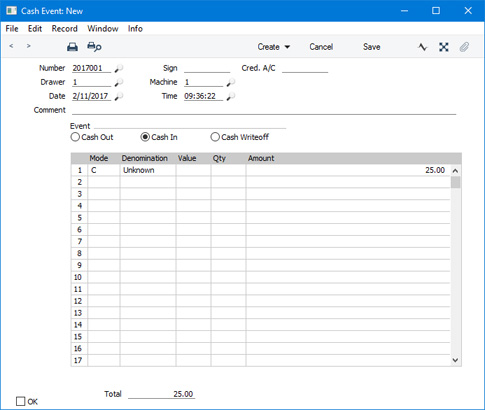
This is the 'Cash Event: New' window used by methods 1 and 2:
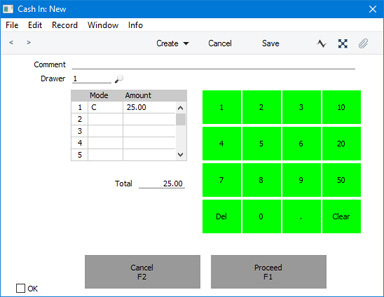
This is the 'Cash In: New' window used by method 3 (the 'Cash Out: New' window is similar and is illustrated at the end of this page):
- Number
- Paste Special
Select from another Number Series
- An identifying code for each Cash Event record will be generated automatically, and in most cases there will be no need to change it. The default will be chosen as follows:
- It will be taken from the first valid row in the Number Series - Cash Events setting.
- It will be the next number following on from the last Cash Event entered.
If you have tills with live-sync connections to the server, you must define Number Series for Cash Events for each live-sync till in the Synchronised Number Series setting before connecting those tills to the server for the first time. You must also define separate Number Series for the live tills in the Number Series - Cash Events setting.
- Sign
- The Signature of the user who created the Cash Event: this will be updated when you save the record.
- Cred. Acc.
- If the Event (below) is "Cash In" or "Cash Out", specify here the Back Office Account that is to be credited (Cash In) or debited (Cash Out) with the value of the Cash Event.
- If you leave this field empty, the Back Office Account specified in the POS Settings setting will be copied here when you mark the Cash Event as OK and save it. This Account will be used as the Back Office Account for every Payment Mode that is listed in the matrix. If you have not specified a Back Office Account in the POS Settings setting, this field will be left blank by default and the amounts will be posted to the Back Office Account(s) specified on flip E of the relevant Payment Mode(s). Therefore, you should only specify a Back Office Account in the POS Settings setting if you want to use the same Back Office Account for every Payment Mode.
- If the Event is "Cash Writeoff", specify the Account that is to be debited with the amount written off. In this case, if you leave the field empty, the Writeoff Account specified in the POS Settings setting will be copied here when you mark the Cash Event as OK and save it. If you have not specified a Writeoff Account in the POS Settings setting and you leave this field empty, the amounts written off will not be recorded in the Nominal Ledger.
- Drawer
- Paste Special
Drawers setting, Point of Sales/Restaurant module
- Enter here the Drawer to which the Cash Event applies. You must specify a Drawer before you can save the Cash Event. The Drawer that was used together with the Local Machine Code of the till you are working on in the most recent POS Session will appear here as a default.
- Machine
- Paste Special
Local Machines setting, Point of Sales/Restaurant/Technics module
- Enter here the Local Machine Code of the till to which the Cash Event applies.
- The Local Machine Code of the till you are working on will appear here as a default.
- If you are recording a Cash Event for a Till Drawer remotely from a desktop client, be sure to enter the correct Local Machine Code and Drawer for the till in question before saving.
- Date
- Paste Special
Choose date
- The Date of the Cash Event: this will be updated when you save the record.
- Time
- Paste Special
Current time
- The Time of the Cash Event: this will be updated when you save the record.
- Comment
- Enter any comment about the Cash Event here.
- Event
- Use these options to specify the type of movement that is represented by the Cash Event.
- Cash Out
- The Cash Event represents the removal of cash, cheques or credit card payments from the Till Drawer to the back office or bank.
- Cash In
- The Cash Event represents the placing of cash or other monies in the Till Drawer.
- Cash Writeoff
- Select this option when the value of cash or other monies in the Till Drawer is less than expected, and you need to account for the difference. You can also use this option if the Till Drawer contains more than expected, in which case you should enter negative figures in the Amount column in the matrix.
The relevant option will be chosen automatically in the 'Cash In: New' and 'Cash Out: New' windows.
Use the grid to list the payments into or out of the Till Drawer or the amounts being written off.
In each row, choose a Payment Mode (e.g. cash). You can then enter the full amount in the Amount field, or you can choose a Denomination (e.g. 10 cent coins) and a Qty (i.e. number of coins or notes), and the Amount will be calculated for you.
- Mode
- Paste Special
Payment Modes setting, Sales/Purchase Ledger
- Each movement into or out of the Till Drawer should have a Payment Mode, representing the type of movement or write-off. For example, when you empty the Drawer at the end of the day, you might use separate Payment Modes for cash, cheques and credit card movements.
- In the 'Cash In: New' and 'Cash Out: New' windows, the Cash Payment Mode specified in the Default Payment Modes setting will be placed in the first row by default.
- If the Cred. Acc. field above is empty and you have not specified a Back Office Account in the POS Settings setting, the Back Office Accounts specified for each Payment Mode (flip E) will be credited when there is a movement into the Drawer or debited when there is a removal. If you have specified a Cred. Acc. in the field above, it will be used instead of the Back Office Accounts for all Payment Modes.
- Denomination, Value, Qty
- If you need to record the movement of a quantity of coins or notes, enter the denomination of the coin or note in the Denomination field. Use 'Paste Special' to choose an option.
- If the denomination that you need is not in the 'Paste Special' list, you can instead enter the value of the denomination in the Value field.
- Then enter the quantity of coins or notes in the Qty field. The Amount will be calculated automatically.
- Amount
- The value of the movement into or out of the Till Drawer or to be written off.
- Total
- The total value of the Cash Event: this will be updated automatically each time you add a payment to the grid.
- OK
- Tick the OK box to approve the Cash Event. Once you have done this and have saved the record, no further changes can be made.
- The OK box is shown in the 'Cash In: New' and 'Cash Out: New' windows, but cashiers do not need to tick it themselves. It will be ticked automatically when they click or touch [Proceed].
- When you next create and mark as OK a POS Balance record (either yourself or using the 'Cash Up' Maintenance function), all approved Cash Events since the previous POS Balance will be recorded in the Nominal Ledger. Please refer here for more details about POS Balances and about the Accounts that will be used in the Nominal Ledger postings.
When the record is complete, click the [Save] button (Windows/Mac OS X) or tap √ (iOS/Android) to save. Once you have saved an approved Cash Event, you can't change it.
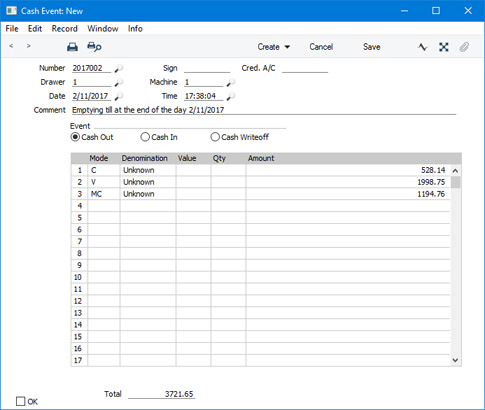
The example Cash Event illustrated above shows the placing of a cash float of 25.00 in a Till Drawer at the beginning of the day. The illustration below shows the removal from the Till Drawer of 528.14 in cash, 1998.75 in Visa receipts and 1194.76 in MasterCard receipts at the end of the day.
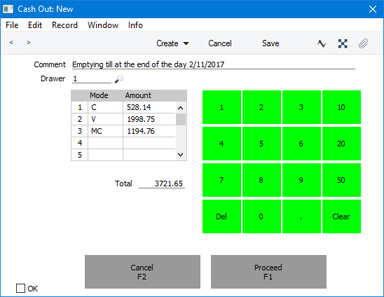
This is the same cash movement shown in a 'Cash Out: New' window:
If you have specified in the
Local Machine Serial Port Devices setting in the Technics module that the till or cash machine you are using is connected to one of the fiscal printers listed below, the Cash Event will be sent to that fiscal printer when you mark it as OK and save:
- Bematech MP-2100 TH FI
- Brio FisUSBM with Middle Ware (Latvia)
- Brio FM32 with Middle Ware (Latvia)
- CHD Virtual Fiscal Printer (Latvia)
- Citizen ST-05 (Lithuania)
- Empirija FB05 (Lithuania)
- Empirija FB15 (Lithuania)
- Empirija FB15 with Middle Ware (Lithuania)
- FPrint 02K
- POSNET (Poland, POSNET Protocol)
- POSNET (Poland, POSNET Protocol w VAT, from 01/10/2013)
- POSNET HD FV EJ (Poland, POSNET Protocol over TCPIP)
If the Cash Events entered by particular users are not to be sent to fiscal printers, assign those users to an
Access Group in which you have explicitly denied access to the 'Print to Fiscal Printer' Action.
If you need to send an existing Cash Event to a fiscal printer, open it in a record window and choose 'Send to Fiscal Printer' from the Operations menu. This function will only be available if the VAT Law in the Company Info setting is set to "Latvian", "Lithuanian", "Polish" or "Zimbabwean".
As noted earlier in this description, the 'Cash Up' Maintenance function for a particular Till/Drawer combination, the function will assume that the contents (cash and other takings) of the specified Drawer have been physically removed to the back office and will create a suitable Cash Event (Cash Out) automatically. Cash Events created by the 'Cash Up' function will not be sent to fiscal printers, so if this is a requirement you should not use the 'Cash Up' function or you should create the Cash Events yourself before you run the 'Cash Up' function.
If you are working on a live-sync till and the first Cash Event record is not synchronised (not sent to the server), the probable reason is that you have not defined Synchronised Number Series for the Cash Events setting. Please refer here for details.
---
Settings related to Point of Sales:
Go back to: