Connecting Printers - Fiscal Printers
A fiscal printer is a device that prints receipts as well as recording them in an internal memory. This information can later be read by tax authorities to ensure that a shop's sales have been registered and reported correctly.
This section describes connecting fiscal printers to tills and cash machines. Precise configuration, connection and operation details will vary depending on the model of fiscal printer that you are using. What follows is a general guide: for more detailed information, please refer to your local HansaWorld representative.
To use a fiscal printer, follow these steps:
- If you have not already assigned Local Machine Codes to your tills and cash machines, you should do so as the first step.
In the case of tills and cash machines with live connections to the server, open the Local Machine setting in the User Settings module and ensure the Code field in the header contains the correct Local Machine Code. You should do this separately on each till. If the Local Machine Code field was previously empty, you should quit Standard ERP on the till and restart.
In the case of a till with a live-sync connection to the server, you will have assigned a Local Machine Code when you connected the till to the server for the first time.
- Connect fiscal printers to each till or cash machine likely to receive cash or credit card payments. Usually the connection will be via USB or RS232 serial cables, but some printers can connect using Bluetooth or, in the case of shared printers, ethernet. Please refer to the sections towards the end of this page for details about connecting these printers.
- If you are using a fiscal printer with middleware, install the middleware on each till and cash machine. In the case of the Empirija FB15, only the .dll file from the Empirija middleware installer is required.
- Using the software supplied with the fiscal printers, make sure that:
- The printers have been configured with the correct VAT Codes (i.e. the VAT percentages in the printer should match the percentages in the Excl % field in the VAT Codes setting)
- The till and printer dates match.
- If the fiscal printers have been used before, make sure as well that the last daily report has been printed from each one.
- If your fiscal printer is the Epson TM-T81F, set payment type 1 in the printer to "Cash", payment type 2 to "Cheques" and payment type 3 to "Credit Card".
- Working on a desktop client, change to the Technics module and open the Local Machine Serial Port Devices setting. This setting should contain separate records for each individual serial port device (i.e. separate records for each individual fiscal printer). By specifying a Local Machine Code in each record, you will in effect use the setting to specify which tills and cash machines are connected to fiscal printers. Enter a separate record for each individual fiscal printer as follows:
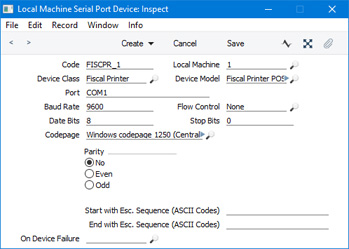
- Code
- Enter a unique Code for the fiscal printer. The Code can consist of up to ten characters, and you can use both numbers and letters.
- Local Machine
- Paste Special
Local Machines setting, Point of Sales/Restaurant/Technics module
- Enter the Local Machine Code of the till or cash machine to which the fiscal printer is or will be attached.
- Device Class
- Paste Special
Choices of possible entries
- Use 'Paste Special' to set the Device Class to "Fiscal Printer".
- Device Model
- Paste Special
Choices of possible entries
- Use 'Paste Special' to specify the model of fiscal printer that you are using.
- For the Epson LX-300, choose "Fiscal Printer Epson (Argentina)" from the 'Paste Special' list.
- Port
- Specify the till's serial port to which the fiscal printer is connected.
- If the till is a Windows machine, the manual for the fiscal printer may recommend a particular port that you should use.
- If a till is a Mac OS X or Linux machine and you have connected the printer using an RS232-to-USB adapter, you can discover the port number of the new port using the Network section of System Preferences or by typing ls /dev/tty.* in a new Terminal window. Then enter the port number in this field (for example, /dev/tty.usbserial or /dev/tty.KeySerial1).
- Leave the Port field empty if the fiscal printer uses a Bluetooth connection.
- If you are using a shared fiscal printer, enter the IP address of the printer and the port, separated by a colon (e.g. 192.10.1.18:1350).
- Baud Rate, Flow Control, Data Bits, Stop Bits, Parity
- Refer to the manual for the receipt printer to specify the appropriate communications settings. In the case of the Flow Control field, you can choose the relevant value using 'Paste Special'.
- Codepage
- Paste Special
Choices of possible entries
- Specify the code page (character encoding system) that is to be used when communicating with the fiscal printer. This information can again often be found in the manual for the fiscal printer. Examples are:
- Bematech MP-2100 TH FI
- US ASCII.
- Citizen ST-05
- Windows codepage 1257 (Baltic).
- Empirija FB05
- Windows codepage 1257 (Baltic).
- Empirija FB15
- Windows codepage 1257 (Baltic).
- Epson LX-300
- DOS CP 437 (US).
- Epson TM-T81F
- US ASCII.
- Epson TM-U220
- DOS CP 437 (US).
- POSNET
- Windows codepage 1250 (Central Europe)
- Tremol TSL FP05
- UTF-8 (Unicode).
- End with Esc. Sequence (ASCII Codes)
- Enter the following values, depending on the model of fiscal printer you are using:
- Citizen ST-05, Empirija FB05, FB15
- 114 (if a cash drawer is connected directly to the printer and you need the drawer to be opened after printing a receipt) or blank (otherwise).
- On Device Failure
- This field is not used with fiscal printers.
Please refer here for more details about the Local Machine Serial Port Devices setting, including details about how information in this setting is sent to the Local Serial Port Devices Cache setting in the User Settings module on each till and cash machine.
- If your fiscal printers have built-in pole displays, remain in the Local Machine Serial Port Devices setting and create separate records for each pole display. These records should be as described above (i.e. with the same Device Model), but the Device Class field should contain "Pole Display". Remember also to choose the Use Cash Display option in the Local Machine setting on each till (or, if a till has a live-sync connection to the server, in the record for the till in the Local Settings setting in the Technics module). The following printer pole displays are supported: Citizen ST-05, Empirija FB05, Empirija FB15, POSNET (POSNET Protocol) and POSNET (POSNET Protocol with VAT, from 01/10/2013).
- Open the Contact records for each Customer to whom you will issue Fiscal Invoices and tick the Fiscal Invoices Only check box on the 'Terms' card. This will ensure Sales Ledger and POS Invoices and Bar Tabs will be marked as Fiscal Invoices, which in turn will ensure they are printed on fiscal printers. Usually you will at least need to do this for the Customer that you have named as the Default Customer (in the POS Settings or Local Machine settings).
- If your fiscal printer is an FP3000, an OPTIMUS or a POSNET, bear in mind that Item Numbers will be truncated if they contain more than 12 characters. You can avoid this problem by specifying a shorter Alternative Code in each Item record. When Items are printed on Fiscal Invoices, they will be identified by Alternative Code. Only if the Alternative Code is blank will the Item Number be printed.
If your fiscal printer is an Epson TM-T81F, Item Numbers must fall in the range 0-99999 and can only contain numeric characters. If an Item Number is greater than 99999 or contains non-numeric characters, the Item will not be printed by the printer.
- Prices in Sales Ledger and POS Invoices printed by most fiscal printers should include VAT. You should therefore either specify in the Account Usage S/L setting that Base Prices include VAT, or create a Price List that includes VAT and assign this Price List to all Customers whose Sales Ledger and POS Invoices are likely to be printed by fiscal printers. An exception to this rule is the Epson TM-T81F, which requires that prices exclude VAT.
- In the Round Off setting in the System module, most fiscal printers require that you choose "Row Sum" as the Discount Calculation and "Per VAT Code" as the VAT Calculation.
- In Argentina (i.e. if your fiscal printer is an Epson LX-300 or TM-U220 or a Hasar 330F), follow these steps to satisfy official reporting requirements:
- Use the Registration Defaults setting in the Sales Ledger to create a list of Official Tax Codes, with a description of each Official Tax Code in the Registration No. column.

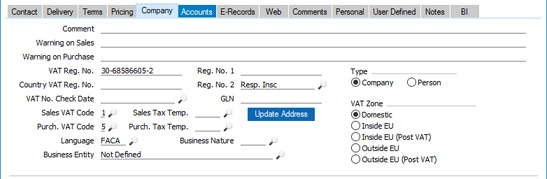
- Open the Contact record for each Customer and, on the 'Company' card, use 'Paste Special' to specify a Reg. No. 2. This will connect each Customer to the relevant row in the Registration Defaults setting, and will ensure that the Official Tax Code for each Invoice will be included in reports submitted to the tax authorities.
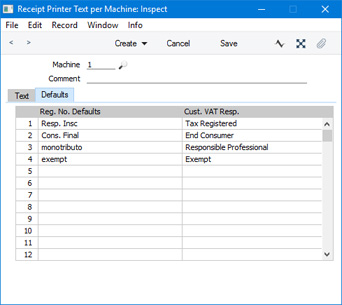
- Create records for each till in the Receipt Printer Texts per Machine in the Point of Sales module. In the matrix on the 'Defaults' card, enter a separate row for each row in the Registration Defaults setting, specifying the Customer VAT Responsibility for each Official Tax Code. Use 'Paste Special' from the Reg No. Defaults column to choose a row in the Registration Defaults setting, and again from the Cust. VAT Resp. column to choose from a list of options. A code representing the Customer VAT Responsibility will be printed on every Invoice by the fiscal printer. Depending on this code, the VAT Perception (shown in the Ext. Tax field in each Invoice) and Gross Income Perception (shown in the TAX2 field in each Invoice) may be printed as well. If a Customer whose VAT Responsibility is Exempt, Not Responsible, End Consumer or Responsible Professional is used in an Order or Invoice, then prices in that Order or Invoice will include VAT.
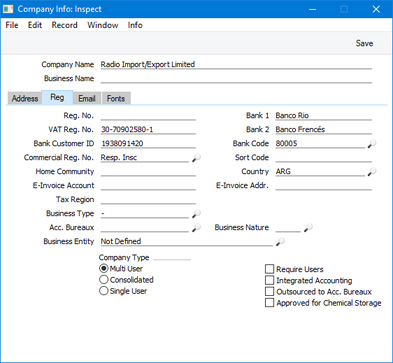
- Specify a valid Commercial Reg. No in the Company Info setting in the System module. 'Paste Special' from this field again connects to the Registration Defaults setting, thus assigning an Official Tax Code and Customer VAT Responsibility to your own company. If your fiscal printer is an Epson LX-300 or TM-U220, this will ensure that a code representing your Customer VAT Responsibility will be printed on every Invoice by the fiscal printer. If your fiscal printer is a Hasar 330F, you will need to register the relevant code in the printer's memory using its own software.
- In Zimbabwe, if you are using the RCH Flea fiscal printer, use the Fiscal Printer VAT Codes (Zimbabwe) setting to map the VAT Codes in Standard ERP to those in the printer. Enter the printer's codes in the Department field: each of these codes should be an integer between 1 and 5. The Fiscal Printer VAT Codes (Zimbabwe) setting is located in the Point of Sales module and will only be available if the VAT Law in the Company Info setting is "Zimbabwean".
- In Brazil, if you are using the Bematech MP-2100 TH FI fiscal printer, follow these steps to configure your VAT Codes:
- On flip B of the VAT Codes setting, assign each VAT Code to a Tax Rule in which the Tax Type is "ISSQN" or "ICMS". Specify an Excl % in each VAT Code.
- Use the Fiscal Printer VAT Codes (Brazil) setting to map the VAT Codes in Standard ERP to those in the printer. You can do this yourself, or you can select 'Sync with Fiscal Printer' from the Operations menu (with "cog" icon). This setting is located in the Point of Sales module and will only be available if the VAT Law in the Company Info setting is "Brazilian".
The 'Sync with Fiscal Printer' function will extract the VAT percentages from the fiscal printer and list them in the Fiscal Printer VAT Codes (Brazil) setting. For each percentage, it will look in the VAT Codes setting for an "ISSQN" or "ICMS" VAT Code with a matching percentage rate (in the Excl. % field). If a match is found, the function will add a row to the Fiscal Printer VAT Codes (Brazil) setting containing the VAT Code and the printer's code in the Department field. If no matching VAT Code is found, the function will add a row to the setting in which the VAT Code field contains the percentage from the printer followed by the % character. The % character is added to signify that you should add a corresponding VAT Code in the VAT Codes setting. If you have already added some VAT Codes to the Fiscal Printer VAT Codes (Brazil) setting that are not in the printer's memory, the function will send them to the printer. Finally, any non "ISSQN" or "ICMS" VAT Codes will be removed from the Fiscal Printer VAT Codes (Brazil) setting.
- Having completed the steps above, each Sales Ledger and POS Invoice and Bar Tab will be marked as a Fiscal Invoice automatically if you used a Customer in which you have ticked the Fiscal Invoices Only box, as described in step 6.
In the case of a Sales Ledger Invoice, you can override the default fiscal status using the Fiscal Invoice check box on the 'Identifiers' card (i.e. you can use the Fiscal Invoice check box to create and print a Fiscal Invoice for a Customer that does not usually receive them, and vice versa).
In the case of POS Invoices and Bar Tabs, you cannot override the Fiscal Invoice default. So, be sure to tick the Fiscal Invoices Only check box in every Customer that you will use in these transactions.
Each time you finish a POS Invoice or Bar Tab that has been marked as a Fiscal Invoice (by clicking or touching the "Finish" button), it will be sent to, printed by and recorded in the fiscal printer automatically.
If your fiscal printer is an FPrint 02K, the printer will send back a control code that will be stored in the Official No. field in the Invoice.
- If for some reason you were able to mark a Sales Ledger Invoice as OK and save it but it was not printed by the fiscal printer, follow these steps:
- If your fiscal printer is an Epson LX-300 or Hasar 330F, go to the User Settings module and open the Local Serial Port Devices setting. Open the record for the fiscal printer and choose 'Reset' from the Operations menu (with "cog" icon).
- In all cases, go back to the Invoice and choose 'Send to Fiscal Device' from the Operations menu. The Invoice will be printed as if it were a new Invoice, with a new fiscal number.
You can use Access Groups to control who can use the 'Send to Fiscal Printer' function. To do this, deny access to the 'Print To Fiscal Printer' Action.
It is not possible to reprint a POS Invoice or a Bar Tab on a fiscal printer.
- Depending on the fiscal printer, each time you mark a Cash In or Cash Out Cash Event as OK and save, it will be sent to, printed by and recorded in the fiscal printer. However, Cash Out Cash Events created by the 'Cash Up' Maintenance function will not be sent to the fiscal printer.
If you need to reprint a Cash Event, open it and choose 'Send to Fiscal Device' from the Operations menu. Again, you can control access to this function using the 'Print To Fiscal Printer' Action as mentioned in the previous step.
- If your fiscal printer is the FPrint 02K, a message will be sent automatically to the printer each time you open or close a work session. Some reports cannot be printed by the printer if a work session is open, so you may need to select the Require Open Session option in the POS Settings setting if you are using the FPrint 02K.
- Each transaction printed by a fiscal printer is also stored in its memory. At the end of each day you will need print a report listing the day's transactions. This report is known as a "Z report" in some countries. Use the Fiscal Printer Reports setting in the User Settings module to instruct fiscal printers to print the Z report and other reports. An exception is the Bematech MP-2100 TH FI: in this case you must use "Daily Z Report" and "Daily Report" buttons from the POS Invoice window to print the Z and other reports.
- If your fiscal printer is the FPrint 02K, you can at any time produce a Printer Status report, showing information such as the printer serial number and next receipt and document numbers. To do this, go to the User Settings module and open the Local Serial Port Devices setting. Open the record for the fiscal printer and choose 'Device status' from the Operations menu with "cog" icon).
Fiscal Printers - Bluetooth ConnectionSome fiscal printers can be connected to iOS and Android devices using Bluetooth. This description uses the POSNET Temo and Trio as examples: some details may vary, depending on the printer you are using. Please refer to your local HansaWorld representative for details about specific printers.
The POSNET Temo and Trio require Bluetooth 4.0 low energy on iOS and Classic Bluetooth on Android. To connect a POSNET printer to an iOS device using Bluetooth, follow these steps:
- In Standard ERP on the iOS device, ensure you have assigned a Local Machine Code to the device, as described in step 1 above.
- Create a record for the printer/till combination in the Local Machine Serial Port Devices setting in the Technics module, as described in step 5 above. Leave the Port field empty. For POSNET printers, the other settings should be: Baud Rate - 115200; Flow Control - None; Data Bits - 8; Stop Bits - 0; Codepage - Windows codepage 1250 (Central Europe); and Parity - None.
- Enable Bluetooth on the iOS device.
- On a POSNET Temo, make sure Bluetooth is set to NG (New Generation). Set the connection type to Bluetooth and enable pairing.
- On a POSNET Trio, connect the optional Bluetooth module to the printer and make sure Bluetooth is set to Low Energy (by default it will be set to Classic). This can be done by POSNET, or you can use the POSNET app, which is a Windows app.
Using the printer's menu, set the code page to Windows 1250 (Configuration> general parameters> communication functions> PC interface> COM interface> Posnet protocol> Code page Windows 1250). Then set the communication parameters (Configuration> hardware configuration> Communication ports> select COM> select Baud rate 115200, Stop bits 1, Parity None, Flow control None). These settings govern the communication between the printer and the Bluetooth module, which connects to the printer's serial port.
- In Standard ERP, open the Bluetooth Devices setting in the User Settings module.
If you did not enable Bluetooth on the device in step (iii), it will be enabled automatically when you open the Bluetooth Devices setting. In this case you will need to close and re-open the setting before the printer will appear in the list.
- On a POSNET Trio, enable pairing on the Bluetooth module.
- In Standard ERP, wait for the printer to appear in the list. When it does, select it. You will be asked if you want to pair the devices. After pairing, the address of the POSNET device will be placed in the Bluetooth Mac Addr field in the Local Machine setting.
To connect a POSNET printer to an Android device using Bluetooth, follow these steps:
- In Standard ERP on the Android device, ensure you have assigned a Local Machine Code to the device, as described in step 1 above.
- Create a record for the printer/till combination in the Local Machine Serial Port Devices setting in the Technics module, as described in step 5 above. Leave the Port field empty. For POSNET printers, the other settings should be: Baud Rate - 115200; Flow Control - None; Data Bits - 8; Stop Bits - 0; Codepage - Windows codepage 1250 (Central Europe); and Parity - None.
- On a POSNET Temo, make sure Bluetooth is set to Classic.
- On a POSNET Trio, connect the optional Bluetooth module and make sure Bluetooth is set to Classic (the default). This can be done by POSNET, or you can use the POSNET app, which is a Windows app.
- Enable Bluetooth on the Android device.
- On the printer, set the connection type to Bluetooth and enable pairing.
- In Standard ERP, open the Bluetooth Devices setting in the User Settings module and wait for the printer to appear in the list. When it does, select it.
If you did not enable Bluetooth on the device in step (e), it will be enabled automatically when you open the Bluetooth Devices setting. In this case you will need to close and re-open the setting before the printer will appear in the list.
- Restart Standard ERP on the Android device.
Fiscal Printers - Shared Printer with Ethernet Connection to the ServerSome fiscal printers can be shared, so that only one printer is needed and the tills and cash machines can all print to the same printer. The printer should be connected to any client in the network using Ethernet. This description uses the POSNET Thermal HD printer as an example: some details may vary, depending on the printer you are using. Please refer to your local HansaWorld representative for details about specific printers.
To connect a shared printer to the network, follow these steps:
- In Standard ERP on the till or cash machine to which the printer will be connected, ensure you have assigned a Local Machine Code to the till, as described in step 1 above.
- On the printer, set the connection type to ethernet and the default interface to TCP/IP (Configuration> general parameters> communication functions> PC interface). Choose a port, set the communication protocol to POSNET and set the code page to Windows 1250.
- Set the IP address of the printer (Configuration> hardware configuration> TCP/IP). Enter a permanent IP address for the printer or specify that the IP address should be assigned by DHCP.
- Connect the fiscal printer to the till by ethernet.
- Check on the printer (Configuration> hardware configuration> TCP/IP) that it has been given an IP address.
- In Standard ERP, create a record for the printer/till combination in the Local Machine Serial Port Devices setting in the Technics module, as described in step 4 above. Enter the printer's IP address and port from steps (V) and (II) above separated by a colon in the Port field (e.g. 192.10.1.18:1350). For POSNET printers, the other settings should be: Device Model - Fiscal Printer POSNET HD FV EJ (Poland, POSNET Protocol over TCPIP); Baud Rate - 9600; Flow Control - None; Data Bits - 8; Stop Bits - 0; Codepage - Windows codepage 1250 (Central Europe); and Parity - None.
---
Configuring the POS Invoice Window:
Go back to:
|