Payment Gateways
If you will use Standard ERP to control the processing of credit and debit card payments for POS Invoices, the first configuration step will be to specify your credit card processing partner in the
Merchant ID setting in the Point of Sales module. The partner is the payment gateway or payment service provider that you will use to process each payment. Having done that, you should then enter separate records in the Payment Gateways setting in the Point of Sales module for each of your merchant account(s). You will need separate Payment Gateway records if you need to process credit card payments from a web shop and to process payments from POS Invoices. If you have several merchant accounts in different Currencies, you will need separate Payment Gateway records for each one (duplicated if necessary for the web shop and POS environments).
Please refer here for more details about using Standard ERP to control the processing of credit and debit card payments for POS Invoices. Precise configuration details will vary depending on your partner. This documentation contains a general guide: for more detailed information, please refer to your local HansaWorld representative.
To work with the Payment Gateways setting, first ensure you are in the Point of Sales module using the [Switch Module] button in the Navigation Centre. Then, if you are using Windows or Mac OS X, click the [Settings] button, also in the Navigation Centre or use the Ctrl-S/⌘-S keyboard shortcuts and then double-click 'Payment Gateways' in the 'Settings' list. If you are using iOS or Android, select 'Settings' from the Tools menu (with 'wrench' icon) and tap 'Payment Gateways' in the 'Settings' list. The 'Payment Gateways: Browse' window opens: open a new record by selecting 'New' from the Create menu (Windows/Mac OS X) or + menu (iOS/Android). When the record is complete, click the [Save] button (Windows/Mac OS X) or tap √ (iOS/Android) to save.
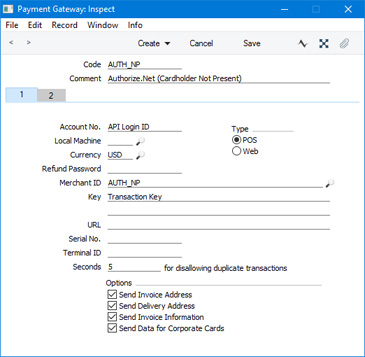
- Code
- Enter a unique identifying Code for the Payment Gateway record. You can use up to five alphanumeric characters.
- For the purposes of Point of Sales, if you have separate Merchant ID records for Cardholder Present and Cardholder Not Present transactions you will also need separate corresponding Payment Gateway records. It is recommended that the Code in the Cardholder Present Payment Gateway should be lower (alphabetically or numerically) than the Code for the Cardholder Not Present Payment Gateway. When a credit or debit card payment for a POS Invoice is processed and if there is a choice of Payment Gateways, the Gateway with the lower Code will be used. A POS Invoice is more likely to be a Cardholder Present transaction.
- Comment
- Assign a descriptive name to the Payment Gateway record. This will be shown in the 'Payment Gateways: Browse' window.
- Local Machine
- Paste Special
Local Machines setting, Point of Sales/Restaurant/Technics module
- If the Type (below) of the Payment Gateway is "POS", you can use this field to specify the Local Machine (i.e. the till or cash machine) that will use the Payment Gateway record.
- When you process a credit card payment, the Payment Gateway with the appropriate Local Machine/Currency combination will be used. If there is no such Payment Gateway, the Gateway record with the appropriate Currency and a blank Local Machine will be used. This will ensure the payment will go to the correct merchant account.
- You can leave this field empty if the Type is "Web".
- Currency
- Paste Special
Currency register, System module
- Specify a Currency here. You will need to enter a separate Payment Gateway record for each Currency you want to process. You must have opened separate merchant accounts with your bank in each Currency, and each Currency must have been activated by your partner.
- Note that Authorize.net only supports USD.
- You must use three-character Currency Codes that follow the ISO 4217 standard so that they are recognisable by the partner.
- Merchant ID
- Paste Special Merchant ID setting, Point of Sales module
- Use this field to connect the Payment Gateway record to a record in the Merchant ID setting. This will ensure that when you process credit card payments, they will be sent to the appropriate merchant account through the correct partner.
- Seconds for disallowing duplicate transactions
- This field will be used if your partner is Authorize.net. If you try to send the same credit card payment to your partner twice within the number of seconds specified here, Authorize.net will reject the second one. This helps prevent registering the same payment twice by accident or design.
- By default (i.e. if you leave this field empty), the rejection period will be 120 seconds. If you enter 0 (zero) or less, the rejection period will be 0 seconds. The maximum is 28800 seconds.
- Type
- Use these options to specify whether the Payment Gateway record is to be used to process credit card payments made through the webshop or to process payments from POS Invoices.
- Options
- By default, Standard ERP will send the minimum necessary information about each payment to the partner. But, if your partner is Authorize.net, you may be able to obtain better rates if you send additional information with each payment. Selecting these options will allow you to provide this additional information for each payment, allowing it to be sent to Authorize.net. Extra fields will be added to the 'Credit Card Payment' window (where you will enter a Customer's credit card number and other details before processing a payment).
- Send Invoice Address
- This option will allow you to enter an invoice address for each payment. This will be sent to Authorize.net who will use the credit card Address Verification System to check that the address given to you by a Customer is the one registered for their credit card.
- Send Delivery Address
- This option will allow you to enter a delivery address for each payment. It will not be mandatory to enter a delivery address for every payment.
- Send Invoice Information
- Selecting this option will cause an Invoice Number and description (e.g. "original invoice", "credit invoice") to be sent to Authorize.net with the payment information.
- Send Data for Corporate Cards
- Selecting this option will cause a Customer Order Number, Invoice tax value, Invoice tax exempt status and freight value to be sent to Authorize.net with the payment information.
Use the remaining fields in the window to enter details about your account with the partner. If your partner is Authorize.net, enter your API Login ID in the Account No. field and your Transaction Key in the first Key field. If your partner is Stripe, enter your API keys in the two Key fields.
---
Settings related to Point of Sales:
Go back to: