Login Shortcuts
This page describes the Login Shortcuts register in the User Settings module. This description focuses on its use in the Point of Sales module: please refer
here if you need a description focusing on its use in the Restaurant module.
---
The Login Shortcuts register allows you to specify the window that will be opened when a user logs in to your Standard ERP system. In some environments (e.g. POS, Restaurant, Production), users usually won't need access the majority of your Standard ERP database, but instead should be taken immediately to the window that they need when they log in.
You can configure the Login Shortcuts register in two ways:
- On client machines and tills that have live connections to the server, you must configure this register separately on each client machine. This method is described immediately below.
- For tills that have live-sync connections to the server, you should create a separate record for each till in the Local Shortcuts setting in the Technics module. When the till logs in for the first time, the relevant record from the Local Shortcuts setting will be sent to the till automatically, updating the Local Shortcuts register on that till. If you change the record in the Local Shortcuts setting on the main server, the change will be sent to the till as soon as possible. As well as allowing you to configure and maintain all tills in one place, this method also has the advantage of removing the need to back up the databases on each till separately. On updating a till to a new version of Standard ERP and starting that version without a database for the first time, the relevant record will again be sent to the till automatically.
To edit the Login Shortcuts register, ensure you are in the User Settings module and open the list of registers from the Navigation Centre. Then double-click (Windows/macOS) or tap (iOS/Android) 'Login Shortcuts' in the resulting list. The 'Login Shortcuts: Inspect' window opens:
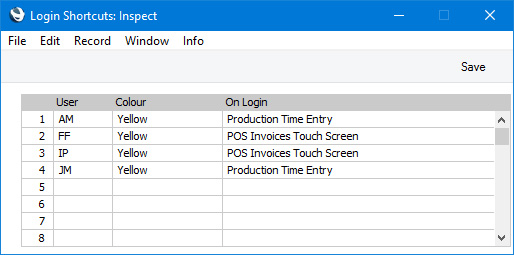
Add a separate line for each user that will use the client machine or till, as follows:
- User
- Paste Special
Person register, System module and Global User register, Technics module
- Enter the Signature of each Person that will use the client machine or till.
- If you are using the Display Login Buttons option in the Login Options setting, the users listed here will be given individual buttons in the 'Login' window, allowing them to log in by touch.
- Colour
- Paste Special
Choices of possible entries
- If you are using the Display Login Buttons option in the Login Options setting, specify here the colour of each button in the 'Login' window.
- On Login
- Paste Special
Choices of possible entries
- Specify here the window that is to appear when each Person logs in using the client machine. The available options are as follows:
- Master Control
- The Navigation Centre will be opened.
- Activity
- A new Activity will be opened.
- Contacts
- The 'Contacts: Browse' window will be opened.
- Bar Tab
- The most recent unfinished Bar Tab in which the user logging in is the Waiter will be opened when that user logs in. If there is no unfinished Bar Tab, a new Bar Tab will be opened instead.
- Business Communicator
- The 'Communication Centre' window will be opened.
- POS Invoices Touch Screen
- A new POS Invoice will be opened.
- Production Time Entry
- The 'Production Time Entry' window will be opened.
- Resource Month Overview
- The 'Overview Rooms' window (the second Resource Planner window, listing Rooms) will be opened, providing the user logging in has access to the Hotel or Resource Planner modules.
- Restaurant Table Layout
- The Table View (floor plan) specified on the 'POS' card in the Local Machine setting will be opened.
- Task Manager
- The Task Manager will be opened.
- Workflow Overview
- TheWorkflow Overview will be opened. This may be useful if you are using the Workflow Overview to monitor Kitchen Orders.
- Resource Type Month Overview
- The 'Month Overview of Room Types' window the first Resource Planner window listing Room Types will be opened, providing the user logging in has access to the Hotel or Resource Planner modules.
Any Persons not listed will see the Navigation Centre when they log in on the client machine or till.
When the register is complete, click the [Save] button (Windows/macOS) or tap √ (iOS/Android) to save and close the window.
---
Go back to: