|
Search HansaManuals.com HansaManuals Home >> Standard ERP >> System >> Account Register Previous Next Entire Chapter in Printable Form Search This text refers to program version 8.4 Entering, Inspecting and Changing Accounts To enter a new Account, open the 'Accounts: Browse' window as described here and select 'New' from the Create menu (Windows/Mac OS X) or from the + menu (iOS/Android). You can also use the Ctrl-N (Windows) or ⌘-N (Mac OS X) keyboard shortcuts. Alternatively, highlight an Account similar to the one you want to enter, and select 'Duplicate' from the same menu. A record window entitled 'Account: New' will be opened, empty if you selected 'New' or containing a duplicate of the highlighted Account.If you want to look at the details of an existing Account, open the 'Accounts: Browse' window and search for the Account that you need, all as described here. Then, double-click (Windows/Mac OS X) or tap (iOS/Android) the Account in the list to open the Account record in a record window entitled 'Account: Inspect'.
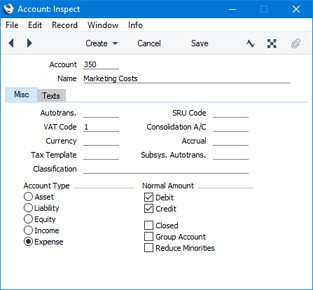
If you are using iOS or Android, the two tabs will be marked 'Items' and 'Details'. 'Details' is the equivalent of the 'Misc' card in Windows and Mac OS X. Complete the Account record as appropriate and as described on the pages linked below, then save it by clicking the [Save] button (Windows/Mac OS X) or by tapping √ (iOS/Android) and close the window by clicking the close box or by tapping <. Then, close the browse window using the close box or < again. Please follow the links below for details about each card:
|