|
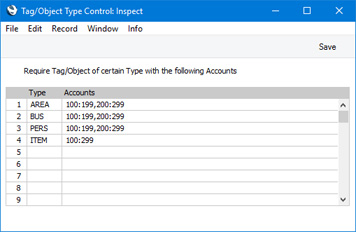
Search HansaManuals.com HansaManuals Home >> Standard ERP >> Nominal Ledger >> Settings Previous Next Entire Chapter in Printable Form Search This text refers to program version 8.4 Tag/Object Type Control This page describes the Tag/Object Type Control setting in the Nominal Ledger. For clarity, the term "Object" has been used in this description.--- If you are using Objects and Object Types, the Tag/Object Type Control setting allows you to specify that you must assign an Object belonging to a certain Object Type to every posting to a particular Account. This feature serves as a handy reminder always to use Objects. It does not prevent you using additional Objects that do not belong to the specified Object Type. To open the Tag/Object Type Control setting, first ensure you are in the Nominal Ledger module. Then, if you are using Windows or Mac OS X, click the [Settings] button in the Navigation Centre or use the Ctrl-S/⌘-S keyboard shortcuts and then double-click 'Tag/Object Type Control' in the 'Settings' list. If you are using iOS or Android, select 'Settings' from the Tools menu (with 'wrench' icon) and tap 'Tag/Object Type Control' in the 'Settings' list. The 'Tag/Object Type Control: Inspect' window will open:
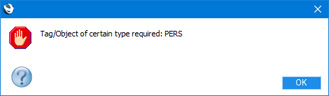
In the example illustrated above, we have specified that whenever we post to an Account between 100 and 199 (i.e. any of our Sales Accounts) or one between 200 and 299 (i.e. any of our Cost of Sales Accounts), it must be together with Objects belonging to each of the "AREA", "BUS", "PERS" and "ITEM" Object Types. We will not be able to save the transaction if an Object belonging to any of these Types is missing. Accounts 100 and 199 are separated by a colon, signifying a range i.e. all Accounts between 100 and 199. Use a comma to separate the two ranges 100:199 and 200:299: this has been done in the first two rows to illustrate separating two ranges of Accounts, although in this case as shown in the last row we could also use one large range to the same effect. You can also enter individual Accounts separated by commas, and mix individual Accounts and ranges (e.g. 100:299,301,303,320:349). If necessary, you can use 'Paste Special' to choose the Object Type and the Accounts. If you need to use 'Paste Special' to enter several Accounts, type the comma or colon before opening the 'Paste Special' list. This will cause the next Account to be added to those already entered. Otherwise, the previous Account will be overwritten. Click the [Save] button (Windows/Mac OS X) or tap √ (iOS/Android) when you are done. Click the close box (Windows/Mac OS X) or tap < (iOS/Android) if you wish to close the setting without saving any changes. If you use an Account in a transaction of any kind and forget to enter an Object belonging to the required Object Type, the following alert will be shown when you try to save the record:
If you are using the Object Type Control feature but do not need the Object Type Control check to be carried out when saving a Simulation or Transaction containing end-of-year postings, select the Skip Tag/Object Control for Year End Records option in the Transaction Settings setting. For this purpose, an end-of-year posting is a Simulation row in which the Status (on flip B) is "Year End Stage 1" or "Year End Stage 2" and a Transaction row in which the Type (on flip G) is "1 - Year End Stage 1" or "2 - Year End Stage 2". If you are using Object Type Control, the Assisted Object Entry feature will help you choose the correct Objects when entering transactions. Please refer here for details. --- Settings in the Nominal Ledger:
|