Object Type Control - Assisted Object Entry
If you are using Object Type Control, the Assisted Object Entry feature will help you choose the correct Objects when entering Transactions (in the
rows only), Invoices (on the
'Terms' card and in the
rows), Purchase Invoices (
'Terms' card and
rows), Deliveries (
rows only), Orders (
rows only) and Stock Depreciation (
header and rows) and Expense records (
rows only), as follows:
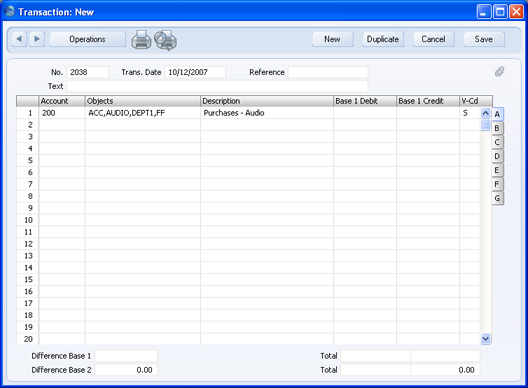
- In a Transaction, Invoice, Purchase Invoice, Delivery or Stock Depreciation or Expense record, use an Account that has been quoted at least once in the Object Type Control setting. In the example Object Type Control setting illustrated above, this means any Account between 100 and 299.
- From the Object field, activate the 'Paste Special' feature using Ctrl-Enter or ⌘-Enter as usual. Instead of the usual 'Paste Special' list, the 'Assisted Object Entry' window opens.
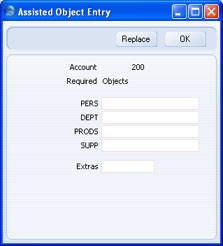
In this example, Account 200 has been used in a Transaction. The illustration of the Object Type Control setting earlier on this page shows that Account 200 requires Objects belonging to four different Object Types. As a result, the 'Assisted Object Entry' window has four fields, one for each required Object Type. (The maximum number of Object Types that can be required by a particular Account is seven.)
- Using 'Paste Special' in the usual way, enter an Object belonging to each Type in the appropriate field. 'Paste Special' here will only list the Objects belonging to the Type in question. Use the Extras field if you want to add another Object belonging to a fifth Type.
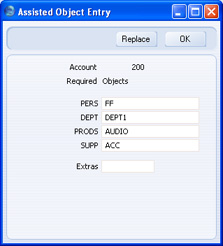
- If you close the 'Assisted Object Entry' window by clicking the [OK] button, the Objects will be added to anything previously in the Object field, providing you typed a comma after the previous Object before activating 'Paste Special'. If you click the [Replace] button, the Objects will replace anything that was previously in the Object field.