Creating a New Database - Changing and Adding Companies
When you create a new database, it will contain a single Company, created for you automatically. If you need to create extra Companies, you can do this now. You should only create extra Companies if your business is one where there are separate departments or subsidiary companies that keep separate accounts, as described on the
Companies and Databases page.
Changing and Adding Companies - Single-user
Follow these steps:
- If you will be adding extra Companies and you have not already done so, make sure you have entered the correct number of Companies in the Configuration setting, as described on the Modules, Users and Companies page.
- Click the [Companies] button in the 'Navigation' section of the Navigation Centre:

- The 'Select Company' window opens. In the top left-hand corner, there is an [Operations] button with the following icon:

Click this button to open the Operations drop-down menu:
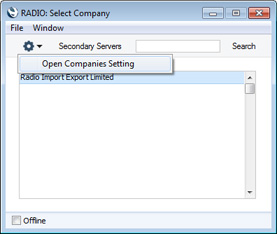
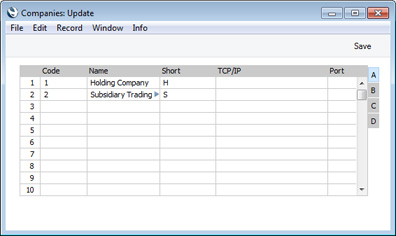
Select the 'Open Companies Setting' option. The 'Companies: Inspect' window is opened:

The Company Name and Short Code in the first Company are both taken from the 'Enter Company Name' window (step 4 on the Creating a New Database - Single-user page). If these are not suitable, change them now.
- To create more Companies, click in the Code field in the first blank row and enter information as described below. Remember, this should only be done for parts of your business that are completely separate accounting entities to the first Company.
- Code
- Enter a unique code. This must be a numeric code between 1 and 99.
- Name
- Enter a name by which this company or department will be identified in the 'Select Company' window. This window is where you will choose the Company you want to work with each time you log in to Standard ERP.
- Short
- If you have more than one Company in your database, you can switch between Companies in a work session, leaving windows from each Company open. This Short Code will appear at the beginning of every window title to indicate the Company to which the information in the window belongs. If you only have one Company, you don't need to specify a Short Code, in which case window titles will not include a Company indicator.
- TCP/IP
- You should only use this field on client machines in multi-user systems. Leave it empty in single-user systems.
- Port
- You should only use this field on client machines in multi-user systems. Leave it empty in single-user systems.
Please refer to this page for details of the fields on flips B, C and D. You only need use the fields on flips B and D in larger multi-user systems, and those on flip C in single-user systems.
If you are creating a new Company, the "DEFAULT.TXT" text file must be present in the folder containing the Standard ERP application. Standard ERP will use this file to import some basic settings to the new Company.
It is advisable to enter as many Companies as you need now, so that you only need apply for an Enabler Key once. You will be able to enter all set up information such as a Chart of Accounts to one Company and then to export those settings to the other Companies (or to transfer them by dragging and dropping). Remember that each Company will maintain completely separate accounts, so there is no need to create separate Companies for departments that are part of the same accounting whole.
- When the entry is complete, click the [Save] button in the top right-hand corner of the Company screen.
- After creating each new Company, log in to it and then enter the correct name and address details as described on this page. You should do this in each Company before applying for an Enabler Key. To change Companies during a work session, simply use the Ctrl-O (alpha O) (Windows) or ⌘-O (Mac OS X) keyboard shortcut to open the 'Select Company' window to choose a different Company.
- You should also enter a new User Account for yourself with a password in each Company. Please refer here for details.
Changing and Adding Companies - Multi-user
In a multi-user installation, all data is stored in the database on the server. There will also be a small database on each client, containing almost no data. If you are working on a client and you create a new record (e.g. a new Invoice) and save it, it will be saved in the server database only. This is the case for most records, but not for Companies. If you are working on a client and you create a new Company, it will be saved in the client database, not on the server. This is because the Companies in the server database and the Companies in each client database are distinct. The Companies in the server database are used to store the data relating to each Company. The Companies in a client database allow you to find a Company on the server, connect to it and log in to it.
Adding a new Company in a multi-user system is therefore a two-stage process. You need first to create the Company in the server database. Then you need to add the Company to the databases on each client so that they will be able to log in to the new Company on the server.
To create the Company in the server database, you must make sure you are the only user logged into the system, and you should be logged in as a system administrator as described here. You may find it easier to work on the server itself for steps 1-7 using the GUI application.
Follow these steps:
- If you will be adding extra Companies and you have not already done so, make sure you have entered the correct number of Companies in the Configuration setting, as described on the Modules, Users and Companies page.
- You should only carry out this step if you have logged in from a client as a system administrator. Do not do it if you are working on the server machine itself. Please refer here for details about logging in as a system administrator.
Use the Ctrl-0 (zero) (Windows) or ⌘-0 (Mac OS X) keyboard shortcut to open the list of modules, and double-click 'Technics'. Click the [Registers] button in the Navigation Centre and double-click 'Program Mode' in the resulting list. Choose 'Admin Client' from the Operations menu (with "cog" icon):
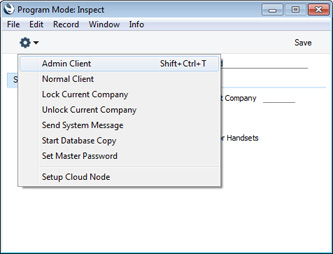
Selecting 'Admin Client' ensures that when you create the new Company as described in steps 4-7, you will save it in the server database. If you do not choose 'Admin Client', the new Company will be saved in the database on your client machine. The phrase "Admin Client" will be added as a suffix to the window title of the Navigation Centre.
- Click the [Companies] button in the 'Navigation' section of the Navigation Centre:
- The 'Select Company' window opens. Click the [Operations] button to open the Operations drop-down menu:
Select the 'Open Companies Setting' option. The 'Companies: Inspect' window is opened:
The Company Name and Short Code in the first Company are both taken from the 'Enter Company Name' window (step 4 on the Creating a New Database - Server page). If these are not suitable, change them now.
- To create more Companies, click in the Code field in the first blank row and enter information as described in step 5 in the 'Single-user' section above. As described in that section, leave the TCP/IP and Port fields empty.
If you are creating a new Company, the "DEFAULT.TXT" text file must be present in the folder on the server containing the Standard ERP application. Standard ERP will use this file to import some basic settings to the new Company.
It is advisable to enter as many Companies as you need now, so that you only need apply for an Enabler Key once. You will be able to enter all set up information such as a Chart of Accounts to one Company and then to export those settings to the other Companies (or to transfer them by dragging and dropping). Remember that each Company will maintain completely separate accounts, so there is no need to create separate Companies for departments that are part of the same accounting whole.
- When the entry is complete, click the [Save] button in the top right-hand corner of the Company screen.
- If you were working from a client, you should now leave "Admin Client" mode. You can either restart the client application or you can return to the 'Program Mode' window as described in step 2 and choose 'Normal Client' from the Operations menu:

- You should now update the Company register on each client. On a client, the purpose of the Company register is to allow you to find, connect to and log in to each Company on the server.
Simply remove the "Hansa.HDB" file from that client and then to restart the client application. When the 'Welcome to Standard ERP' window appears, choose the [Connect to Server] option. On connecting to the server, the Companies in the server database will be copied to the client database.
- After creating each new Company, log in to it and then enter the correct name and address details as described on this page. You should do this in each Company before applying for an Enabler Key . To change Companies during a work session, simply use the Ctrl-O (alpha O) (Windows) or ⌘-O (Mac OS X) keyboard shortcut to open the 'Select Company' window to choose a different Company.
- You should also enter new User Accounts with passwords in each Company. Please refer here for details.
Having done so, the next steps in configuring a new database are to
import set-up data and apply for an
Enabler Key.
---
Go back to: