Tax Templates - Workflow and Examples - Selling to a Different Tax Jurisdiction
This example describes using Tax Templates to collect and report sales tax.
The example is based on a store in a county where sales are subject to two taxes: the state sales tax (6%); and a county tax (1%). So far, the store has only sold to Customers in the county where it is located. In this county, the county tax is 1%. In this next example, the store will start making deliveries to Customers in counties where the county tax is a different percentage.
Depending on the state, sales tax on out-of-county sales can be charged in one of three ways:
- The store must charge county tax at the rate in the Customer's location.
- The store must charge the taxes that are common to the Customer's location and the store's location (for example, the store must charge state tax because this is common to both locations, but not county tax).
- The store must charge county tax at the rate in the store's location.
In main part of this example, we will describe situation (i). For situation (ii), please refer to step 12 below. For situation (iii), the store can continue as described in the previous examples.
The change in circumstances requires some configuration work. Follow these steps:
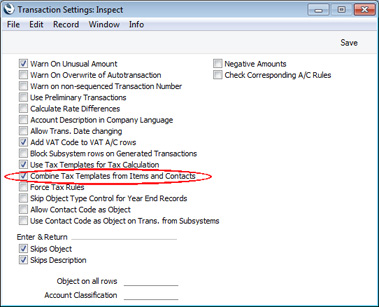
- The first step is to select the Combine Tax Templates from Items and Contacts option in the Transaction Settings setting:
- In the VAT Codes setting, enter separate rows for each county tax rate, with Max. Amounts on flip F if necessary. In some states, it is only necessary to enter rows for each rate, it isn't necessary to enter rows for each county:
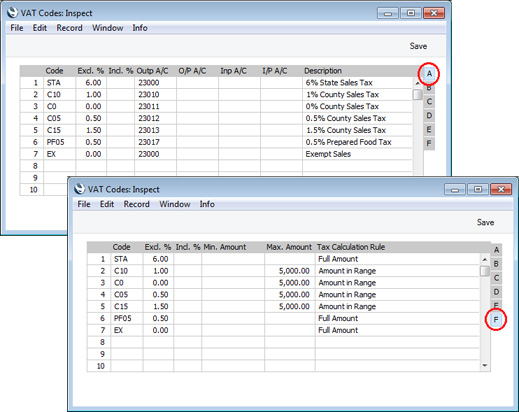
In this example, we have entered a different Output Account for each county tax. This will help with reporting.
- Return to the Tax Template that you created in step 3 on the original Configuration page and add the county taxes:
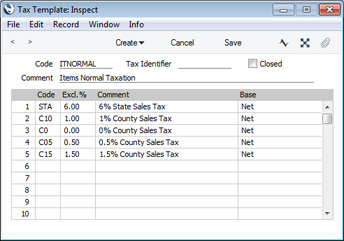
In the Tax Template, list every tax that can be charged on the sale of an Item. If you have more than one Tax Template because you sell Items that are taxed at different rates (e.g. prepared food), add the various county taxes to those Tax Templates as well.
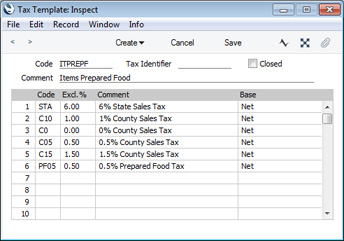
These Tax Templates will be termed "Item Tax Templates" in this description.
- Create new Tax Templates for each county tax rate. In some states, it is only necessary to enter Tax Templates for each rate, it isn't necessary to enter them for each county. Each of these Tax Templates should contain the state tax and the appropriate county tax. If you have any special tax rates (e.g. for prepared food), include them in these Tax Templates as well:
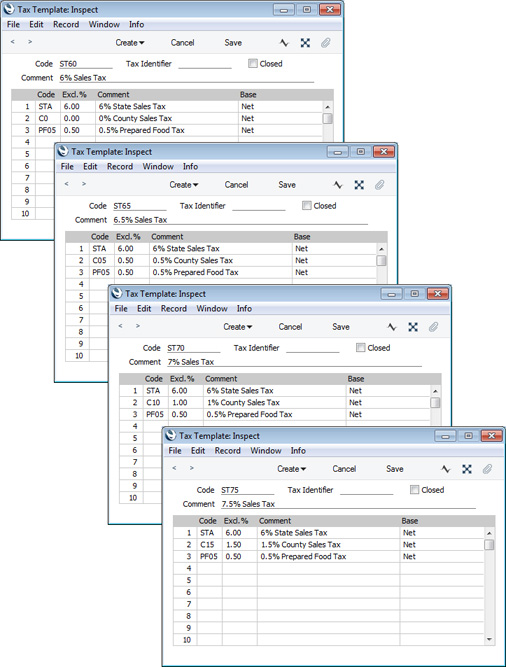
These Tax Templates will be termed "Customer Tax Templates" in this description.
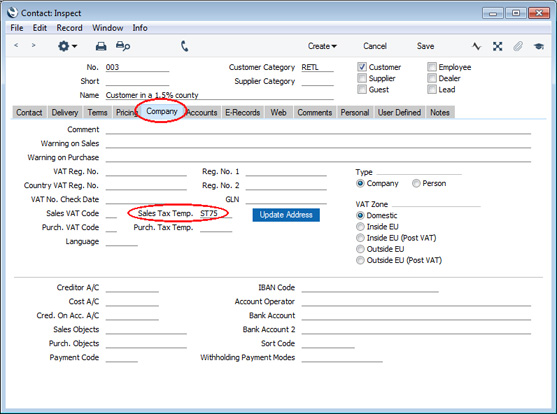
- In the Contact records for each Customer that is located in a different county to the store, specify the relevant Customer Tax Template in the Sales Tax Temp. field on the 'Company' card:
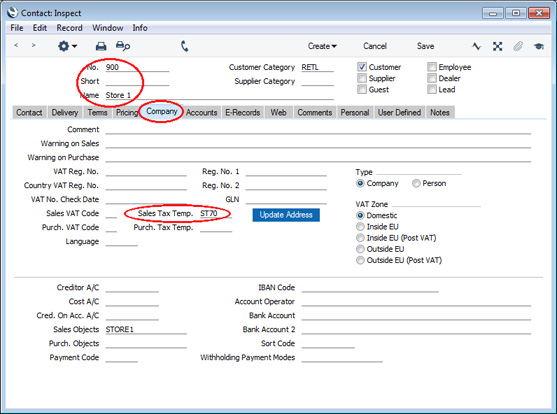
- Enter a record in the Contact register to represent the store. On the 'Company' card, specify the Sales Tax Template representing the location of the store:
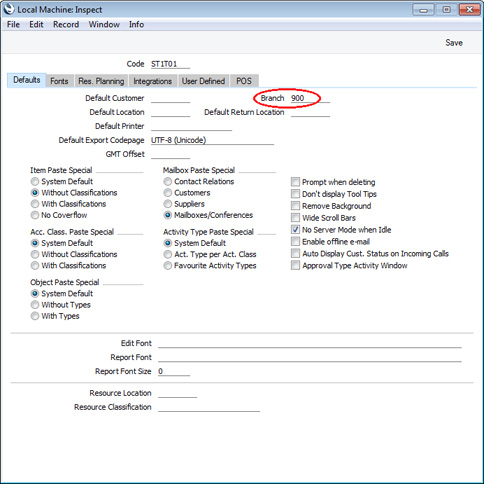
- The Local Machine setting in the User Settings module contains some settings specific to a particular client machine (e.g. to a particular terminal or till). On each client machine in the store, open the Local Machine setting and specify the Contact record from step 6 above in the Branch field:
This completes the configuration work. Proceed now as follows:
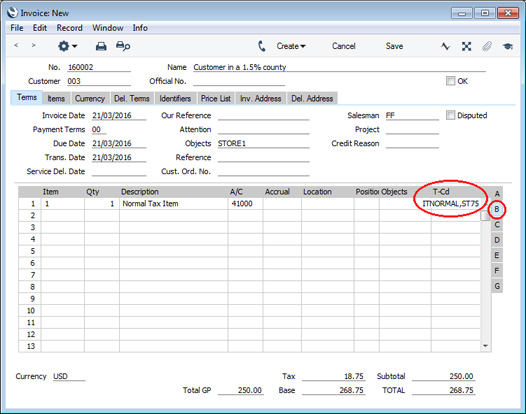
- When you enter an Invoice and specify an Item, the Combine Tax Templates from Items and Contacts option (step 1 above) will mean that at least two Tax Templates will be shown in the T-Cd field on flip B: a Customer Tax Template and an Item Tax Template. The Customer Tax Template will be chosen as follows:
- If the Customer is in the same county as the store, the Customer will not have its own Tax Template. Instead the Customer Tax Template will be taken from the Contact record specified as the Branch in the Local Machine setting (steps 6 and 7 above).
- If the Customer is in a different county to the store, the Customer will have its own Tax Template (step 5 above) and this will be used in the Invoice. This is illustrated below:
- Opening the Tax Matrix from the Operations menu shows that the tax will be calculated using the VAT Codes that are common to both Tax Templates:
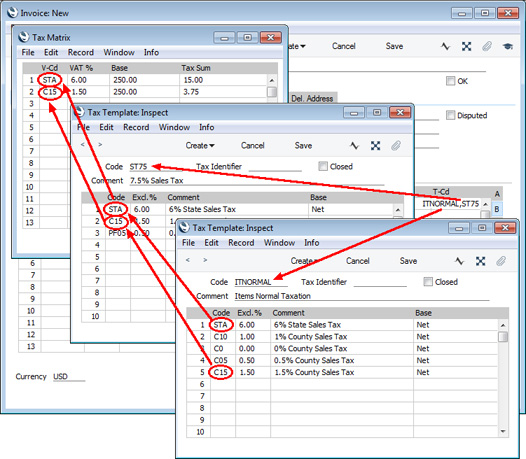
Because the Item Tax Template contains every county tax rate and the Customer Tax Template only contains the appropriate county tax rate for the Customer, selecting the VAT Codes that are common to both Tax Templates means that the correct one(s) will be picked in every sales transaction.
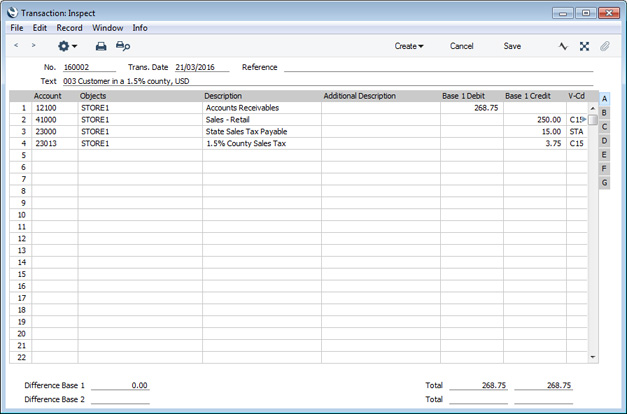
- In the Nominal Ledger Transaction that will result from the Invoice, the tax will be credited to the Output Accounts specified in each VAT Code. Although not fully visible in the illustration, the T-Cd field in row 2 will contain "C15,STA":
- In this next step, we will add two more rows to the VAT Report Definition. Row 6 will print the value of sales made to counties where there is no county tax, and row 7 will print the value of sales where the county tax is different to the rate applying in the county where the store is located. Both rows use the VATRESULT command to print the total value of sales made during the report period with particular VAT Codes, and thus illustrate again the value of using the All VAT Codes option in the VAT Code on Transaction rows setting (step 5 on the Configuration page). We also increased the range of Accounts in rows 4 and 5 to include all the county tax Accounts:
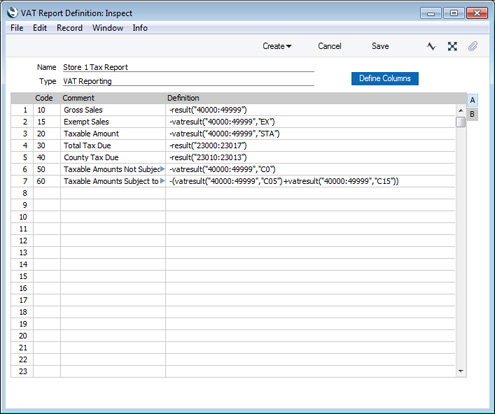
This is the resulting report:

- As mentioned at the beginning of this section, in some states stores should charge the taxes that are common to both the Customer's location and the store's location. For example, a store should charge state tax because this is common to both locations, but not county tax.
In this situation, the configuration work is broadly the same as described in steps 1-7 above, with one exception: do not follow step 5 (i.e. do not specify Sales Tax Templates in the Contact records for out-of-county Customers).
Instead, create records in the Delivery Addresses setting in the Sales Orders module for each Customer's Delivery Address(es). Specify the relevant Customer Tax Template in these Delivery Address records.
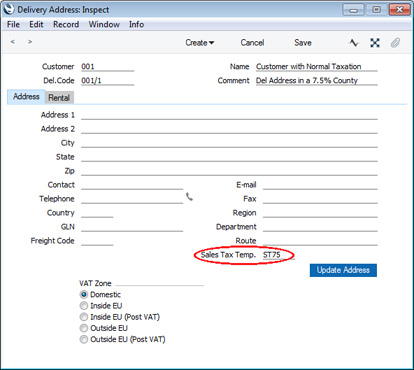
As each Customer does not have a Tax Template, when you create an Invoice, the Customer Tax Template will be taken from the Contact record specified as the Branch in the Local Machine setting (steps 6 and 7 above). If a Customer has a Delivery Address in a different county to the store and you specify this Delivery Address in the Invoice, the Tax Templates from the Branch and from the Delivery Address will both be copied to the Invoice. This will mean that each Invoice row will have three Tax Templates, including the Item Tax Template. Tax will be calculated using the VAT Codes that are common to all three Tax Templates (usually this will mean that tax will only be calculated using the VAT Code that represents state tax, together with any special taxes that might apply, such as the tax on prepared foods). The key factor is that there are no Tax Templates in the Contact records for the Customers. This ensures that the Branch Tax Template will always be used, together with the Delivery Address Tax Template when appropriate.
Tax Template Examples:
---
Settings in the Nominal Ledger:
Go back to: