Connecting Printers - Serial Receipt Printers with pre-defined print-outs
This page describes connecting serial receipt printers to tills and cash machines: for details about USB/Wifi receipt printers, please refer
here, and for details about fiscal printers,
here.
The following serial receipt printers are supported:
- Axiohm A777
- CHD 6800
- EpsonTM-T88II
- Epson TM-U210
To work with serial receipt printers, follow these steps:
- If you have not already assigned Local Machine Codes to your tills and cash machines, you should do so as the first step.
In the case of tills and cash machines with live connections to the server, open the Local Machine setting in the User Settings module and ensure the Code field in the header contains the correct Local Machine Code. You should do this separately on each till. If the Local Machine Code field was previously empty, you should quit Standard ERP on the till and restart.
In the case of a till with a live-sync connection to the server, you will have assigned a Local Machine Code when you connected the till to the server for the first time.
- Connect receipt printers to each till and cash machine using RS232 serial cables. If a till is a Mac OS X or Linux machine that does not have a serial port, you will need an RS232-to-USB adapter and driver.
- Working on a desktop client, change to the Technics module and open the Local Machine Serial Port Devices setting. This setting should contain separate records for each individual serial port device (i.e. separate records for each individual receipt printer). By specifying a Local Machine Code in each record, you will in effect use the setting to specify which tills and cash machines are connected to receipt printers. Enter a separate record for each individual receipt printer as follows:
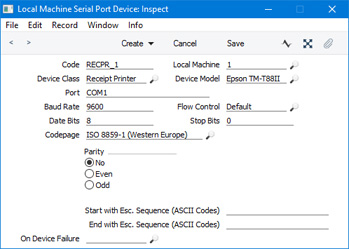
- Code
- Enter a unique Code for the receipt printer. The Code can consist of up to ten characters, and you can use both numbers and letters.
- Local Machine
- Paste Special
Local Machines setting, Point of Sales/Restaurant/Technics module
Local Machine Code of the till or cash machine to which the receipt printer is or will be attached.
- Device Class
- Paste Special
Choices of possible entries
- Use 'Paste Special' to set the Device Class to "Receipt Printer".
- Device Model
- Paste Special
Choices of possible entries
- Use 'Paste Special' to specify the model of receipt printer that you are using.
- Port
- Specify the till's serial port to which the receipt printer is connected (e.g. "COM1" if the till is a Windows machine).
- If a till is a Mac OS X or Linux machine and you have connected the printer using an RS232-to-USB adapter, you can discover the port number of the new port using the Network section of System Preferences or by typing ls /dev/tty.* in a new Terminal window. Then enter the port number in this field (for example, /dev/tty.usbserial or /dev/tty.KeySerial1).
- Baud Rate, Flow Control, Data Bits, Stop Bits, Parity
- Refer to the manual for the receipt printer to specify the appropriate communications settings. In the case of the Flow Control field, you can choose the relevant value using 'Paste Special'.
- Codepage
- Paste Special
Choices of possible entries
- Specify the code page (character encoding system) that is to be used when communicating with the receipt printer. This information can again often be found in the manual for the receipt printer.
- Start with Esc. Sequence (ASCII Codes), End with Esc. Sequence (ASCII Codes)
- If required by the receipt printer, specify the escape sequences that should mark the start and end points of each communication with the printer. Again, please refer to the manual for the printer for this information.
- On Device Failure
- Paste Special
Local Machine Serial Port Devices setting, Technics module
- You can specify here a secondary printer that is to be used if the receipt printer fails. The secondary printer should have its own record in the Local Machine Serial Port Devices setting, and should also be attached to the till or cash machine.
Please refer here for more details about the Local Machine Serial Port Devices setting, including details about how information in this setting is sent to the Local Serial Port Devices Cache setting in the User Settings module on each till and cash machine.
- If your receipt printers have their own cash drawers, remain in the Local Machine Serial Port Devices setting and enter separate records for each cash drawer. These records should be as described above (i.e. with the same Device Model), but the Device Class field should contain "Drawer". You may also need to specify a Start Escape Sequence: refer to the printer's manual for this information. Please refer to step 8 for more information about cash drawers.
- If you need to use incremental printing, open the Local Machine setting on each till and tick the Incremental Receipt Printing box on the 'POS’ card. This will mean each POS Invoice will be printed as the cashier scans the Items, rather than being printed in its entirety when the cashier touches or clicks the "Finish" button. You can only use the Incremental Receipt Printing option with the Axiohm A777 and Epson TM-T88II receipt printers.
If a till has a live-sync connection to the server, you should select the Incremental Receipt Printing option in the record for the till in the Local Settings setting in the Technics module.
- Use the Receipt Printer Texts and/or Receipt Printer Texts per Machine settings to enter the text that is to be printed at the top and bottom of each receipt.
- Having followed the steps above, each time a cashier finishes a POS Invoice (by clicking or touching the "Finish" button), it will be printed on the receipt printer.
- If your receipt printers have their own cash drawers and you have created separate records in the Local Machine Serial Port Devices setting for each till for those drawers as described in step 3, the cash drawer will be opened after a POS Invoice has been printed, providing the following conditions are met:
- The cashier belongs to an Access Group that includes a row explicitly giving full access to the 'Open Cash Drawer' Action; and
- The POS Invoice contains at least one payment. The Payment Mode of this payment must have been registered together with the Local Machine Code of the till in a row in the Local Machine Payment Modes setting in the Point of Sales module. In this row, the Drawer field should not be empty.
Please refer here for more details about opening cash drawers.
- If you will need cashiers to be able to re-print POS Invoices on receipt printers, add "All Invoices" and "Reprint Receipt" buttons to the POS Invoice window.
---
Configuring the POS Invoice Window:
Go back to: