Adding a Secondary Register - Printing Information from the Secondary Register
Having added a
secondary register and
linked it to the primary register, you now need to specify what information from the Invoice register is to be printed in the report. In the example Customer list, the Invoice Number and Date, Due Date and Total will be printed, as will the Customer Number as a check that the report is working correctly.
- Change to the 'Layout' card:
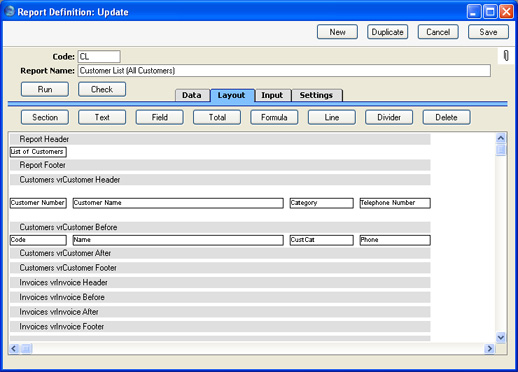
Four new sections have been added to the report layout allowing you to print information from the Invoice register. These sections are added automatically.
The ten sections will be printed in this order:
- Header
- Customer Header
- Customer Before
- Invoice Header
- Invoice Before
- Invoice After
- Invoice Footer
- Customer After
- Customer Footer
- Footer
The Customer Before and Customer After sections will be printed once for each Customer, thus building up the list of Customers. The Invoice Header and Invoice Footer sections will also be printed once for each Customer, while the Invoice Before and Invoice After sections will be printed once for each Invoice. The other sections will be printed once per report.
The new Invoice Header, Invoice Before, Invoice After and Invoice Footer sections are connected to the Invoice register. You can place fields from the Invoice register in these sections, but not fields from any other register.
- The next step is to add the column headings that will identify the Invoice information. Click on the Invoice Header section (marked "Invoices vrInvoice Header" in the example) and then use the [Text] button as described here to add the column headings:

You can also use the [Line] button as described here to increase the space given to the Invoice column headings.
- Now add to the report the fields that contain the information that you want to be printed in the report. Click once on the Invoice Before section (marked "Invoices vrInvoice Before" in the example) so that it changes to a darker shade of grey. Then use the [Field] button as described here to add the appropriate fields from the Invoice register to that section:

"Sum1" is the internal name for the field in the Invoice register that contains the Invoice Total (excluding VAT). This figure has been right justified.
- Now you can add a total figure to show the Invoice Total for each Customer. This should go in the Invoice Footer section, as that is printed once per Customer (the Invoice After section is printed once per Invoice). Click on the Invoice Footer section (marked "Invoices vrInvoice Footer" in the example) to select it, and then click the [Total] button. The 'Total' dialogue box opens:

Using 'Paste Special', choose the field that you want to be totalled, enter appropriate left and right co-ordinates and choose a justification. Check the Clear On Print box if you do not want the total to be cumulative (i.e. if you want the total to be set back to zero each time it is printed). In the example, we want to print a total for each Customer, so we have checked the Clear On Print box:

When you click [OK], the total is placed in the correct position in the report. In the illustration, we have also added some identifying text and some space underneath the total:

This is the resulting report. We have added an accumulated total to illustrate the effect of not using the Clear On Print option in the 'Total' dialogue box:
