The Design of the VAT Report Document
You can use the VAT Report document to submit your VAT return to the relevant authority. It uses a Form with the Form Code of "VAT_RETURN". To edit this Form, follow these steps:
- Switch to the System module. Click the [Forms] button in the Master Control panel.
- The 'Forms: Browse' window is opened, listing Forms already entered. Find the "VAT_RETURN" in the list and double-click.
- Select 'Properties' from the Operations menu.

Using 'Paste Special' from the Document Type field, ensure the Form has been classified as a VAT Report. This will ensure that, you will only be able to include appropriate fields in the design. Click the [OK] button in the dialogue box.
- Change the design of the Form as appropriate. To include fields, click the [Field] button and then draw a box on the Form where the field is to appear. You can move or resize it later if necessary. The 'Field' window opens. Enter the Field Name: use 'Paste Special' to see all available Field Names for the "VAT Report" Document Type.
- Three fields have been provided to ensure the figures in the document are the same as those in the VAT Return report. These are shown at the bottom of the Field 'Paste Special' window:
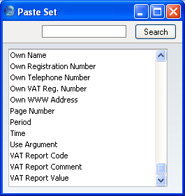
These three fields contain the information that is shown in the VAT Return report. This is a sample report:
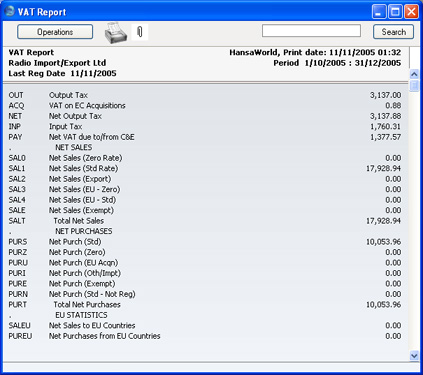
The text in the first column is stored in the VAT Report Code field, that in the second column is stored in the VAT Report Comment field and that in the third column is in the VAT Report Value field.
You can include each column in its entirety in your Form design or you can pick out individual pieces of information, using the Field Argument. For example, if you enter 3 as the Field Argument (as in the illustration below), this indicates that the field will show the information from the third row (for the VAT Report Value, 3,137.88 in the report shown above).
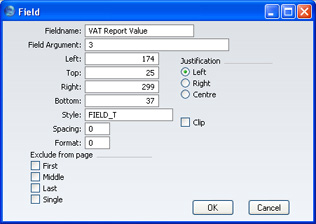
If you leave the Field Argument blank, the field will show all the values in the report in a column. Use the Spacing field to prevent the figures being superimposed on one another. In the case of 10 point Times, a Spacing of at least 10 points is recommended.
- Click the [OK] button in the dialogue box to save the Field specifications, and repeat steps 4 and 5 as necessary until the design is complete.
- Click the [Save] button in the Button Bar to save the Form.
- Change to the Nominal Ledger and open the 'Documents' window using the 'Documents' item on the File menu or by clicking the [Documents] button in the Master Control panel.
- Highlight 'VAT Report' in the list and select 'Define Document' from the Operations menu. Ensure that "VAT_RETURN" is specified in the Form field. Click [Save] to save and close this window.