|
Search HansaManuals.com HansaManuals Home >> Standard ERP >> Job Costing >> Settings Previous Next Entire Chapter in Printable Form Search This text refers to program version 4.2 Item/Job Group Prices, Job Group/Item Prices - Job Group/Item Prices When you double-click 'Job Group/Item Prices' in the 'Settings' list in the Job Costing module, the 'Job Group/Item Prices: Browse' window opens, listing the Job Groups for which pricing structures have already been entered. To enter a new record, click the [New] button in the Button Bar. The 'Job Group/Item Price: New' window appears: enter the details as appropriate and click [Save] to save the new record.
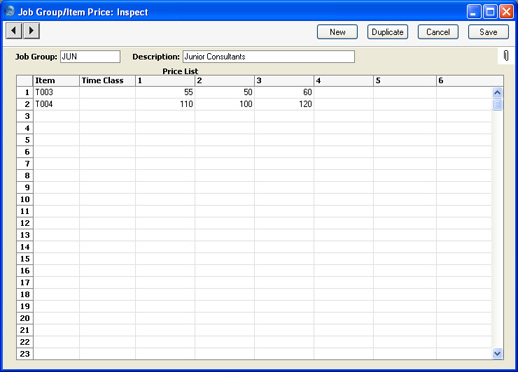
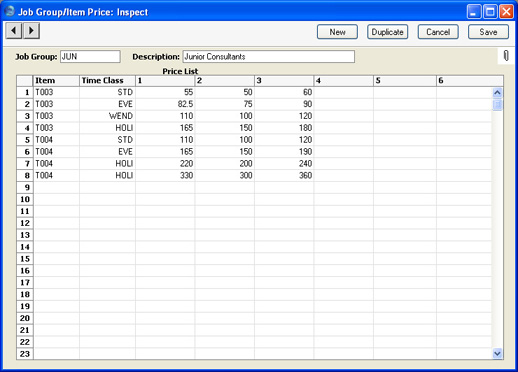
Use the grid to list the various Items (i.e. types or work) offered by the Job Group. The columns represent Price Lists. You should define Price Lists numbered 1 to 6 in the Price List register in the Pricing module and then allocate them to each Customer individually or via Customer Categories. For example, referring to the illustration above, Customers with Price List 2 will be charged 50.00 per hour for Item T003 and 100.00 per hour for Item T004 when the work is carried out by a member of the JUN Job Group. The Price List 1 column will be used for Customers with no Price List or Category, those whose Category has no Price List and those whose Price List is not numbered 1 to 6. Use the Time Class column if you have different charge out rates for various kinds of work (e.g. standard rate, evening rate, etc.) and are managing them using Time Classes. As shown in the illustration below, for each Item you should enter separate rows with each Time Class. When you enter a Time Sheet and specify a Time Class on flip C, the price in the resulting Project Transaction(s) will be taken from the Job Group/Item Price row for the Item/Time Class combination.
|