Automatic Timed Back-ups
The importance of establishing a regular routine for backing up cannot be emphasised enough. Because FirstOffice works - like all financial systems - with a single file database in which all your data about customers, invoices, nominal ledger etc. is stored, if you lose that file, you have lost not just a single document, but all your accounting and customer information.
To make this task easier, FirstOffice contains a timed back-up feature whereby a database back-up file can be created automatically every day. To specify when the back-up files are to be created, and where they are to be stored, follow the steps outlined below.
- Select 'Technics' using the [Select Module] button in the Master Control panel. In multi-user systems, you can do this on the server machine, when no other user is logged in. To gain access to the [Select Module] button, select 'Quit, Remove Autoserver' from the File menu and restart FirstOffice.
If it is inconvenient to work on the server (e.g. it does not have a graphical interface, or it is in another building), you can work from a client machine. Log in as a Person that has access to the Technics module.
If 'Technics' is not available in the list of modules in a single-user system, this will probably be because you have not granted yourself access to the Server module in the Configuration setting.
- Choose 'Settings' from the File menu. Double-click 'Timed Operations'. The following window appears:
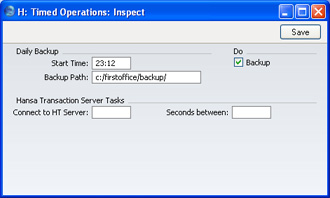
- Set the Operation Time (the time when the backup is to take place) to the appropriate time, when it is likely that no-one will be using FirstOffice. Use the 24-hour clock, and place a colon (:)between the hour and the minute. The back-up file will be created at the specified time, even if there are still users logged in to FirstOffice. However, such users will find the speed of operation to be much reduced while the back-up is being carried out. It is therefore highly recommended that you specify a time that is outside working hours, to minimise such inconvenience.
- Specify the Database Backup Path, which determines where on your hard disk the back-up files are to be saved. If you leave this field blank, the back-up files will be saved in the folder containing the FirstOffice application.
The following examples show the correct syntax for the Database Backup Path. You can use either \ or / as a separator between folder names under Windows, Linux and Mac OS X while you should use : on Mac OS 9. Note that the separator appears as the final character in the path.
It is recommended that you save the back-up file in a folder or directory named "Backup" which should be in the same folder or directory as the FirstOffice application. All back-up files in this folder will be shown in a list of importable files if it becomes necessary to restore from a back-up. Under Windows XP, Linux and Mac OS X, you can do this using a relative path:
- backup/
Under Mac OS 9, you can only use an absolute path:
- hard disk:firstoffice:backup:
If you want to store the back-up file somewhere else, use absolute paths with the following syntax:
- Windows
- c:/samplefolder1/samplefolder2/backup/
- Mac OS 9
- hard disk:samplefolder1:samplefolder2:backup:
- Mac OS X
- /samplefolder1/samplefolder2/backup/
Note that if you make a mistake (for example, you make a syntax error or specify a non-existent folder) there is a risk that the back-up file will not be created.
- Click the [Save] button in the Button Bar to save the back-up specifications.
Once you have set up the timed back-up feature as described above, a new back-up file will be created automatically every day at the same time. It will be given the name "TBYYMMDD.TXT" where "YYMMDD" represents the current date. The file will contain a back-up comment stating that it was created by timed back-up and showing the date and time this occurred.