Single- and Multi-Page Forms
When you design a Form, you should consider what is to happen when the printing of a document requires more than one page. Two options are available:
- The "simple" option, where the same page design is used for each page.
- The "multi-page" option allows the use of up to four page designs, as follows:
- First
- The first page of a multi-page document.
- Middle
- In a multi-page document, the pages between the first and last pages.
- Last
- The last page of a multi-page document.
- Single
- The sole page of a single-page document.
Usually, the First and Single page designs will be the same.
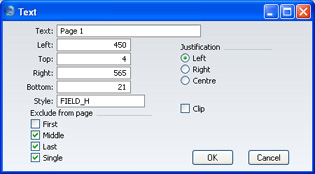
When you add an object of any kind (i.e. text, line, frame or field) to a Form design, you can use the Exclude From Page check boxes to specify the pages on which the object is to be printed. If you do not check any of these boxes, the object will be printed on every page. This will be the case when using the "simple" option. If you want the object to be printed on certain pages only, check one or more of the boxes. For example, if the object is to be printed on all pages except the first, check the First box. If it is only to be printed on the first page, check all boxes except the First box (i.e. it will be excluded from all pages except the first). The text object in the illustration below will be printed on the first page only:
To help with the design process, you can choose to display the objects from a particular page. To do this, select 'First Only', 'Middle Only', 'Last Only' or 'Single Page Only' as appropriate from the Operations menu. For example, select 'First Only' to view the objects that are to be printed on the first page (i.e. those whose First box has not been checked). Select 'View All' to see all objects, irrespective of the page on which they are to be printed.
The number of pages printed will vary from record to record, depending on the number of rows that the record has. An Invoice with one Item will be printed on a single page (i.e. using those objects whose Single box is not checked). An Invoice with 100 Items (i.e. 100 rows) will be printed over several pages. You should specify the maximum number of rows that can be printed on each page by selecting 'Properties' from the Operations menu. This opens the 'Form Properties' window, which has four fields under the overall heading of Matrix Rows On:
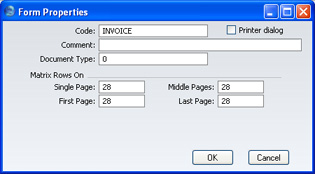
In the case of the "simple" option, you should enter the same number to each of these four fields. Otherwise, enter different numbers as appropriate. For example, in an Invoice Form, First and Single are set to 5, Middle to 6 and Last to 7. Invoices will be printed as follows, depending on the number of rows:
| Invoice rows | Pages | Type of Page |
| Up to 5 | 1 | Single |
| 5-12 | 2 | First and Last |
| 13-19 | 3 | First, Middle and Last |
| 19-25 | 4 | First, 2 x Middle, Last |