Printing Invoices
There are several occasions when you may want to print an Invoice: to view a test print-out to check the Invoice before you finally approve it; to produce a copy for your own files, or to send the original Invoice to the Customer.
To do a test print-out, save the Invoice and then click on the Printer icon in the Button Bar before you approve the Invoice. If you are not using the No Test Printout option in the Configuration setting in the System module, the Invoice will be printed with the text "Test Printout" diagonally across the page as a watermark. This is to avoid the test being confused with the final version. As you have not yet approved the Invoice by checking the OK box, you can go back and correct any errors you may find in the printout. This is also true for Credit Notes.
If you want to print a range of final Invoices, follow the instructions below:
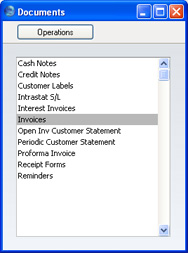
- Select 'Documents' from the File menu or click the [Documents] button in the Master Control panel. Double-click 'Invoices' in the resulting list.
The 'Specify Invoices' window is shown.
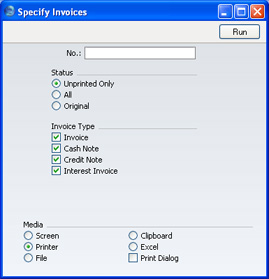
- Enter the Invoice Number for a single Invoice, or the highest and lowest Invoice Numbers of a range of Invoices separated by a colon (:). Use the Status options to specify which Invoices are to be printed:
- Unprinted Only
- This option ignores any Invoices in the range that have already been printed.
- All
- Prints all Invoices in the range. If you are not using the No Test Printout option, any Invoices previously printed will have the word "Copy" printed diagonally across the page as a watermark.
- Original
- This option also prints all Invoices in range. However, any Invoices previously printed will be printed again as though they were original copies, without the "Copy" watermark, irrespective of whether you are using the No Test Printout option.
Use the Invoice Type check boxes to limit your selection to specific kinds of Invoice, as described in step 7 below.
- Press [Run] in the Button Bar to start the printing, or cancel by closing the window.
You can also print a single Invoice by clicking on the Printer icon when that Invoice is shown on the screen. If you want to print to screen, click the Preview icon.
Invoices can also be printed automatically on approval. This is controlled using the Auto Actions setting in the System module.
If you specified in the Invoice Form that several copies are to be printed, perhaps on different printers, these copies will only be printed the first time you print an Invoice after approving it. If you print the Invoice again, or print it before you have approved it, only one copy will be printed. If you need to print all copies again, you must print the Invoice using the 'Documents' function on the File menu, and you should choose the Original option.
Whichever method is used, the Form used is determined as follows:
- Using the Form register in the System module, design the invoice form and name it "INVOICE". Use the 'Properties' function on the Operations menu to assign a Document Type of "Invoice". A sample Invoice Form is supplied with FirstOffice: this can be modified to suit your requirements. Full instructions for using the Form register can be found here.
- Select the Sales Ledger using the [Select Module] button in the Master Control panel or the Ctrl-0 (Windows and Linux) or ⌘-0 (Macintosh) keyboard shortcut.
- Click [Documents] in the Master Control panel or select 'Documents' from the File menu. The 'Documents' list window is opened: highlight 'Invoices'.
- Select 'Define Document' from the Operations menu.
- In the subsequent window, enter "INVOICE" in the Form field of the first row (you can use 'Paste Special' to ensure the spelling is correct).
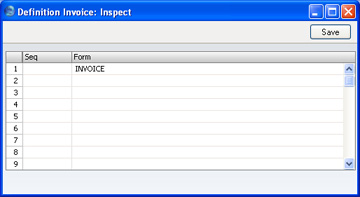
- Click [Save] to save the Invoice Form definition. From now on, the invoice form that you have designed will be used from the 'Documents' function and from the Printer icon, except as described in step 7 below.
- Repeat the previous six steps in turn for the Cash Note, Credit Note and Interest Invoice documents. These will be used from the 'Documents' function and the Printer and Preview icons instead of the standard Invoice document in the following circumstances:
- Cash Note
- If the Invoice has Payment Terms of the "Cash" type, the Cash Note document is always used instead of the Invoice document.
- Credit Note
- If the Invoice has Payment Terms of the "Credit Note" type, the Credit Note document is always used instead of the Invoice document.
- Interest Invoice
- If the Invoice was created using the 'Create Interest Invoices' Maintenance function, the Interest Invoice document is always used instead of the Invoice document.
In each of the three cases described above, if the document does not have an associated Form (steps 4-6 above), FirstOffice will give the warning "Can't find document". If you get this warning, check the type of the Invoice before looking to see which document is missing its Form.