Editing Objects - Text Objects
To add a new text element to the Form, click the [Text] button and then draw the object where you want the text to appear.
When you release the mouse button, the following dialogue box will appear:
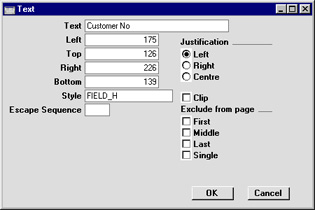
- Text
- The text that is to be printed on the Form. This can be up to 80 characters long, but it is limited to one line. To create a text area with more than one line, use the appropriate number of separate one-line text objects.
- Left, Top, Right, Bottom
- Use these fields to specify the size and position of the text box that is to contain the text. When creating a new text box, the measurements of the box that you have just drawn will appear here.
- Style
- Paste Special
Styles setting, System module
- Use this field to assign a font and font style to the text. If no Style is entered here, the first record in the Styles setting will be used.
- Escape Sequence
- The Escape Sequence is used when printing cash receipts: please refer to your local Hansa representative for details of this feature.
- Justification
- Use these options to specify where the text will appear inside the text box.
- Exclude from page
- Please refer to the Single- and Multi-Page Forms page for details about these options.
Click [OK] to close. The text field is visible on the screen, and you can move it around the Form with the mouse.
To edit a text object once it has been created, double-click it to open the 'Text' dialogue box.