Configuring a Local Mailbox System - The Clients
If you are using the Local Mailbox system, there should be two Companies in the databases on each client machine, as follows:
- The "Local Company" will be used to read and edit Mail off-line.
- The "Client Company" allows the user to log in to the server.
Follow these steps to configure each client machine to use the Local Mailbox system. These steps assume you are installing Hansa on each client machine for the first time. Please refer to points i-v at the bottom of this page if you have been using Hansa for some time before you start using Local Mailboxes.
- Install Hansa on the client. Ensure that the Hansa folder contains the "DBDef.txt" and "Default.txt" files but not a "Hansa.HDB" file and launch the Hansa application.
- Hansa opens the 'Companies: Inspect' window. Enter a single Company, as follows:
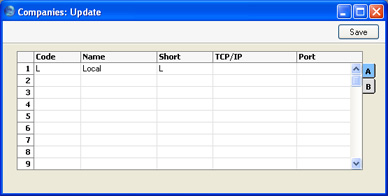
This is the Company that will be used to read and edit Mail off-line (the "Local Company"). As it will not be used to connect to the server, the TCP/IP and Port fields are left blank. Click the [Save] button to save and double-click the new Company in the subsequent list.
- When the 'Import files available' window appears, close it by clicking the close box. Do not import anything yet.
- Select 'System Module' from the Modules menu, and click the [Settings] button in the Master Control panel. Double-click 'Configuration'.
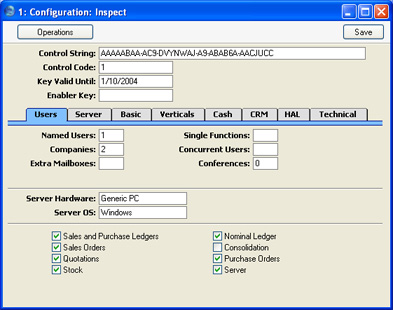
If you are using Named Users, set the number of Named Users to the number of different users that you anticipate will be using the machine. If you are using Concurrent Users, the numbers of Concurrent Users can be set to one, and the number of Extra Mailboxes should be set to the number of different users that you anticipate will be using the machine. For example, if the machine will be used by one user in the morning and another in the afternoon, set the number of Named Users to two, or the number of Concurrent Users to one and the number of Extra Mailboxes to two, depending on which option you are using. The number of Companies should be set to two. Check the Local Mailbox option on the 'CRM' card, and any other boxes as required. Click the [Save] button to save.
- Open the Person register by clicking the [Persons] button in the Master Control panel or by selecting 'Persons' from the Registers menu. Enter Person records for all members of staff that will be using the machine. In our example, two records will be entered, one for the morning user and one for the afternoon user. Don't forget to set passwords for all users.
As mentioned on the Server page, each of these members of staff should also have records in the Person register on the server (with the same initials), and should have Mailboxes on the server as well.
- Change to the E-mail and Conferences module using the Modules menu, and click the [Mailboxes] button in the Master Control panel. Create a Mailbox for each user. In the example, two Mailboxes will be created.
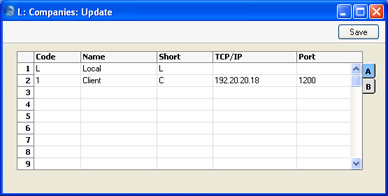
- Change back to the System module and click the [Companies] button in the Master Control panel (or select 'Companies' from the Registers menu). Enter a second Company with the IP address of the server and Port Number that is the same as the Server Port in the Program Mode register on the server. The Code should be the same as that you entered on the server.
When you click [Save], Hansa will quit for reasons of security. The client machine is now configured to use the Local Mailbox system: repeat these steps for the other clients. You should then apply for an Enabler key for each client.
If you have been using Hansa for some time before you start using the Local Mailbox system, you can still configure each client as described above, with these differences:
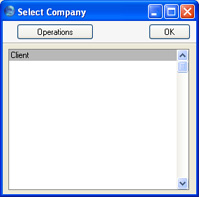
- The database on the client machine will already contain a single Company, the "Client Company". When you launch Hansa, this Company will be shown in the 'Select Company' window:
If the Login window appears instead of the 'Select Company' window, click [Cancel]. The 'Select Company' window will then appear.
- Select 'Open Company Register' from the Operations menu. The 'Companies: Inspect' window opens:

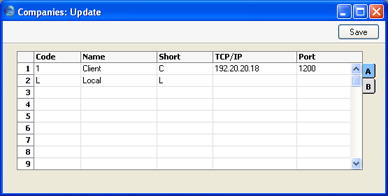
- Enter the Local Company on the second row as shown:
- Click [Save]. Hansa will quit for reasons of security. Restart Hansa and choose to enter the Local Company. Complete steps 4, 5 and 6 as described above. The client machine is now configured to use the Local Mailbox system: repeat these steps for the other clients. You should then apply for an Enabler key for each client.
- In some installations, you might not be able to save the 'Companies: Update' window when you click the [Save] button in step iv, because the number of Companies has been exceeded. In this situation, you should quit Hansa, take the "Hansa.HDB" file out of the Hansa folder and follow the sequence for a new client database from step 1 above. The only information that will be lost will be any custom window positions, sizes and/or sort orders that you might have saved using the 'Save Position' function on the Window menu.