Printing Customer Letters
You can print letters from a Customer Letter record using one of two methods. In both cases, if the Customer Letter record has not been approved and if you are not using the No Test Printout option in the Optional Features setting in the System module, the phrase "Test Printout" will be printed diagonally across each letter as a watermark. The two methods are:
- With a Customer Letter record on screen, click the Printer icon.
- Use the 'Documents' function (accessible using the [Documents] button in the Master Control panel). Double-click 'Customer Letters' in the resulting list. This method allows you to print letters from a range of Customer Letter records.
In both cases, the letters will be printed using a layout or template that you have designed using the Form register in the System module. You should design this layout or template to ensure the letters will be printed in your house style and that they fit on your headed stationery.
The design should take into account what is to happen when the printing of a letter requires more than one page. Usually, in such cases the address, date and greeting will be printed on the first page only. This means the letter text might start higher up on the second and subsequent pages compared to the first page.
To design the letter template follow these steps:
- Switch to the System module and click the [Forms] button in the Master Control panel.
- The 'Forms: Browse' window is opened, listing Forms already entered. To enter a new standard letter template, click the [New] button in the Button Bar; to modify an existing template, double-click it in the list.
- In the case of a new Form, select 'Properties' from the Operations menu.
Enter an appropriate Code and, using 'Paste Special' from the Document Type field, classify the Form as a Customer Letter. This will ensure that you will only be able to include fields appropriate to letters in the template.
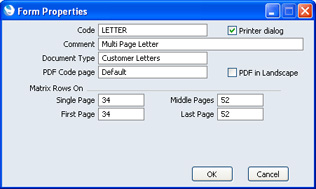
You should now calculate how many lines of letter text can be printed on each page of a multi-page letter. In the example we will use throughout this description, the first page has room for 34 lines of text, while the second and subsequent pages have room for 52. Type these figures in to the four fields under the heading of Matrix Rows On, as shown in the illustration.
These four fields are used as follows:
- First
- The first page of a multi-page document.
- Middle
- In a multi-page document, the pages between the first and last pages.
- Last
- The last page of a multi-page document.
- Single
- The sole page of a single-page document.
Usually, the First and Single page designs will be the same (a single page letter will have the same appearance as the first page of a multi-page letter).
So, in this example, letters will be printed as follows, depending on the length of the letter text (i.e. on the number of lines):
| Lines of Text | Pages | Type of Page | | Up to 34 | 1 | Single | | 35-87 | 2 | First and Last | | 88-139 | 3 | First, Middle and Last | | 140-191 | 4 | First, 2 x Middle, Last |
When all fields are complete, click the [OK] button in the dialogue box to close it.
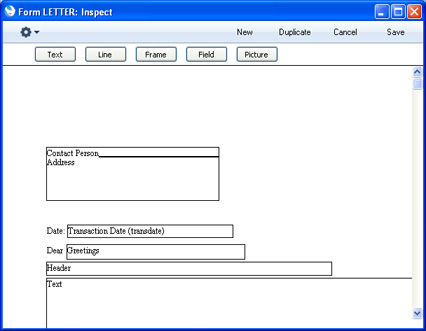
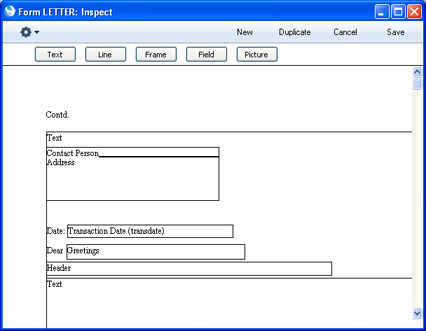
- In this step, you will design the First and Single pages. Add fields and text objects as described below, so that the design ends up looking something like this:
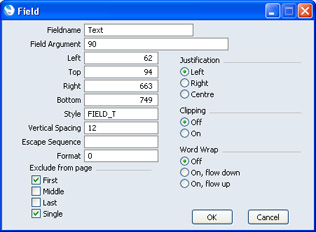
To add a field to the design, click the [Field] button at the top of the window and then draw a box on the Form where the field is to appear. You can move or resize it later if necessary. The 'Field' window opens:

Enter the Field Name (use 'Paste Special' to see all available Field Names for the "Customer Letter" Document Type), and paste a type style in the Style field.
Use the Exclude From Page options to set the page specification for each field. Check the Middle and Last of these options, to signify that each field will be printed on the First and Single pages (i.e. they will be excluded from the Middle and Last pages).
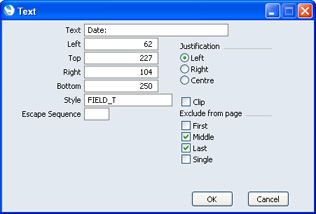
In the case of the field representing the letter text itself, enter "Text" as the Field Name, and complete the other details as follows:
- Vertical Spacing
- Since the letter text is likely to extend over more than one line, you should specify a Vertical Spacing. If you leave it at 0 (the default), all the lines of text will be superimposed on one another. In the case of 10 point Times, a Vertical Spacing of at least 10 points is recommended.
- Top, Bottom
- Don't forget to ensure that the Text field is deep enough to accommodate the required number of lines of text in the specified font (34 lines in the example).
- Field Argument
- Enter here the maximum number of characters that can be printed in one line. In the example illustration, it has been specified that up to 90 characters can be printed per line (fewer if the 90th character occurs in the middle of a word).
Click the [OK] button in the dialogue box to save the field specifications, and repeat as necessary until you have added every field to the First and Single pages.
You can add text objects to the design in a similar manner, by clicking the [Text] button at the top of the window and then drawing a box on the Form where the object is to appear. When the 'Text' window opens, type the text that is to be printed on the Form in the Text field. This can be up to 80 characters long, but it is limited to one line. To create a text area with more than one line, use the appropriate number of separate one-line text objects.
As with fields, give all the text objects that are to appear on the First and Single pages the same page specification using the Exclude From Page options, as shown:
Click the [OK] button in the dialogue box to save the text object specifications, and repeat as necessary until you have added every text object to the First and Single pages.
- Now design the Middle and Last pages. In our example, they will be the same. To help with this, you can hide the objects added in step 4 above. To do this, select 'Middle Only' from the Operations menu. This displays only those objects that are to be printed on the Middle page. At this stage, there are no such objects, so the window goes blank. Add fields and text objects, so that the design looks something like this:
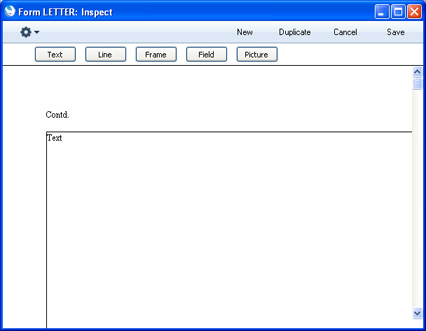
This time, use the Exclude From Page options to specify that each object will be printed on the Middle and Last pages (i.e. they will be excluded from the First and Single pages). In the case of the Text field, don't forget to ensure that it is deep enough to accommodate the required number of lines of text in the specified font (52 lines in the example):
- Now, choose 'View All' from the Operations menu. All objects from all pages are displayed. This confirms that the left-hand margins of all objects are correctly aligned:
Note how the Text field from the Middle and Last pages starts higher up the page than the Text field from the First and Single pages.
- If any object is not aligned correctly, dragged it into position using the mouse, or double-click it to open its specification window and type in the correct co-ordinates.
- When the design is complete, click the [Save] button in the Button Bar to save the Form.
- Now you should inform Standard CRM that the template you have just designed is to be used when printing letters. For details about how to do this, please refer to the description of the 'Header' card of the Customer Letter record.
---
In this chapter:
Go back to:
|