Routines - Reports
Reporting in Standard CRM is non-destructive, i.e. you can make and print a report as many times as you wish. Some programs are designed in such a way as to allow journal printing only directly in connection with the data entry. Standard CRM does not have this limitation.
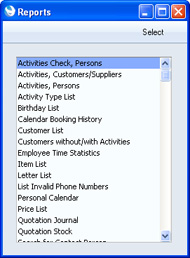
When you click the [Reports] button in the Master Control panel or use the Ctrl-R (Windows) or ⌘-R (Mac OS X) keyboard shortcut, a window will be opened, containing a list of all available reports. The contents of this window will vary with the selected module: the illustration below shows the reports in the Contact module (if you have any Value Packs or Extra Features, you may see more reports than are shown in the illustration):
Choose a report by clicking an item in the list once. If you need to set the page size, number of copies and other printer options for the report, choose 'Page Setup' from the File menu. You can also use this function to choose the printer on which the report is to be printed. These settings will be used whenever you print the report until you choose 'Page Setup' once again.
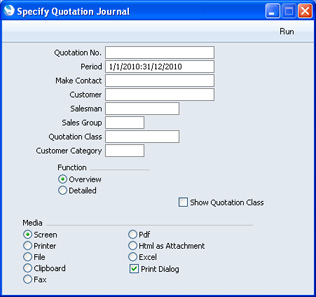
Once you have done this, double-click the report name in the list. A specification window will open, where you can choose the information that you want to be shown in the report. For example, when producing a Quotation Journal, you can use its specification window (illustrated below) to choose the period that is to be covered by the report.
While the specification window is open, you can choose the destination of the printout by selecting one of the Media options at the bottom of the window. These are the available options:
- Screen
- If you print to screen (the default setting), the report will be shown in a new window (described here). You can subsequently send the report to a printer by clicking the Printer icon in the Button Bar of this window or by selecting 'Print' from the File menu.
- Printer
- Use this option to send the report directly to a printer.
- File
- Choose this option to export the contents of a report to a tab-delimited text file on your hard disk. You can then open this file in Excel, for further calculations etc, or in Word or a page make-up program, for incorporation in publicity material or published reports.
- Clipboard
- This option will place the contents of a report in your computer's clipboard, from where you can paste it into another application.
- Fax
- You cannot use this option with reports.
- Pdf
- Choose this option to print a report as a PDF file on your hard disk.
- Excel
- This option opens the Excel application and creates a new workbook containing the report.
- Html as Attachment
- This option will place an html version of a report in your Personal Desktop. You may need to close and re-open the Master Control panel to see the report there.
- You can only use this option in a multi-user system, where it can be useful when you need to produce a long report. You can print a report using this option, log off and leave the server to produce the report overnight, and the report will be waiting for you in your Personal Desktop the next day.
- To open the report, highlight it in your Personal Desktop and choose 'Open Record' from the Master Control panel's Operations menu. The report will be shown in a new window in your browser.
If your database is in restricted mode, you will only be able to print a report using the Screen option.
If you want a print dialogue to appear when you send the report to a printer, check the Print Dialog box (last of the Media options). You might do this if you want to print several copies of a report.
Once you have entered the reporting criteria and have chosen a print destination, click [Run] to produce the report.
Individual Reports
Please click the links for details about the individual reports, descriptions of which have been divided into the following categories:
In this chapter:
Go back to: