Settings in the System module - Access Groups
In a multi-user system, you should use Access Groups to control the access that each user has to your Books by HansaWorld system. For example, you may want to grant a particular user access to Accounts Receivable and Payable while preventing them from entering the General Ledger. After configuring your Access Groups as described below, whenever you enter a record to the
Person register for each user, you should allocate that Person to the relevant Access Group. You can do this in one of two ways:
- You can exclude a Person from everywhere in your Books by HansaWorld database except those areas that you list in that Person's Access Group. This is known as "Starting from No Access".
- You can allow a Person to go everywhere in your Books by HansaWorld database except to those areas that you list in that Person's Access Group. This is known as "Starting from Full Access".
Bear this choice in mind while configuring your Access Groups as described below.
You can only control a Person's access by assigning them to an Access Group. Persons that do not belong to an Access Group will have full access to your Books by HansaWorld database.
To work with Access Groups, first use the [Module] button in the Master Control panel to enter the System module and then click the [Settings] button, also in the Master Control panel. Double-click 'Access Groups' in the resulting list to open the 'Access Groups: Browse' window. This is a list of the Access Groups that are already in the system.
To create a new Access Group, click the [New] button above the list, or highlight an Access Group in the list and click the [Duplicate] button. To edit an existing record, double-click one of the items in the list. When the record is complete, click the [Save] button in the Button Bar to save changes and close it using the close box, or click the close box if you don't want to save changes.
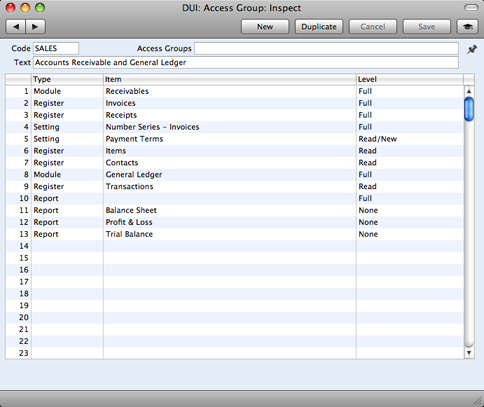
The example illustration above shows an Access Group that will be assigned to Persons who "Start from No Access".
Members of this Access Group will only have access to two modules - the Receivables module (row 1 in the Access Group) and the General Ledger (row 8). This means only that members of the Access Group will be allowed into those modules: access is not granted to anything in those modules. The first row gives access to the Receivables module, so this will be the active module when members log in to your Books by HansaWorld database.
Rows 2, 3 and 4 give Full access to the Invoice and Receipt registers and the Number Series - Invoices setting.
Row 5 gives Read/New access is granted to the Payment Terms setting. This allows members of the Access Group to create new Payment Term records but not to modify existing ones. You also need to give some level of access to Payment Terms if you want members to be able to choose a Payment Term using 'Paste Special' when entering Invoices.
Rows 6 and 7 give Read access to the Contact and Item registers. Again, this is to allow members of the Access Group to be able to choose Customers and Items using 'Paste Special' when entering Invoices.
Row 9 gives Read access to the Transaction register. As well as allowing members of the Access Group to open the Transaction register and look at individual Transaction records, this also allows them to use the 'Open GL Transaction' Operations menu function from Invoices and Receipts.
In row 10, the Item field is empty. This row therefore gives Full access to all reports in both the Receivables module and the General Ledger.
Having granted Full access to all reports, the final lines take away that access for the Balance Sheet, Profit & Loss and Trial Balance reports.
The Access Group record contains the following fields:
- Code
- Use this field to assign a unique identifier to each Access Group. You can use up to five alpha-numeric characters.
- Text
- Enter a description of the Access Group, to be shown in the 'Access Groups: Browse' and 'Paste Special' windows.
- Access Groups
- Paste Special
Access Groups setting, System module
- You can use this field if you are creating an Access Group that will include access rights that you have already included in another Access Group. Specify that Access Group here. You can enter several Access Groups, separated by commas.
- For example, you might already have one Access Group giving access to the Receivables module and one giving access to the Payables module. If you now need to create a third Access Group giving access to both modules, you can enter the two previous Access Groups here, saving you the need of listing the registers, settings and so on in the grid once again. It also reduces the maintenance burden: if you make a change in the Access Group giving access to the Receivables module, you won't need to make the same change in the Access Group giving access to both modules.
- The access rights in the Access Group that you specify in this field will have priority over those that you specify in the grid below. For example, if you deny access to the Number Series - Invoices setting in the grid below, and you enter an Access Group in this field in which you have given full access to the same setting, then users will have full access to the setting. If you list several Access Groups in this field with varying levels of access to that setting, then access will be given as specified in the last-named Access Group. For example, if you enter Access Groups A, B and C, then C will have priority over A and B and over the grid below.
Use the grid area to determine the areas of your Books by HansaWorld database to which members of the Access Group will be given access, and the level of that access. You can allow or disallow access to any module or any component of a module (such as a particular register or setting).
- Type
- Paste Special
Choices of possible entries
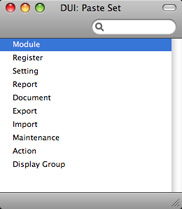
- The first step is use the Type field to specify the area of your database to which you are controlling access (for example, module, register, setting, report, document, etc.). Use 'Paste Special' to open a list of the Types available:
- Item
- Paste Special
Choices of possible entries
- Having specified the Type, use the Item field to name the specific component whose access you are controlling. Again, use 'Paste Special' to open a list of the components available. The 'Paste Special' list will vary, depending on the Type.
- For example, if you entered "Module" in the Type field, the 'Paste Special' list from the Item field will contain a list of modules:
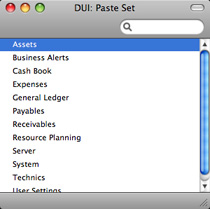
The list will show every module in Books by HansaWorld, including those that are provided by the various Value Packs and Extra Features that you may not be using. Make sure you only select modules that are included in your particular installation of Books by HansaWorld.
- If you enter "Action" in the Type field, the 'Paste Special' list from the Item field will contain a list of functions to which you can restrict access if necessary. These include the checking of the OK box in transactions of all kinds, the Operations menu functions and some miscellaneous features such as deleting records.
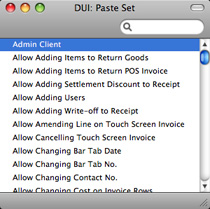
Note that, as indicated by their names, some of these Actions will Allow access, while others will Disallow access. Make sure you make an appropriate entry in the Level field to the right.
- If you enter "Reports" in the Type field, 'Paste Special' from the Item field will list all reports, and so on.
- You can leave the Item field empty if you want to apply the Level to all sub-components of the specified Type. For example, if the Type is "Reports", the Item is empty and the Level is "None", members of the Access Group will have no access to any report. You can then list individual reports on subsequent rows with a Level of "Full" to give access only to those reports listed.
- Level
- Paste Special
Choices of possible entries
- Use the Level field to specify the level of access that you are allowing to the Item. A further 'Paste Special' list displays the available options:
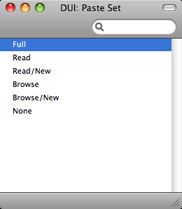
You can use the following two options with any Type:
- Full
- Allows full access to the Item.
- None
- Denies all access to the Item.
- If the Type is "Document", this Level will allow Users to print from browse and record windows, but any further access will be denied. For example, a User with no access to the Invoice document will be able to open an Invoice record and print it. They will not be able to choose which Invoices are to be printed from the 'Documents' list window, and they will not be able to change the Form used when Invoices are printed.
You can only use the remaining options when the Type is "Register" or "Setting", with one exception noted in the text:
- Browse
- Allows users to open the register or setting and to see the records it contains in a list. Users will be able to search the list. Users will not be able to open, modify or create individual records.
- Browse/New
- Allows users to open the register or setting and to see the records it contains in a list. Users will be able to search the list. Users will not be able to open or modify individual records, but they will be able to create new ones (although not by duplicating existing ones).
- Read
- Allows users to open the register or setting and to see the records it contains in a list. Users will be able to search the list. Users will be able to open individual records but not to modify them or to create new ones.
- You can also use this Level when the Type is "Report", in which case users will be able to print the report to screen but not to a printer or to a text file.
- Read/New
- Allows users to open the register or setting and to see the records it contains in a list. Users will be able to search the list. Users will be able to open individual records but not to modify them. They will be able to create new records (including by duplicating existing ones).
If you want to allow 'Paste Special' access to a register or setting to which access is otherwise denied, you should grant Browse or Read access to that register or setting. For example, if a user only has access to the Invoice register, you should grant them Browse or Read access to the Contact and Item registers if you want them to be able to choose Customers and Items using 'Paste Special' when they enter new Invoices.
System Administrator
In multi-user systems it is recommended that at least one member of staff acts as a system administrator, able to use the Technics module on a client machine when other users are logged in. To implement this, create an Access Group that explicitly grants full access to the Technics module:
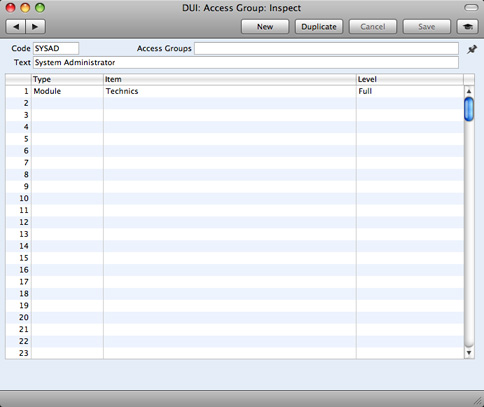
If you do not have an Access Group that grants access to the Technics module, you will not be able to carry out certain tasks (e.g. backing up) on a client machine. You will only be able to do them on the server machine when no other users are logged in. This may not be convenient if the server is in another building or is otherwise inaccessible.
The Technics module is unusual in that you must include it in an Access Group to gain access to it, even if you assign the Access Group to Person records that Start from Full Access. If the Technics module is not listed in an Access Group, access will not be given.
---
In this chapter:
Go back to: