Settings in the System module - Conversions - Master, Conversions - Accounts
These settings allow you to change the Account Number of an Account, and/or to merge two or more Accounts into one. For example, you might have been using Account 41000 for sales of a particular product, but for some reason you now want to use Account 41100 instead. Using these settings, you can change Account 41000 wherever it appears in the database to Account 41100 (e.g. in the Account register itself, in General Ledger Transactions and in settings such as Account Usage A/R). All previous entries to the old Account will appear under the new Account in all reports. Follow these steps:
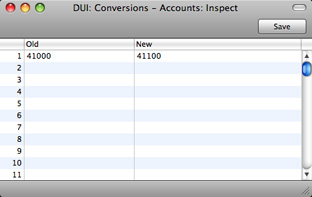
- Use the [Module] button in the Master Control panel or the ⌘-0 (zero)/Ctrl-0 keyboard shortcut to ensure you are in the System module, and click the [Settings] button, also in the Master Control panel (or use the ⌘-S/Ctrl-S keyboard shortcut). Double-click 'Conversions - Accounts' in the resulting list. Enter the old and new Account Numbers one by one in the window as shown in the illustration. Finish by saving the setting by clicking [Save].
As well as using the Conversions - Accounts setting to change Account Numbers as illustrated above, you can also use it to add a prefix or suffix to existing Account Numbers, as follows:| Old | New | Result |
| + | A | "A" will be placed in front of all Account Numbers |
| - | A | "A" will be placed at the end of all Account Numbers |
The prefix or suffix will be added to all Account Numbers in the database.
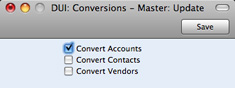
- From the 'Settings' list, select 'Conversions - Master' and enter a check mark in the Convert Accounts check box. Save the setting by clicking [Save].
- Make a text back-up of your database and quit Books by HansaWorld.
- If you are using Mac OS X, locate the "Books.hdf" file, as described below. Hold down the Ctrl key on your keyboard and click on this file. When the menu appears, choose 'Show Package Contents'. A window will open, listing the contents of the "Books.hdf" file. Move the "HANSA.HDB" file out of the package. The "Books.hdf" file will be stored in one of two places, as follows:
- If you have placed the Books by HansaWorld application in your 'Applications' folder as is recommended, the "Books.hdf" file will be stored in Home/Library/Application Support/HansaWorld.
- If you have placed the Books by HansaWorld application somewhere else (i.e. not in the 'Applications' folder or in a sub-folder in 'Applications'), the "Books.hdf" file will be stored in the folder containing the application.
If you are using Windows, remove the Books by HansaWorld database file (named "HANSA.HDB") out of the directory containing your Books by HansaWorld application. Ensure, however, that the "DBDef.txt" and "Default.txt" files are present.
- Launch Books by HansaWorld again. Because there is now no "HANSA.HDB" file, the 'Welcome' window will appear. Click the [Import backup] button.
- Locate and import the back-up file that you created in step 3
- The routine will renumber the Account records in the Account register as required. In the example, Account 41000 will be given the new number of 41100. If Account 41100 already existed, the old Account (41000) would be deleted. Check the Account register to make sure that this has happened.
- Produce a General Ledger report for one of the new Accounts and check that all the Transactions have been converted as you expected.
- You must now inspect and change all report definitions in the General Ledger where the old Account Number has been used. Refer to the description of the Report Settings setting for details.
- Return to the Conversions - Master setting in the System module and turn off the option to Convert Accounts.
- Return to the Conversions - Accounts setting and delete everything line by line.
During the import of the back-up file, all references to the old Account numbers will be replaced in all transactions (including Accounts Receivable and Accounts Payable transactions) and in all settings (including Account Usage A/R and Payment Modes).
If you have more than one Company in your database, you must follow steps 1 and 2 above in the Company in which the conversion is to take place, and repeat those steps in any other Company where the conversion is also to take place. Check that the Conversions - Accounts setting is empty and that nothing is ticked in the Conversions - Master setting in all other Companies. If you want a different conversion to take place in another Company, enter old and new Account numbers in the Conversions - Accounts setting in that Company as necessary, and turn on the option to Convert Accounts in the Conversions - Master setting in that Company as well.
---
In this chapter:
Go back to: