Reports in the General Ledger - Tax Report
Whenever a Tax Return is due you should print a Tax Report. This report will act both as a transaction document for the ledger and as the basis for payment.
The report summarizes the postings made to the Input and Output Tax Accounts during the specified period, and also shows the total Inputs (purchases) and Outputs (sales).
Defining the Tax Report
You can define the Tax Report to determine the Accounts that should be included.
To change the report definition of the Tax Report, ensure you are in the General Ledger, first click the [Settings] button in the Master Control panel, then double-click 'Report Settings' in the subsequent list. Then highlight 'Tax Report' in the list on the left-hand side of the 'Report Settings' window and click the [Definition] button. The 'Tax Report Definition: Browse' window is opened.
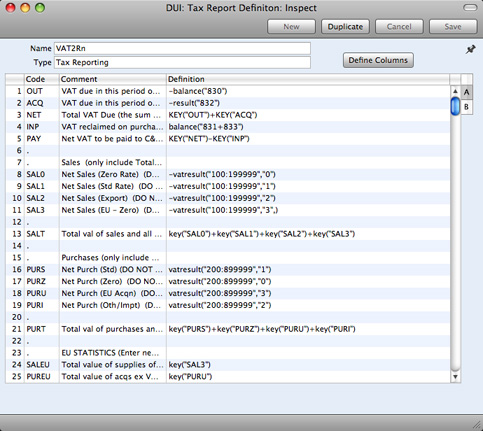
The definition above is a standard UK Tax report, using the Chart of Accounts and definitions supplied with Books by HansaWorld. You can alter it to suit your specific requirements: you will need to change it if you have modified the standard Chart of Accounts or imported your own. You will also need to change it if you are using the Book Receipt Tax, and/or Book Payment Tax options to calculate Tax from Receipts and Payments, not from Invoices and Purchase Invoices. If so, you will need to replace the Output and Input Accounts in the formulae with the O/P and I/P Accounts specified in the Tax Codes setting. Please refer to the description of that setting
here for more details about this feature.
Each row in the definitions list represents a line in the Tax Report. You can add, insert or delete rows as necessary. To insert a row, highlight the row above which the new one is to be inserted (by clicking the row number) and press the Return key. To delete a row, highlight it and press the Backspace key.
- Row
- Each line of the report is defined on its own numbered row.
- Code
- A code identifying a row that you can use in the definitions of other rows.
- Comment
- A descriptive text that identifies the line in the finished report.
- Definition
- The definition of the row in the report, i.e. the Accounts that should be used in calculating the figure to be shown, and the formula of that calculation.
Several commands are available for use by formulae in the Definition field. They are not case sensitive.
- RESULT("Account Code")
- This command returns the net change during the period for the Account specified in the brackets. Some examples of the use of this command are as follows:
- RESULT("100")
- Returns the net change in Account 100 for the specified period.
- RESULT("100:1999")
- Returns the sum of the net changes in Accounts 100 to 1999 for the specified period. The Accounts used are determined using an alpha sort, rather than a numeric one. Thus Account 1000001 will be included in the example range, while Account 200 will not.
- -RESULT("100:1999")
- As the previous example, but the sign of the final figure is changed. This is useful when displaying figures for sales, which are stored as negative figures in Books by HansaWorld. Prefixing the RESULT command with a minus sign will cause sales to be displayed as positive figures.
- RESULT("100+120:1999")
- Takes the net change in Account 100 and adds it to the sum of the net changes in Accounts 120 to 1999.
- CREDRESULT("Account Code")
- This command returns the total credit posting during the report period to the Account specified.
- DEBRESULT("Account Code")
- This command returns the total debit posting during the report period to the Account specified.
- BALANCE("Account Code")
- This command returns the closing balance for the Account specified. It therefore differs from the RESULT command in that balances brought forward from previous periods are taken into account.
- The command can return the sum of the balances of specified Accounts in the same manner as the RESULT command: please refer to the description of the RESULT command above for examples.
- CREDBALANCE("Account Code")
- This command returns the closing credit balance for the Account specified. It therefore differs from the CREDRESULT command in that balances brought forward from previous periods are taken into account.
- DEBBALANCE("Account Code")
- This command returns the closing debit balance for the Account specified. It therefore differs from the DEBRESULT command in that balances brought forward from previous periods are taken into account.
- KEY("Code")
- Use the KEY command to include the value of another Tax Report row in the calculation. You must already have defined the Tax Report row that you are referring to. If not, a zero value will be used. Therefore, in the example illustration, the BOX1 line must appear below the SEXCL and BOX4 lines.
- Note that although the KEY command itself is not case sensitive, the reference to another Tax Report row is. Thus, in the example illustration, you can use key("SEXCL") and KEY("SEXCL"), but not key("sexcl").
- VATRESULT("Account Code","Tax Code")
- This command is similar to RESULT, but in calculating the net change during the period for the Account specified, only Transactions with the specified Tax Code are taken in account.
- The reference to the Tax Code is not case sensitive.
- The command can return the sum of the balances of specified Accounts in the same manner as the RESULT command: please refer to the description of the RESULT command above for examples.
- VATBALANCE("Account Code","Tax Code")
- This command returns the closing balance for the Account specified, with only Transactions with the specified Tax Code taken into account. It therefore differs from the VATRESULT command in that balances brought forward from previous periods are taken into account.
- VATCREDRESULT("Account Code","Tax Code")
- This command returns the total credit posting to the Account specified during the period, taking only transactions with the specified Tax Code into account.
- VATDEBRESULT("Account Code","Tax Code")
- This command returns the total debit posting to the Account specified during the period, taking only transactions with the specified Tax Code into account.
The illustration of the Tax Report definition shows examples of the various commands. There are a few things to remember.
When you define your Tax Report, remember that all calculations will use figures as stored inside the Books by HansaWorld. This means that credit balances (e.g. those for Sales Accounts) will be negative. If you want to print these balances as positive figures, place a minus sign in front of the formula.
The value of a well-structured Chart of Accounts can easily be seen here. For example, if you have grouped your Income Accounts together in a consecutive series, totaling them becomes simple.
When you have finished defining the Tax Report, click [Save].
Printing the Tax Report
Ensure you are in the General Ledger, click the [Reports] button in the Master Control panel and then double-click 'Tax Report' in the 'Reports' list. The 'Specify Tax Report' window is opened.
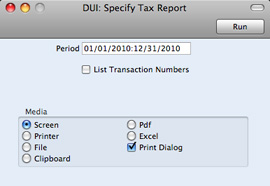
- Period
- Paste Special
Reporting Periods setting, System module
- Enter the period for which you want to print the report in the format "1/1/11:12/31/11". If you are using four-digit years as in the illustration, the leading digits will be inserted automatically. The first period in the Reporting Periods setting is the default value.
- List Transactions
- With this box checked, the Transaction Numbers of all Transactions that fall within the reporting period, together with debit and credit totals, will be listed at the bottom of the report.
Click [Run] to print the report.
---
In this chapter:
Go back to: