Working in the Account Register
If you are using Standard Accounts, open the Account register by first using the [Module] button in the Master Control panel to enter the Nominal Ledger and then clicking the [Accounts] button, also in the Master Control panel. If you are using any other Standard product, simply click the [Accounts] button in the Master Control panel. In all cases, the 'Accounts: Browse' window will be opened, showing the Accounts that you have already entered.
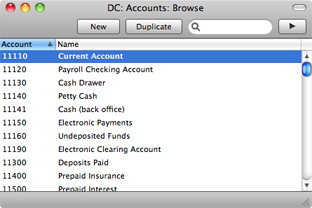
The list contains two columns: Account Number and Account Name. By default, the Accounts are listed in Number order: change the sort order by clicking on one of the column headings: the blue heading shows the current sort order. Click the column heading again to reverse the sort order.
To search for a particular Account, first sort the list by the column that you want to use for the search. Then, enter the text that you want to find in the Search field in the top right-hand corner of the window and press Enter or Return. For example, to search for a particular Account Name, sort by Name before entering an Account Name (or its first few characters) in the Search field.
If you want to look at the details of an Account, double-click its name in the 'Accounts: Browse' window to open the Account record. To create a new Account, click the [New] button above the list or use the ⌘-N keyboard shortcut. Alternatively, highlight an Account similar to the one you want to enter and click [Duplicate] (or use ⌘-Y).
The 'Account' window will open, with the title 'Inspect' if you opened an existing Account, or 'New' if you are creating a new one. Complete the Account record as appropriate and as described below, then save it using the [Save] button and close the window by clicking the close box. Then, close the browse window using the close box again.

The 'Account' window contains the following information:
- Account
- The unique number of the Account. You can use up to ten characters, with a minimum of two.
- Once you have saved the record, you cannot change the Account Number.
- Name
- The name or description of the Account.
- VAT Code
- Paste Special
VAT Codes setting
- You can assign a VAT Code to each Account. This VAT Code will be used automatically every time you use the Account in a Purchase Invoice (in Standard Accounts) or Nominal Ledger Transaction (in Standard Accounts and Standard Nominal Ledger).
- When you specify the Account in a Purchase Invoice row in Standard Accounts, a default VAT Code will be brought in, chosen as follows:
- The Purch. VAT Code for the Supplier will be used.
- It will be taken from this field in the relevant Account record.
- The VAT Code in the Account Usage P/L setting will be used.
When you post the Purchase Invoice to the Nominal Ledger, the VAT Code in a Purchase Invoice row will determine the Input VAT Account that will be debited and the rate at which VAT will be charged.
- When you specify the Account in a Transaction row Standard Accounts and Standard Nominal Ledger, this VAT Code will be brought in automatically. No calculation will ensue: the VAT Code is for reporting purposes only. It will affect the accuracy of the figures for Net Sales and Net Purchases in the VAT Report.
- Account Type
- An Account can belong to one of five types: Assets, Liabilities, Equity, Revenues or Expenses. This information is used to control how the balance of this Account will be stored, as a negative or a positive figure. Assets and costs are treated as positive values, while accounts for liabilities, equity, and incomes are treated as negative.
- Normal Amount
- Click one or both of the check boxes to indicate what type of posting is the usual for the Account. If you use this option, and try to debit an Account usually used for credit or vice versa, a warning will alert you about the possible error.
- Closed
- Check this box if you want to close the Account for further Transactions. You will no longer be able to use it, and it will not appear in the 'Paste Special' selection window. If you want to open the Account again later, simply click in the box again to remove the check mark.
---
In this chapter:
Go back to home page for: