Opening Balances
The task of entering opening balances can have two stages:
- You should enter balances for each Account as they stood at the end of the previous fiscal year. You can use the Brought Forward Balance register or the Transaction register for this task. This information should be available in the Trial Balance report obtained from your old system.
You can enter a single opening balance figure for each Account, or you can divide the opening balance figure into individual postings. This decision may depend on the Account itself.
The advantages of using the Brought Forward Balance register for this purpose are that you can save unbalanced Brought Forward Balance records, and you can return to a Brought Forward Balance record to change it. This allows you to enter opening balances as a gradual process, saving frequently.
If you want to use the Brought Forward Balance register, refer to steps 1-6 below. If you want to use the Transaction register, please refer to the description here.
- If appropriate, enter the Transactions for the current year to date, using the Transaction register. Please refer to steps 7-12 below.
Once you have entered all balances and Transactions, print out a Trial Balance and compare it with that obtained from your old system. Any discrepancies should be investigated immediately: any delay will make this more difficult.
The following sections assume you have already defined a Chart of Accounts and a set of VAT Codes.
To enter Account balances as they stood at the end of the previous fiscal year to the Nominal Ledger using the Brought Forward Balance register, follow these steps:
- Click the [Brought Fwd Balances] button in the Master Control panel or use the ⌘-3 keyboard shortcut to open the Brought Forward Balance register.
- When the 'Brought Forward Balances: Browse' window opens, click [New] on the Button Bar to open a new record.
- Enter the information as shown in the following illustration. It is recommended that you choose a Transaction Date that is at the end of the previous fiscal year and that is, in any case, prior to the date when you will be starting work with Standard Nominal Ledger.
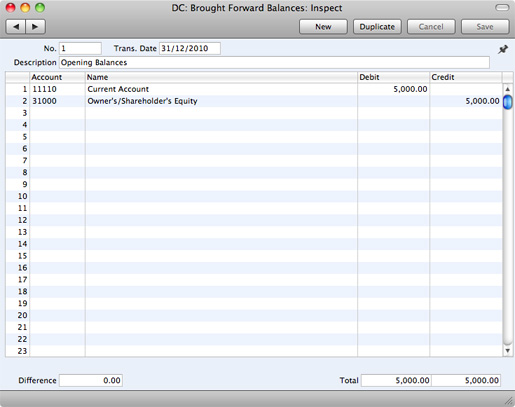
If you are entering a single opening balance figure for each Account, use each row in the grid to enter these balances, taking the figures from the Trial Balance report produced by your old system. If you are entering opening balances as individual postings, enter each posting on a separate row. You can enter single opening balance figures for some Accounts, and individual postings for others.
- The Brought Forward Balance screen has 500 rows, allowing you to enter opening balances for up to 500 Accounts in a single record. If you need to enter a significant number of opening balances, it is recommended that you save the Brought Forward Balances record periodically, by clicking the [Save] button in the top right-hand corner. The record does not have to balance for you to save it. Account balances will be updated as soon as you save the record. However, if you discover a mistake at a later date, you will be able to correct the record without difficulty.
- If you run out of rows, click the [New] button (or use the ⌘-N keyboard shortcut). The Brought Forward Balances record will be saved and closed, and a new empty record will be opened, allowing you to enter more opening balances.
- Finish with [Save] when you have entered the last balance, and close the window by clicking the close box.
If you are starting to use Standard Nominal Ledger in the middle of a fiscal year, you should now enter the Transactions for the current year so far. You should enter these from the original documentation, not copy them from Transaction Journal reports produced from your old system. Follow these steps:
- Click the [Transactions] button in the Master Control panel or use the ⌘-1 keyboard shortcut to open the Transaction register.
- When the 'Transactions: Browse' window opens, click [New] in the Button Bar to open a new record.
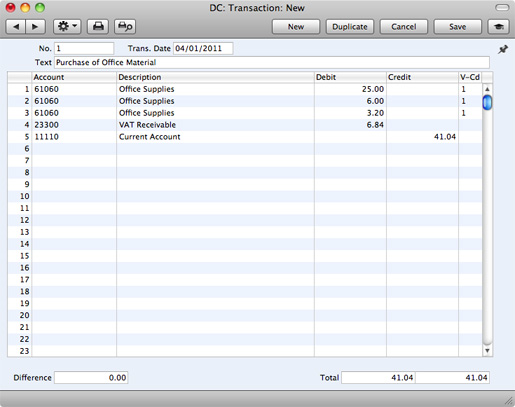
- Enter the information as shown in the following illustration. Full details about the fields are to be found in the description of the Transaction register. Ensure you use the same Transaction Date that was used when entering the Transaction to your previous system.
- The Transaction screen does not have an OK check box, so Account Balances will be updated as soon as you save the Transaction. Therefore, before saving the Transaction, make sure that no mistakes have been made. One check is that the Debit and Credit totals are the same. Once you have saved the Transaction, you will only be able to change it by using one of the correction features.
- Click the [Save] button (or use the Shift-Enter keyboard shortcut) to save the Transaction. Alternatively, if you click the [New] button (or use the ⌘-N keyboard shortcut), the Transaction will be saved and closed, and a new empty record will be opened, allowing you to enter another Transaction.
You can use another feature when you need to enter several Transactions quickly in one sitting and don't want to interrupt your typing by reaching for the mouse. Enter the debits in a Transaction first and then, with the cursor in the Credit field in the final credit row, press the Return or Enter key twice. The first pressing causes the correct credit amount to be entered for you, balancing the entry. The second saves, closes and commits the Transaction to the Nominal Ledger and opens a new, empty, Transaction.
- Finish with [Save] when you have entered the last Transaction, and close the window by clicking the close box.
---
In this chapter:
Go back to: