Available Tools and Functions (POS Button Types) - Payment Methods
This page describes the POS Buttons that you can use to handle payments in POS Invoices. Please refer
here for details about making these buttons appear in POS Invoices.
You must make sure you have placed at least one of the buttons listed in this section in the POS Invoice window (although not necessarily in the "Page 1" POS Button record). The POS Invoice workflow requires you to be able to record payments.
Cash
- Function
- Receives and manages cash payments for POS Invoices.
- Requirements
- In the row in the POS Button record that defines the "Cash" button, you must specify a Payment Mode in the Code field, using 'Paste Special' if necessary.
- Workflow
- When every Item has been added to a POS Invoice, click or touch the "Cash" button.
- The 'Cash Payment' window appears:
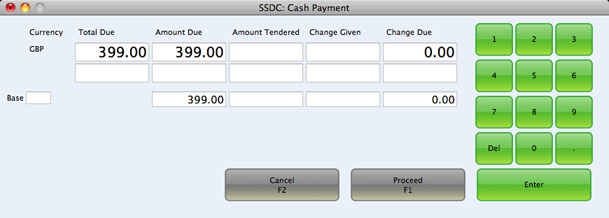
- Enter the value of the cash payment provided by the Customer in the top Amount Tendered field. The Change Due field will show you how much change is needed.
- Enter the value of the change that you give to the Customer in the Change Given field. (This is only necessary if the figure is not the same as the Change Due.)
- If you are using a touch-screen, use the numeric keypad to enter amounts, and touch the [Enter] button to move from field to field.
- Click or touch [Proceed] to commit the payment, or [Cancel] to abandon it.
- Lines will be added to the bottom of the POS Invoice, showing the value of the cash payment and the change.
Cheque
- Function
- Receives and manages cheque payments for POS Invoices.
- Requirements
- In the row in the POS Button record that defines the "Cheque" button, you must specify a Payment Mode in the Code field, using 'Paste Special' if necessary.
- Workflow
- When every Item has been added to a POS Invoice, click or touch the "Cheque" button.
- The 'Cheque Payment' window appears:
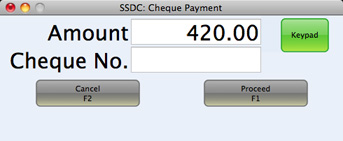
- Enter the value of the cheque payment in the Amount field (this will default to the total of the POS Invoice) and the cheque number in the Cheque No. field.
- If you are using a touch-screen, use the [Keypad] button to open a numeric keypad to enter the Amount or Cheque No.
- Click or touch [Proceed] to commit the payment, or [Cancel] to abandon it.
- A line will be added to the bottom of the POS Invoice, showing the value of the cheque payment.
Credit Card
- Function
- Receives and manages credit card payments for POS Invoices.
- Requirements
- In the row in the POS Button record that defines the "Credit Card" button, you must specify a Payment Mode in the Code field, using 'Paste Special' if necessary.
- Workflow
- When every Item has been added to a POS Invoice, click or touch the "Credit Card" button.
- The 'Credit Card Payment' window appears:
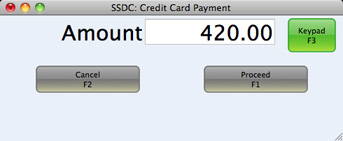
- Enter the value of the credit card payment in the Amount field (this will default to the total of the POS Invoice).
- If you are using a touch-screen, use the [Keypad] button to open a numeric keypad to enter the Amount.
- Click or touch [Proceed] to commit the payment, or [Cancel] to abandon it.
- A line will be added to the bottom of the POS Invoice, showing the value of the credit card payment.
Debit Card
- Function
- Receives and manages debit card payments for POS Invoices.
- Requirements
- In the row in the POS Button record that defines the "Debit Card" button, you must specify a Payment Mode in the Code field, using 'Paste Special' if necessary.
- Workflow
- When every Item has been added to a POS Invoice, click or touch the "Debit Card" button.
- The 'Debit Card Payment' window appears:
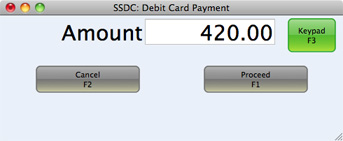
- Enter the value of the debit card payment in the Amount field (this will default to the total of the POS Invoice).
- If you are using a touch-screen, use the [Keypad] button to open a numeric keypad to enter the Amount.
- Click or touch [Proceed] to commit the payment, or [Cancel] to abandon it.
- A line will be added to the bottom of the POS Invoice, showing the value of the debit card payment.
Pay
- Function
- Receives and manages payments for POS Invoices, to be used when the Customer uses more than one payment method (e.g. cash and credit card). You can also receive such payments individually (e.g. using the "Cash" button followed by the "Credit Card" button).
- Requirements
- Your payment methods must be listed in the Payment Modes setting.
- Workflow
- When every Item has been added to a POS Invoice, click or touch the "Pay" button.
- The 'Payment' window appears:
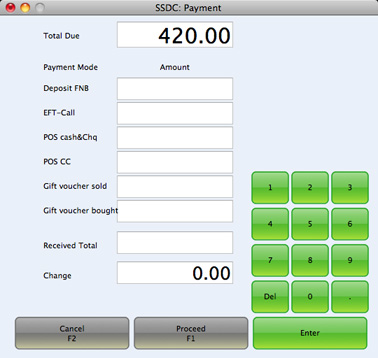
There will be one Amount field for each Payment Mode (i.e. one Amount field for each payment method).
- Enter the value of the payment in the Amount field(s) for the relevant payment method(s).
- If you are using a touch-screen, use the [Keypad] button to open a numeric keypad to enter the Amount.
- Click or touch [Proceed] to commit the payment, or [Cancel] to abandon it.
- Lines will be added to the bottom of the POS Invoice (one line for each payment method), showing the value of the payment.
- Notes
- It is not practical to use the "Pay" button if you have many Payment Modes. If so, the depth of the 'Payment' window becomes limited by the size of the screen, so the Received Total and Change fields and some Amount fields will not be visible. In this situation it is recommended that you use individual Button Types instead (e.g. "Cash" and "Credit Card").
- If the 'Payment' window does not list every payment method, this will be because the window has lost connection with the Payment Modes setting. Re-establish the connection by opening the Payment Modes setting, making a minor change and saving. Then close and re-open the 'Payment' window. It should now list every payment method. This problem is most likely to occur in a new database.
---
In this chapter:
Go back to: