Contact Settings
This page describes the Contact Settings setting in the Sales Ledger and the CRM module.
---
The Contact Settings setting, allows you to set various defaults that will be used when you create new records in the Contact register.
To open the Contact Settings setting, first ensure you are in the Sales Ledger or the CRM module. Then, if you are using Windows or Mac OS X, click the [Settings] button in the Navigation Centre or use the Ctrl-S/⌘-S keyboard shortcuts and then double-click 'Contact Settings' in the resulting list. If you are using iOS or Android, select 'Settings' from the Tools menu (with 'wrench' icon) and tap 'CRM Settings' in the 'Settings' list. The 'Contact Settings: Inspect' window opens:
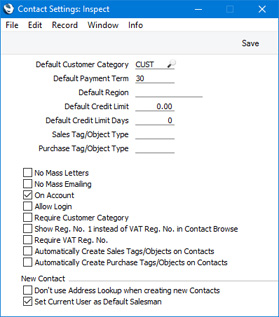
- Default Customer Category
- Paste Special
Customer Categories setting, Sales Ledger
- If you enter a Customer Category here, it will be brought in as a default to new Contacts that you enter directly to the Contact register. It will not be used when you create new Contacts using the 'Linked Contact Person' function on the Create menu (i.e. when you add Contact Persons to a Customer or Supplier).
- Default Payment Term
- Paste Special
Payment Terms setting, Sales/Purchase Ledger
- If you enter a Payment Term here, it will be brought in as a default Sales Pay. Term when you create new Contacts.
- Default Region
- Paste Special
Regions setting, Sales/Purchase Ledger
- If you enter a Region here, it will be brought in as a default when you create new Contacts.
- Default Credit Limit, Default Credit Limit Days
- If you enter a Credit Limit and/or Credit Limit Days in these fields, they will be brought in to the Sales Credit Limit and Sales Credit Limit Days fields when you create new Contacts.
- Sales Tag/Object Type, Purchase Tag/Object Type
- Paste Special
Tag/Object Types setting, Nominal Ledger
- If you need to create Tags/Objects that are specific to each Contact, there are two methods that you can use:
- You can have a Tag/Object created automatically whenever you save a Contact for the first time. To use this method, select the Automatically Create Sales Tags/Objects on Contacts and/or Automatically Create Purchase Tags/Objects on Contacts options below.
- After saving a Contact, you can create a Tag/Object by selecting 'Tags/Objects' from the Create menu (Windows/Mac OS X) or + menu (iOS/Android).
In both cases, the new Tags/Objects will be assigned to the Contact automatically, as follows:
- If the Contact is a Customer, the new Tag/Object will be placed in the Sales Tags/Objects field.
- If the Contact is a Supplier, the new Tag/Object will be placed in the Purch. Tags/Objects field.
- If the Contact is both a Customer and a Supplier, the new Tag/Object will be placed in the Sales Tags/Objects and in the Purch. Tags/Objects fields.
The new Tag/Object will be added to any Tags/Objects that are already there. The existing Tags/Objects will not be overwritten.
- The Contact Number will be used as the Code of the new Tag/Object. For example, Tag/Object 001 will be created from Contact 001.
- If you need the new Tag/Objects to be assigned toTag/Object Types, specify those Tag/Object Types in these fields. If you need the Sales Tag/Object and Purchase Tag/Object to be assigned to different Tag/Object Types, you should specify Start Strings in those Tag/Object Types so that Tags/Objects with different Codes can be created. This will allow you to avoid the issue that Tag/Object 001 cannot be assigned to two Tag/Object Types, an issue that would otherwise arise if a Contact is both a Customer and a Supplier. If you have specified Lengths (maximum numbers of characters) in each Tag/Object Type, take care that these are sufficient for Tag/Object Codes to be constructed from the Start Str and Contact Numbers.
- The two methods will only create Tags/Objects from Contacts that are Customers or Suppliers, not from other Contacts such as Contact Persons. So, if you are using the automatic method, be sure to mark a new Contact as a Customer or Supplier before saving for the first time.
- No Mass Letters, No Mass Emailing, On Account, Allow Login
- The options you choose here will be selected by default when you create new Contacts.
- Require Customer Category
- Select this option if you want every Contact that is a Customer to be assigned to a Customer Category.
- Require VAT Reg. No.
- Select this option if you need a VAT Registration Number to be specified for every Contact that is a Customer or a Supplier.
- Show Reg. No. 1 instead of VAT Reg. No. in Contact Browse
- Use this option if you would like the Reg No.1 to be shown in the 'Contacts: Browse', 'Paste Customers' and 'Paste Suppliers' windows instead of the VAT Registration Number. You will need to quit Standard ERP and restart for this change to take effect (there is no need to restart the server).
- Automatically Create Sales Tags/Objects on Contacts, Automatically Create Purchase Tags/Objects on Contacts
- Select these options if you would like Sales and/or Purchase Tag/Objects to be created automatically from and assigned to Customers and Suppliers when you save them for the first time. Please refer to the description of the Sales Tag/Object Type and Purchase Tag/Object Type fields above for more details.
- Don't use Address Lookup when creating new Contacts
- If your database is registered in Estonia, Latvia or the UK, a 'New Contact' window will open before the main 'Contact: New' window whenever you begin entering a new Contact record. The 'New Contact' window allows you to obtain the address of the new Contact from a central database using the Company Registration Number (Estonia and Latvia) or postcode (UK). This address will be copied to the 'Contact: New' window. Address Lookup is a chargeable Cloud Service.
- If your database is registered in one of these countries and you do not want the 'New Contact' window to open (i.e. you want to go straight to an empty 'Contact: New' window), select this option. You will still be able to access the central Registration Number or postcode databases using the [Update Address] button on the 'Contact' card of the 'Contact: New' window. This option will not be visible in other countries (i.e. if the VAT Law in the Company Info setting in the System module is not "Estonian", "Latvian", "Lithuanian", "Norwegian" or "Default").
- Set Current User as Default Salesman
- Select this option if you would like the current user's Signature to be placed in the Salesman field in each new Contact record. Otherwise, the Salesman field in new Contacts will be blank.
When the setting is complete, click the [Save] button (Windows/Mac OS X) or tap √ (iOS/Android) to save changes and close the window. To close the window without saving changes, click the close box (Windows/Mac OS X) or tap < (iOS/Android).
---
Settings related to Contacts:
Go back to: