|
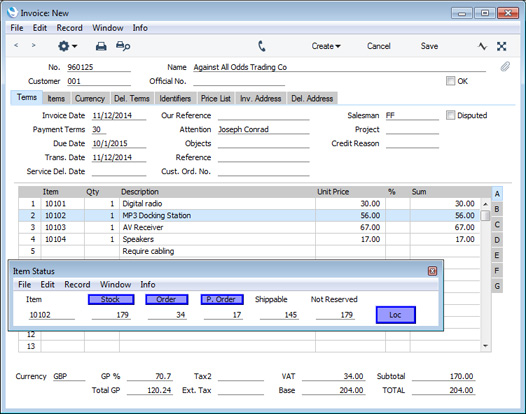
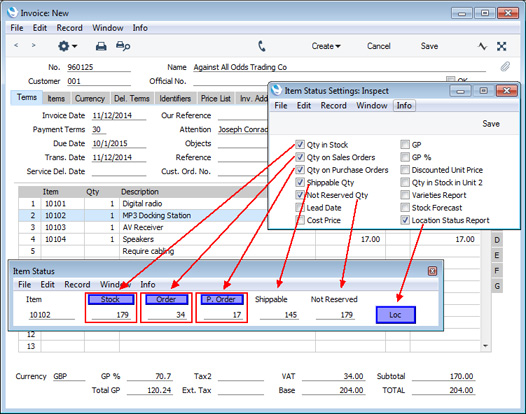
Search HansaManuals.com HansaManuals Home >> Standard ERP >> Items and Pricing >> Item Status Settings Setting Previous Next This text refers to program version 8.0 The Item Status Settings setting - Configuring the 'Item Status' window Whenever you are working with Items (e.g. in Quotations, Orders, Invoices, Purchase Orders, Deliveries, Stock Depreciations and many other registers), you can use the 'Item Status' function if you need to check the status of any of the Items in the record (for example, the quantity in stock, the quantity on unfulfilled Sales Orders, etc).To use the 'Item Status' function, first, click in any field in the row containing the Item you are interested in, then right-click or ctrl-click the row number and select the 'Item Status' function from the resulting menu (in versions prior to 8.0, place the insertion point in the row, then select 'Item Status' from the Operations menu). The 'Item Status' window will be opened, displaying various figures about the Item you were checking. For the example illustrated below, we placed the insertion point in the second row of the Invoice (containing Item 10102) before selecting the 'Item Status' function:
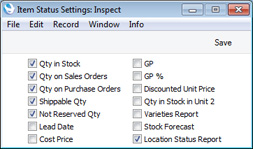
You can specify the information that will be shown in the 'Item Status' window, on two levels:
To work with the Item Status Settings setting, use the [Switch Module] button in the Master Control panel to ensure you are in the Sales Ledger and then click the [Settings] button, also in the Master Control panel. Double-click 'Item Status Settings' in the 'Settings' list. Select options as appropriate and as described below. Then, to save changes and close the window, click the [Save] button. To close the window without saving changes, click the close box.
In each case, the figures displayed in the 'Item Status' window will relate to the Location specified in the record from where you opened it. If you have not specified a Location in that record, the figures will relate to all Locations. The one exception is 'Location Status Report', which will display separate figures for each Location. The Order figure is the quantity of the Item currently included in all unfulfilled Sales Orders, irrespective of whether they have been marked as OK. These are Sales Orders that are not delivered and not closed. The Shippable quantity is the quantity in stock less this Order figure. You can decide whether the Stock, Order and Shippable figures should be reduced when you create a Delivery or when you mark that Delivery as OK. This is controlled using the Decrease Available on Deliveries options in the Stock Settings setting in the Stock module. For example, you have ten units of an Item in stock and you receive an Order for one unit. The 'Item Status' window will contain the following figures at each stage of the Order process, depending on which Decrease Available on Deliveries option you have selected:
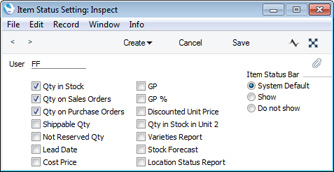
Note that if you are using the When Delivery has been Created option, the Stock figure will be reduced when you create a Delivery (from 10 to 9 in the example). At this point, the Stock List will still show 10 as being in stock, so you should treat the Stock figure as a "free" stock figure (showing the quantity that is available for new Deliveries) rather than a strict stock figure. The Purchase Order figure will always include the quantity on Goods Receipts that have not yet been marked as OK. As previously mentioned, the options that you choose in the Item Status Settings setting in the Sales Ledger will determine the information that will be shown in the 'Item Status' window to every user. If you need a particular user to be shown different information, change to the User Settings module and create a new record for that user in the Item Status Settings register:
If the figures in the 'Item Status' window are not correct, you can have them recalculated. To do this, go to the Technics module and run the 'Recalculate Item Status' Maintenance function. If a figure is still incorrect after running this function, change to the Database Maintenance module and enter the Item Number in the Log Item Status Updates setting. Then run the 'Recalculate Item Status' Maintenance function again and open the "hansa.log" file (the server's "hansa.log" file in a multi-user system). Each transaction that affects the Item Status will be listed, which may help you find the cause of the error. Each transaction will update figures for the relevant Location and figures for all Locations (marked in the "hansa.log" file as ;;;). --- Go back to:
Previous Next Top |