Instalments
This setting allows you to define Instalment plans that you can then attach to Payment Terms. These Instalment plans will help you manage Invoices (on both the sales and purchase sides) that are payable in Instalments.
To work with this setting, first use the [Switch Module] button in the Navigation Centre to ensure you are in the Sales Ledger. Then, if you are using Windows or Mac OS X, click the [Settings] button, also in the Navigation Centre, or use the Ctrl-S/⌘-S keyboard shortcut and, when the 'Settings' list window opens, double-click 'Instalments'. If you are using iOS or Android, select 'Settings' from the Tools menu (with 'wrench' icon) and tap 'Instalments' in the 'Settings' list. The 'Instalments: Browse' window will open, listing the Instalment plans that you have previously entered. Double-click (Windows/Mac OS X) or tap (iOS/Android) an Instalment plan in the list to edit it, or add a new record by selecting 'New' from the Create menu (Windows/Mac OS X) or the + menu (iOS/Android). The Instalment record window illustrated below will open:
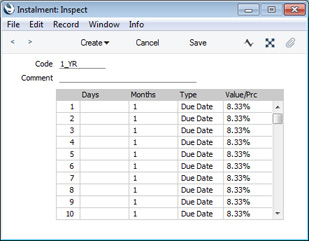
Enter a unique Code and a name and then use the grid to define the Instalment plan as follows:
- Days, Months
- Use these two columns to specify how the Due Dates of each Instalment are to be calculated.
- If the period between each instalment is to be a certain number of days, specify that number of days in the Days column. If the period between each instalment is to be a certain number of months, specify that number of months in the Months column.
- If you enter values in both fields (i.e. you enter both a number of Days and a number of Months), they will be added together to calculate the period between instalments.
- The Due Date of the first Instalment will be calculated by adding the number of Days and/or Months that you specify in the first row of the grid to the Invoice or Due Date (depending on the Type that you specify in the field to the right). The Due Dates of subsequent Instalments will be calculated by adding the number of Days and/or Months that you specify in the following rows to the Due Date of the previous Instalment.
- The example Instalment plan illustrated above will cause twelve monthly Instalments of equal value to be created from an Invoice. In the case of a Sales Invoice, the first Instalment will become due one month after the Due Date, the second Instalment will become due one month after the first Instalment, and so on.
- Type
- Paste Special
Choices of possible entries
- In the first row of the grid, use this field to specify how the Due Date of the first Instalment will be calculated, as follows:
- Due Date
- The Due Date of the first Instalment will be calculated by adding the number of Days and/or Months to the Due Date of the Invoice.
- The Due Date of the Invoice will be the Invoice Date plus any Net Days specified in the Payment Term.
- Inv. Date
- The Due Date of the first Instalment will be calculated by adding the number of Days and/or Months to the Invoice Date of the Invoice.
- This option will only be operational when creating Instalments from Sales Invoices: from Purchase Invoices, it will behave as if you had selected the Due Date option above.
- Rsrv. Date
- You can only use this option in Down Payment Invoices that you will create from Hotel Reservations. As you should not use it in other Invoices, you may need dedicated Instalment plans and Payment Terms for use in such Invoices. Please refer to the 'Example - Hotel Reservations' section below for more details.
In most cases, the Due Dates of subsequent Instalments will be calculated by adding the number of Days and/or Months to the Due Date of the previous Instalment, so this field will not have any effect in the second and subsequent rows. The exception is when the Type in one of the rows is "Rsrv. Date", as illustrated in the 'Example - Hotel Reservations' section below.
- Value/Prc
- Specify here the value of the Instalment. You can enter a fixed amount or a percentage of the Invoice value. Percentages must be followed by the % sign as in the illustration.
- If you enter percentages that do not add up to 100, the percentage in the final row will be ignored and the value of the final Instalment will be the remaining balance on the Invoice. For example, if you enter four Instalments with percentages 25%, 25%, 5% and 10%, the 10% in the last row will be ignored and the final Instalment will be for 45% of the Invoice value. If the four percentages are 25%, 25%, 65% and 10%, the final Instalment will be for -15%. This also applies if you enter fixed amounts. In effect, this balancing feature means you can leave the Value/Prc field in the final row empty.
Save the Instalment record by clicking the [Save] button (Windows/Mac OS X) or tapping √ (iOS/Android) in the Button Bar. To close the Instalment record without saving changes, click the close box (Windows/Mac OS X) or tap < (iOS/Android).
ExampleTo work with Instalments, follow these steps:
- Configure your Instalment plans in the Instalments setting, as described above. In this example, we will illustrate the use of Instalments using the following Instalment plan:
This Instalment plan will cause twelve monthly Instalments of equal value to be created from an Invoice.
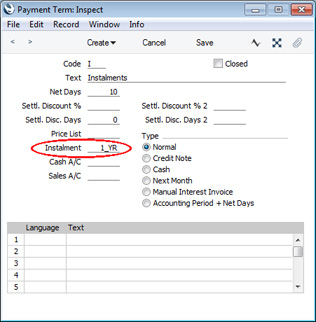
- Assign the Instalment plan to a Payment Term record using the Instalment field. Use 'Paste Special' to ensure you choose the correct one:
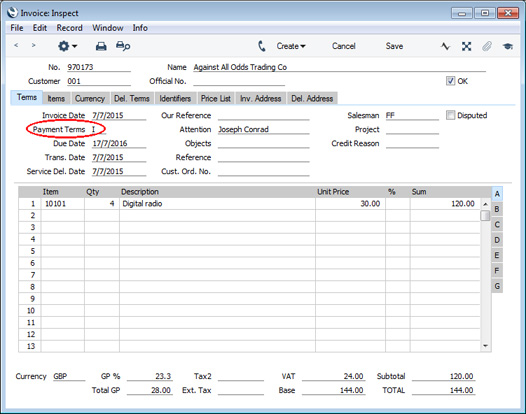
- When you need to enter an Invoice that will be payable in Instalments, specify the appropriate Payment Term but proceed as normal in all other respects:
- When you mark the Invoice as OK and save, a normal Nominal Ledger Transaction will be created:
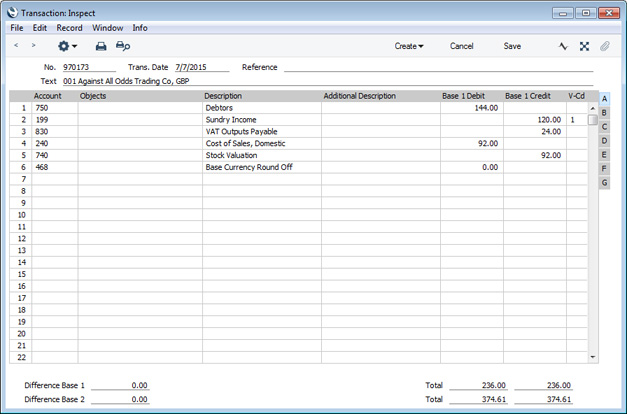
In this case, the full value of the Item was posted to the Sales Account immediately. If you need the value to be posted gradually to the Sales Account (i.e. in line with the Instalment schedule), use the Accruals feature. Please refer here (sales side) or here (purchase side) for details.
- When you design the Form Template that will be used when you print Invoices, you can include fields that will print an Instalment schedule in a table format. These fields are Instalment Date and Instalment Sum: as these fields print information in a list format, you should specify Line Heights for them. These fields are only available for Sales Invoices.
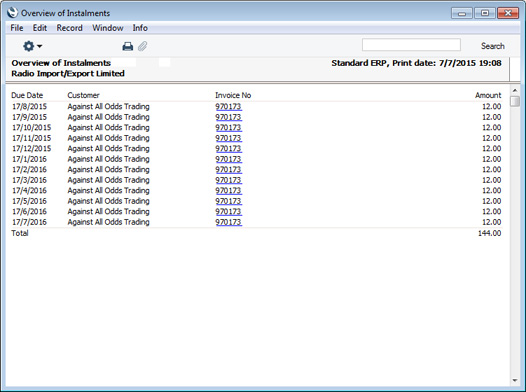
- On the sales side, Instalments will be listed in the Overview of Instalments, Periodic Customer Statement (Detailed version) and Receipts Forecast reports. They will also be listed in the Open Invoice Customer Statement (both report and form) and the Sales Ledger report if you produce them using the Show Instalments option. Illustrated below is the Overview of Instalments report showing the Instalment schedule for the example Invoice:
On the purchase side, Instalments will be listed in the Overview of Instalments, Periodic Supplier Statement (Detailed version) and Payments Forecast reports. They will also be listed in the Purchase Ledger report if you produce it using the Show Instalments option.
Both sales and purchase Instalments will be included in the Liquidity Forecast report in the Nominal Ledger and, depending on the options that you select, in the file created by the Analytical Cash Flow export function.
Other reports will treat the Invoices as being due on their Due Dates as normal.
- On the sales side only, you can edit an Invoice's Instalments if necessary. Open the Invoice and choose 'Edit Instalments' from the Operations menu. A modified version of the Overview of Instalments report will be printed to screen:

To change an existing Instalment, click (Windows/Mac OS X) or tap (iOS/Android) on a Due Date to open the Instalment that is due on that date:
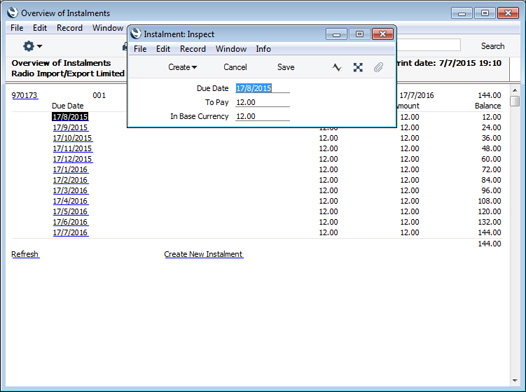
Change the date or the value as appropriate. You can also delete the Instalment altogether by selecting 'Delete' from the Record menu (which has a 'cog' icon if you are using iOS or Android). If you change the value, the values of the other Instalments will be recalculated automatically (you will need to recalculate the report to see this).
If you need to add an extra Instalment, click or tap the 'Create New Instalment' link at the bottom of the report. The report will be redrawn to show the new Instalment, which will have no value. Click or tap its date to open it and enter the correct date and value.
The report will not show Instalments that have already been paid (as described in the following steps). So, you will only be able to edit or delete Instalments that have not yet been paid.
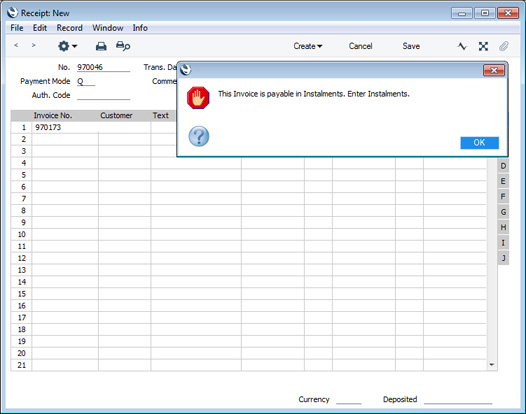
- When you receive or issue payment against an Invoice payable in instalments, you can enter its Invoice Number on flip A of a Receipt or Payment row respectively in the normal way. When you do so, a message will inform you that the Invoice is payable in Instalments:
- Go to flip G and activate 'Paste Special' from the Instalment field. A list of open Instalments will be opened. This list will show the open (unpaid) Instalments of the Invoice that you specified on flip A in the previous step, or all open Instalments if you did not specify anything on flip A.
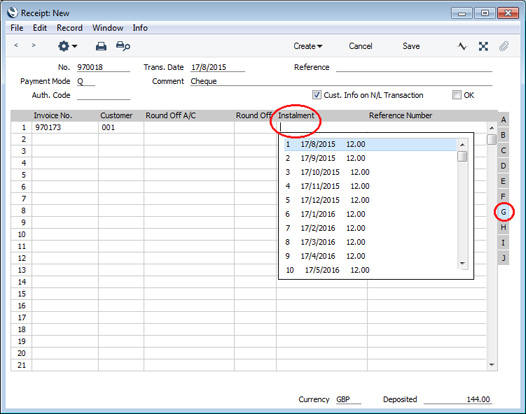
Select the Instalment being paid: the open value of the Instalment will be copied to the Received Value field (in a Receipt) or to the Sent Value field (in a Payment). If you did not specify an Invoice Number on flip A in step 8, the Invoice Number and Customer or Supplier information will be brought in as well.
- Mark the Receipt as OK and save in the usual way. The Invoice will be treated as paid to the value of the Instalment, and the Instalment will be removed from the Overview of Instalments report (assuming the full value of the Instalment was paid i.e. that you did not change the Received or Sent Value).
- If you specify an Invoice Number on flip A as described in step 8 and then do not specify an Instalment on flip G, the Invoice will be treated as paid to the value of the Received or Sent Value. By default this will be the full open value on the Invoice and therefore will pay the Invoice in full.
Example - Hotel ReservationsIf you are using the Hotel module, you can use Instalments as already described, but the ability to calculate Instalment dates from Reservation Check In Dates provides extra flexibility.
For example, when you issue Down Payment Invoices for Reservations that are booked in advance, you may want a percentage to be paid immediately (i.e. on or a few days after the Invoice Date) and the remainder to be paid before Check In (i.e. on or a few days before the Check In Date).
To set up such a system, follow these steps:
- Add a new record to the Instalments setting containing the Instalment plan:
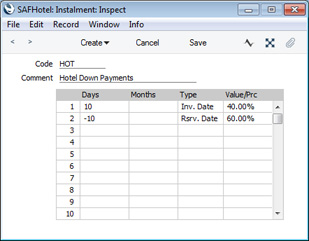
This example will cause two Instalments to be created, as follows:
- The first Instalment for 40% of the Invoice value will become due ten days after the Invoice Date.
- The second Instalment for 60% of the Invoice value will become due ten days before the Check In Date (the Type in the second row is "Rsrv. Date").
Be careful when using an Instalment plan with a negative figure in the Days or Months field in any row. Instalments will not be created correctly if the negative figure means that the Due Date of an Instalment will already be in the past. The Instalment Plan in the example can only be used in an Invoice that will be created ten or more days before the Check In Date, so would be useful in situations where bookings tend to be received well in advance.
If any row in an Instalment record has the Type "Rsrv. Date", you should also be careful only to use that Instalment record in Invoices created from Hotel Reservations. An Invoice that was created in any other way will not be connected to a Hotel Reservation and so will not have a Check In Date. Instalments cannot be created correctly from such an Invoice.
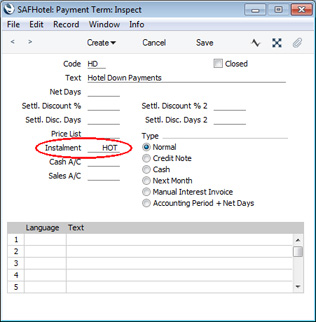
- Assign the Instalment plan to a Payment Term record using the Instalment field. Use 'Paste Special' to ensure you choose the correct one:
- When you create a Down Payment Invoice from a Hotel Reservation, the Payment Term and Down Payment Percentage will be chosen as follows:
- They will be taken from the record for the Customer in the Customer Terms setting in the Hotel module.
- In the case of Online Reservations only, they will be taken from the 'Defaults Online' card of the Hotel Settings setting, also in the Hotel module.
- They will be taken from the 'Other' card of the Hotel Settings setting.
- They will be taken from the Down Payments setting in the Sales Orders module.
As the example Instalment plan contains a row in which the Type is "Rsrv. Date", it should not be specified in the Down Payments setting, as from there it could be used in Down Payment Invoices that are not related to Hotel Reservations. So, in this example we will specify the Payment Term and the Down Payment Percentage on the 'Other' card of the Hotel Settings setting:

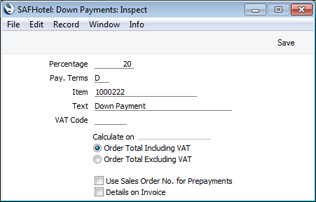
- Although we will not use the Payment Term specified in the Down Payments setting, we should still use that setting to specify the Down Payment Text and the Down Payment Item that will supply the Sales Account and the VAT Code:
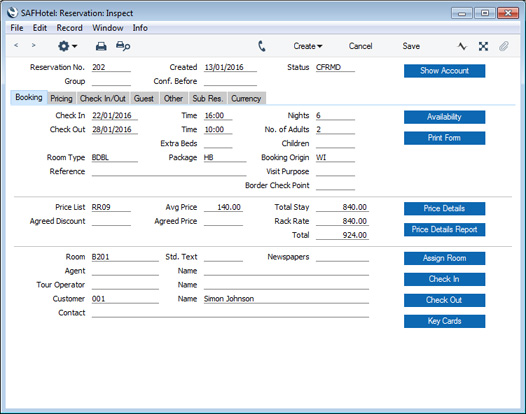
- Create the Reservation and save:
- Create the Down Payment Invoice by choosing 'Down Payment' from the Create menu (Windows/Mac OS X) or + menu (iOS/Android). A Down Payment Invoice will be created:
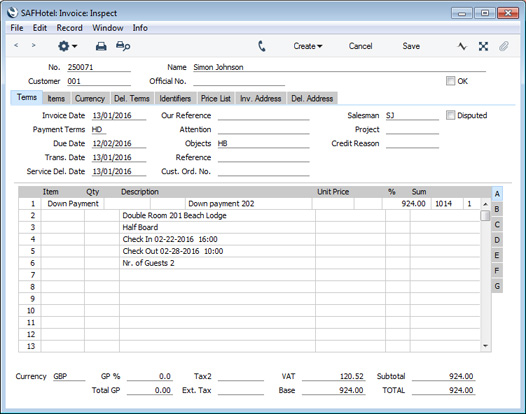
In this example, note that the Invoice Date is about six weeks before the Check In Date. This means there is sufficient time for the Instalments to be created correctly. The Description, Sales Account and VAT Code in the Down Payment row are as specified in the Down Payments setting (step 4).
- Mark the Invoice as OK and save.
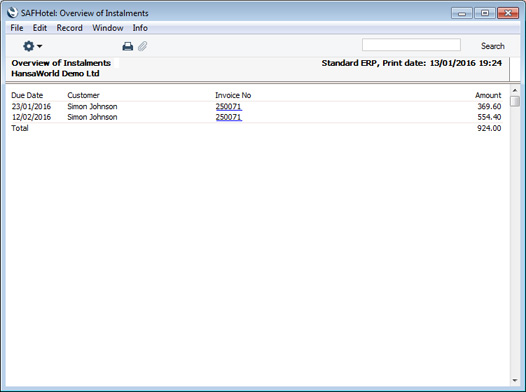
- The Overview of Instalments report lists the two Instalments, dated ten days after the Invoice Date and ten days before the Check In Date:
---
Settings in the Sales Ledger:
Go back to:
|