Installation - Multi-user
This page describes how to create a multi-user Standard ERP installation. Please refer
here for details about creating a single-user installation.
---
In a multi-user Standard ERP installation, you can locate the server application and database in one of three places:
- In the HansaWorld cloud.
- In a non-HansaWorld cloud.
- On your premises.
In all three cases, you will control the server remotely from a web page known as your
MyStandard page. This allows you to control the server wherever you are from any device. If your server is located in the HansaWorld cloud, it will be connected to your MyStandard page automatically. If your server is located in a non-HansaWorld cloud or on your premises, you will need to install a "
Cloud Node" on the server machine to connect it to your MyStandard page. Through your MyStandard page, you will be able to start, stop and restart your server on demand, resolve server issues, manage recoveries and routine backups, securely store important files on your own cloud drive and ensure the version of Standard ERP is always up to date. The MyStandard page is described in more detail
here.
After installing the server application, the next step will be to create and configure a new database. This process will depend on where the server will be located. If your server will be located in the HansaWorld cloud, it will be installed for you by your HansaWorld partner or by us at HansaWorld. Please refer to the links at the end of the page for the steps that you should follow after your server has been installed. The remainder of this page will outline the steps that you need to follow to install your server in a non-HansaWorld cloud or on your premises.
The Standard ERP server application is available as a command line application (for Linux and macOS) or a service (for Windows) version of Standard ERP as your server application. These versions do not have graphical interfaces. This allows their speed to be optimised, and also reduces the risk of users causing them to quit accidentally.
It is recommended that you use the Standard ERP client application (with graphical user interface or GUI) to create a new database and carry out the initial configuration work described in this manual, effectively working single-user. When you have completed the configuration work, you can then open the new database using the command line or service applications (depending on platform), making it available to the network and allowing users to log in. You can do this as follows:
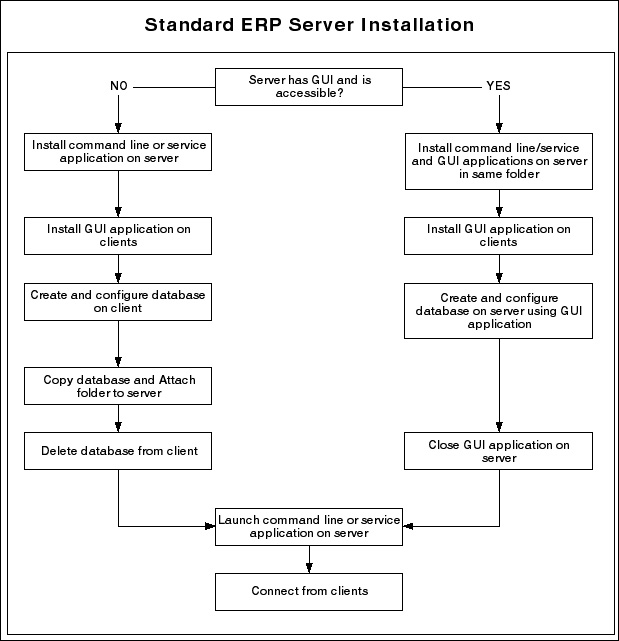
- If the server machine has a graphical interface and is accessible, you can install both the GUI and command line or service versions of the application in the same folder on the server. Use the GUI application to create the database and carry out the initial configuration work. When you are ready to make the database available to the network, close the GUI application and start the command line or service application. Because both applications are in the same folder, they will both automatically open the same database.
- If the server machine does not have a graphical interface and/or is not accessible (e.g. it is in the cloud), you should install the command line or service version of the application on the server remotely. Using the GUI application on a local machine, create the database and carry out the initial configuration work. When you are ready to make the database available to the network, copy it to the folder on the server containing the command line or service application. The file that you should copy will be named "HANSA.HDB". You should also copy the "Attach" folder if you added any Attachments. Then, remove the database from the local machine or at least move it out of the folder containing the GUI application. This will prevent the possibility of saving data in the wrong database. Finally, start the command line or service application on the server remotely.
The diagram below illustrates these two options:
Proceed as follows:
- Create a network including all the computers and other equipment you are going to use. Use the Windows, macOS or Linux installation tools to install and configure TCP/IP on each machine.
- Click the link to go to our product download website, standardinstall.com.
- Choose your platform, country and product (Standard ERP) from the drop-down menus at the top of the page.
- Download the appropriate versions for your platform and operating system. The versions you should download and install are as follows:
- Standard ERP Server YYYY-MM-DD
- Use as the server application (for Windows, separate downloads are available for 32- and 64-bit machines. .NET Framework 4.7.2 or later must be installed)
- Standard ERP YYYY-MM-DD
- Use as the client application. Also use as a GUI application (i.e. application with graphical user interface) on the server for initial configuration work only
- For Windows, the server version of the Standard ERP application is a service. A service is an application that runs in the background with no user intervention. Services are usually launched automatically when the server starts up.
The server application is supplied as an installer file. Launch the installer by double-clicking, and follow the instructions on screen. The installer will install the application as a service, so that it appears in the services registry..
- If your server is a macOS machine, the command line application is supplied as a .dmg file. Open the .dmg file by double-clicking, and then copy its contents to the 'Applications' folder on your server.
- If your server is a Linux machine, install the appropriate command line application as described on the Linux Server Installation page.
- For all platforms, if the server machine has a graphical interface and is accessible and you want to create your database and carry out the initial configuration work using that machine, install the relevant GUI version of the application in the same folder or directory as the command line or service application. To do this, follow the procedure described on the Single-user page.
- Install the relevant GUI versions of Standard ERP on each of the client machines, again as described on the Single-user page.
Having successfully installed Standard ERP, follow these steps to create the new database and carry out the basic configuration that is needed to get started:
See also:
---
Go back to: