Creating a New Database - Single-user
This page describes creating a new Standard ERP database for use in a single-user environment.
---
To create a new single-user database, follow these steps:
- Ensure there is no database file with the name "HANSA.HDB" in the folder containing the Standard ERP application, then launch the application by double-clicking. A new database will be created automatically.
The "DBDEF.TXT" and "DEFAULT.TXT" text files must be present in the same folder as the application when you create a new database. Standard ERP will use these files to set some initial preferences in the new database.
! | The installation will not be correct if the "DBDEF.TXT" file is missing. |
|
- The 'Welcome to Standard ERP' window will appear, asking you how you want to use the application:
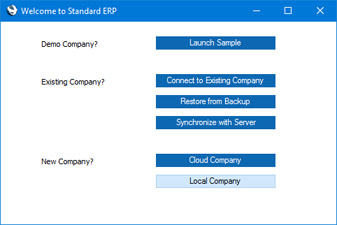
Click the [Local Company] button if you are starting Standard ERP for the first time, or the [Restore from Backup] button if you have already been using Standard ERP and you need to import a back-up file to a new database. The first option is described here: for details of the second, please refer to the Restoring from a Back-up page.
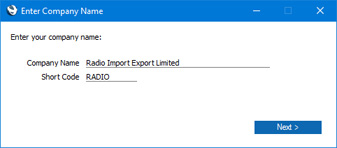
- The 'Enter Company Name' window will appear, asking for your company name. Enter your company name and a shortened version of it (up to ten characters), then click the [Next] button.
- The 'Set up User' window will be opened. Here you can enter your personal details, to create a User Account for yourself. You must enter your Signature, Full Name and Email Address before you can progress to the next step, but the other information is optional. You can use your initials or other abbreviation of your name as the Signature, and the Email Address will become your StandardID. Whenever you log in to your Standard ERP system, you will be able to do so using your Signature or your Email Address (StandardID). You will also be able to log in to other HansaWorld services (such as the support forum) using your StandardID.
When you enter the Email Address and either change to another field or click the [Finish] button at the bottom of the window, the Email Address will be checked to see if it has already been used as a StandardID. If it hasn't, two fields will be added to the window allowing you to specify a password. The password must contain at least eight characters. You will be able to use the password when logging in using your Signature and when logging in to any HansaWorld service using your StandardID. If the Email Address has already been used as a StandardID, the password fields will not appear because you will be able to use its existing password.
Note that if you are using Windows, you cannot include special characters such as *, å, ä, ö in passwords.
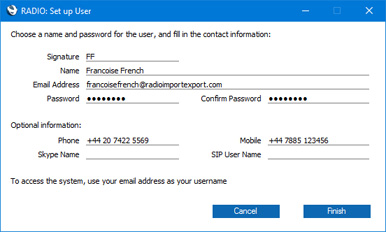
When you click the [Finish] button, your User Account will be created.
- The 'Login' window will appear, with your Signature already entered:
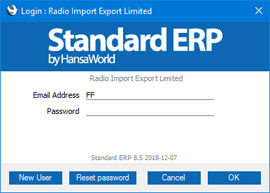
Enter your Password and click [OK].
- If you specified an Email Address that has not previously been used as a StandardID, an email address validation mail will be sent to the address that you specify.
When you receive the email address validation mail, click the link in the mail or copy it to a browser window to confirm that the email address is valid.
- You will be asked if you want Standard ERP to remember your Signature and Password, so that you do not have to enter them yourself each time you log in.
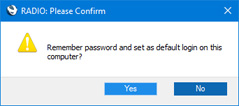
Bearing in mind that logging in is a security feature, it is recommended that you only click the [Yes] button if you are absolutely sure no-one other than yourself will have access to your computer. If you click the [Yes] button and then change your mind, you can turn off the feature by choosing 'Stop Auto Login' from the File menu.
- The Navigation Centre will appear, with your name shown in the title bar. This is illustrated on the Work Area page.
- Refer to the following pages to prepare the database for work:
---
Go back to: