Balance Sheet - Defining
Before producing a Balance Sheet for the first time, you should define the structure of the Balance Sheet to suit your requirements. The following example illustrates the set-up process.
A file containing an example Balance Sheet definition is supplied with Standard ERP. If you want to use this example as a template for your own definitions, import the relevant file (named "UKACCS1.TXT" in the UK) as described on the Importing Sample Data page.
To set or change the report definition of the Balance Sheet, ensure you are in the Nominal Ledger, click the [Settings] button in the Navigation Centre and double-click 'Report Settings' in the subsequent list. Then, double-click 'Balance Sheet' in the list on the left-hand side of the 'Report Settings' window (or highlight it and click the [Definition] button). The 'Balance Sheet Report Definition: Inspect' window will be opened.
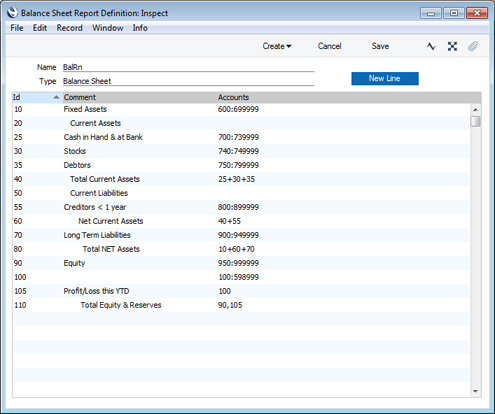
The window shows the Balance Sheet row by row, as it has been presented up to now.
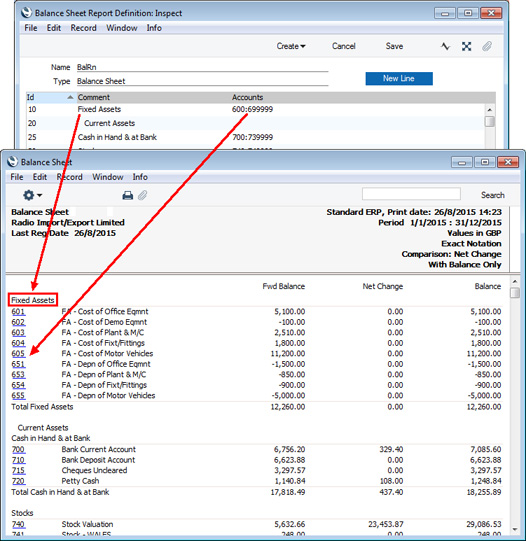
Each row in the definitions list will cause a section to be printed in the Balance Sheet, as shown in the illustration below:
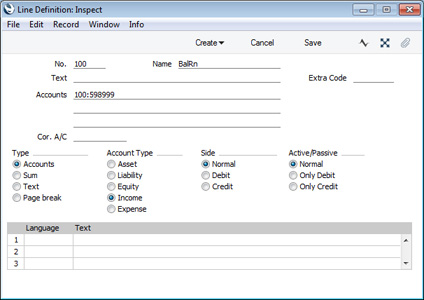
A row in the definitions list is sometimes known as a "Line Definition". To insert a new Line Definition, click the [New Line] button. To open and edit an existing Line Definition, double-click the row in the definitions list. To duplicate a Line Definition, open it from the list and then select 'Duplicate Line Definition' from the Create menu (do not highlight it in the list and select 'Duplicate Balance Sheet Report Definition' from the Create menu because then you will duplicate the entire report definition, not just the line). In all cases, the 'Line Definition' window will open:
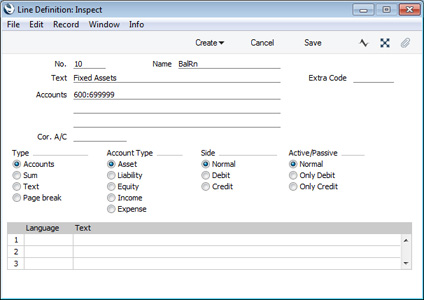
The example Line Definition illustrated above will cause the Account Number, Name and balance of a range of Accounts to be printed in the Balance Sheet, as follows:
- No.
- As well as acting as the unique identifying code for each row in the Balance Sheet, the No. determines the order in which the rows will be printed in the report. When entering rows, it is recommended that you leave gaps in the numbering sequence, so there is room to insert new rows later.
- Text
- This Text will be printed in the report as a heading.
- You can use the grid in the lower part of the window to enter various translations of this Text. Specify a Language in the first column using 'Paste Special' if necessary, and the appropriate translation in the second column. There is no need to enter a row for your home Language. When you print the report, you will be able to specify which Language is to be used.
- Accounts
- Paste Special
Account register, Nominal Ledger/System module
Enter an Account or a range of Account numbers separated by a colon (:). The Account Number, Name and balance of every Account in this range will be printed in the Balance Sheet, under the heading specified in the Text field. An alpha sort is used so, in the example illustration above, "600:69999" effectively means that all Accounts whose first digit is "6" will be printed in the report.
The Accounts field consists of three rows, with room for a definition 300 characters long. As well as specifying a single Account or a range of Accounts, you can also specify a number of individual Accounts, or ranges of Accounts, separated by commas. If you enter a range of Accounts with the highest number first, the Accounts in that range will be presented in reverse order. For example, the sequence "605:601,626,651:655" will appear as follows in the printed report:
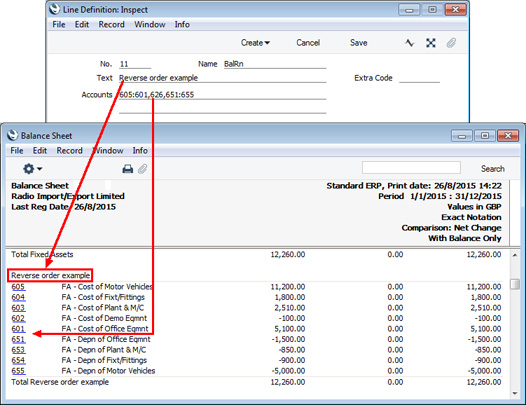
In this example, the "Reverse order example" heading was taken from the Text field in the Line Definition.
- Type
- Choose the "Accounts" option to signify that each of the Accounts in the range will be printed individually in the report. After the last Account in the group, a total for the range will be printed.
- Account Type
- Choose the Account Type. This will connect the Line Definition with the Presentation of Balances setting, which controls whether figures and balances will be treated in reports as positive or negative depending on the Account Type. For example, if you select "Asset" as the Account Type, the Line Definition will obey the Assets check box in column 1 in the Presentation of Balances setting.
- Side and Active/Passive
- These options are described on the Special Features of the Balance Sheet page.
- Extra Code
- This field is used in Russia where the Balance Sheet is printed using a standard report design that includes line numbers: use this field to specify the correct line number for this row of the report. The Extra Code will only appear in the report when you produce it using the No Comparison option.
- Cor. A/C
- Paste Special
Account register, Nominal Ledger/System module
- This field is only used in the Profit & Loss report, not the Balance Sheet (you will use the same 'Line Definition' window when defining both reports).
- If you specify an Account as the Cor. A/C in this field, the report will show the balance posted to the Accounts specified above where the Cor. A/C is the balancing Account. For example, if you have entered "100:199" in the Accounts field above and "720" as the Cor. A/C, the report will print the total amount posted to the Accounts 100:199 where Account 720 is the balancing Account.
The next example Line Definition will add the results of previous Line Definitions together and print the result:

- Type
- Choose the "Sum" option to signify that the line in the report will add the total values from previous lines in the report together and print the result on a separate line. In this case, the result will be printed under the heading " Total Current Assets" (from the Text field).
- Accounts
- Since the Type is "Sum", use the Accounts field to specify the line numbers (25+30+35) whose total values are to be added together. Do not enter Account Numbers in the three Accounts fields if the Type is "Sum".
- Account Type
- Again these options control the presentation of the total figure when printed in the report (positive or negative).
The Text field in the next example Line Definition (illustrated below) is empty. As the Type is "Accounts", this means that the line will not be printed in the report. If this line had some Text, it would cause the balances of every Account between 100 and 599999 to be listed in the report, followed by the total balance for that range of Accounts. As there is no Text, the processing will still take place (i.e. the total balance for that range of Accounts will still be calculated), but this processing will effectively be hidden as nothing will be printed.
The next line (105) will print the total balance figure that was calculated by line 100:

Taken together, lines 100 and 105 will print the total balance for Accounts 100:599999 without listing those Accounts individually. Since these are the Income and Expense Accounts, this is appropriate for the Balance Sheet.
If the Type in a Line is "Text", then you can leave the Text field empty. This will cause a blank line to be printed in the report. This can be useful if you want to insert spaces between sections in the report.
When you have finished with the last row, if you want to save your changes, click [Save], or else close the window with the close box. Then, close the list of definitions using the close box once again.
The new Balance Sheet report is now ready to print.
! | A standard Chart of Accounts and a set of Report Definitions are supplied with Standard ERP. This is a well-structured Chart, with systematic groupings of Accounts. It is suitable without any changes for most small or medium companies, but it is also easily modified by you or your financial adviser. |
|
If you stay within the structure of the Chart (e.g. avoid putting Liability Accounts among the Assets!), there is no need to alter the definitions. But remember, it is a good idea to print a test Balance Sheet to see if your definitions produce exactly what you expect.
Deleting a line from the Balance Sheet
- Ensure you are in the Nominal Ledger, then open the 'Settings' list window and double-click 'Report Settings' in the subsequent list. Then, double-click 'Balance Sheet' in the list on the left-hand side of the 'Report Settings' window (or highlight it and click the [Definition] button).
The 'Balance Sheet Report Definition: Inspect' window is opened.
- Double-click the line you want to remove, to open its definition window.
- Select 'Delete' from the Record menu. The line will be deleted from the Balance Sheet and you will be returned to the 'Balance Sheet Report Definition: Inspect' window.
! | You cannot undo the deletion of a row in the Balance Sheet. |
|
---
Please click for details about:
---
Reports in the Nominal Ledger:
---
Go back to: