Updating to New Versions of Standard ERP - Updating Clients Automatically
When you update to a new version of Standard ERP, you should ensure that you are update to the same new version on the server and on all client machines. If you have many client machines in your network, updating them manually can be a laborious job. To make this task easier, you can use the auto update feature that will cause the version on the client machines to be updated automatically the next time they connect to the server.
To configure the auto update feature, follow the steps below. If you updated your server application to the new version as described here, the auto update feature will already have been configured for Windows .NET and Mac OS X clients. If these are the only clients you are using, ignore steps 1-8 and proceed to step 9.
- Set up a new Standard ERP installation on a client machine, with no database (no .hdb file). Create a folder or directory named "clientmp" and place it in the folder containing the Standard ERP application.
- Inside "clientmp", create one sub-folder or sub-directory for each client platform that you need, as follows:
| Folder | For Client | Application Name |
| books | Books Mac | Books.app |
| hansaraamaosx | HansaRaama Mac (only used in Estonia) | HansaRaama.app |
| hansaraamawin | HansaRaama Windows (only used in Estonia) | HansaRaama.EXE |
| hansaraamawindowsnet | HansaRaama Windows .Net (only used in Estonia) | HansaRaama.EXE |
| linuxxt | Linux XT | HansaWorld |
| linuxwine | Linux Wine | HansaWorld.EXE |
| macosx | Mac OS X | HansaWorld.app |
| win98 | Windows 98/NT | HansaWorld.EXE |
| wince | Windows CE | HansaWorld.EXE |
| windows | Windows 2000/XP | HansaWorld.EXE |
| windowsnet | Windows .Net | HansaWorld.EXE |
- Copy the following files into the sub-folders or sub-directories from step 2:
- The "DBDEF.TXT" and "DEFAULT.TXT" files;
- The new version of the relevant Standard ERP application for the operating system. This must be named as shown in the list in step 2 (the names are case-sensitive). Depending on how you have configured your operating system, the file extensions may not be visible.
- The new "Hob" folder (which should contain the "serverip.dat" file from step 1, as this will ensure you don't need to repeat step 1 each time you update); and
- (optionally) a file named "AUTOUPDATEIMPORT.TXT", which can contain information that will be imported to each client database.
- The "windowsnet" folder should also contain the following files: "Boo.HtmlEditor.Shared.dll", "ColorPicker.dll" and "HtmlAgilityPack.dll".
- Create a folder or directory named "clients" in the folder containing the Standard ERP application that you are using.
- Start the Standard ERP application and change to the Database Maintenance module. To gain access to the Database Maintenance module, grant yourself full access to it in your Access Group and log in again.
Run the 'Create Autoupdate Clients' Maintenance function:
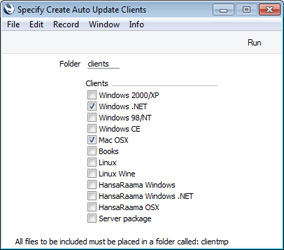
Tick the Client options that you need (each option should have its own folder as listed in step 2), specify the Folder (if different to step 4) and click the [Run] button.
The Maintenance function will create separate .ha files for each Client option, saving them in the "clients" folder (for example, "windows.ha", "windowsnet.ha" and "macosx.ha").
- Open the 'About' window from the Info menu (Windows) or the Standard ERP menu (Mac OS X) and make a note of the build number. You can also copy the build number from the log file (a line containing the version and build such as "8.0 2015-07-19 (build 80020801)" will have been written to the log file in step 5).
- On the server machine, create a folder or directory named "updateclients" in the folder containing the Standard ERP server application.
- Copy the .ha files from the "clients" folder into the "updateclients" folder created in the previous step.
- Update your Standard ERP server application to the new version as described here, and then launch this application as normal.
- Log in from a client using the new version and change to the Technics module. To do this, you should be working on a client and you should have logged in as a system administrator (i.e. as a Person that has access to the Technics module) as described here.
Open the Available Client Version setting in the Technics module:
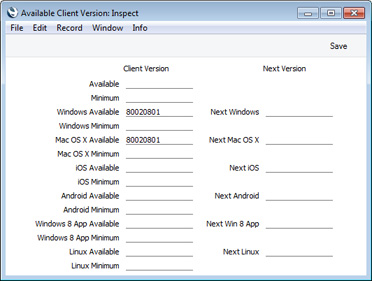
If you updated your server application to the new version as described here, the auto update feature will automatically have been configured for Windows .NET and Mac OS X clients. As a result, the Mac OS X Available and Windows .NET Available fields will already be filled in with the relevant build number, as shown in the illustration. You may see a different build number than the one in the illustration (build 80020801 refers to version 8.0 150719: each dated version has its own build number).
If you have clients on other platforms and have created .ha files for those platforms, you can either enter the Build number of the server application in one or both of the top two fields (Available or Minimum), or you can enter it in the specific field(s) for the platform(s). Use the build number from step 6.
When a client logs in using a version that is earlier than the one specified in these fields, the client will be asked to update. If the client version is earlier than the Minimum version, the update will be mandatory (i.e. the new version is the minimum that can be used). If the client version is earlier than the Available version, the update will not be mandatory (i.e. the new version is the latest one available).
The top two fields set an overall default that you can override using one of the specific platform fields. For example, if you specify an Available version and a Mac OS X Available version, the Available version will be used for all platforms except Mac OS X. Usually it is recommended that every client use the same version so using the top two fields will be sufficient (and using the Minimum field (mandatory updates) will also help with this aim).
If the new version contains structural changes compared to the old, the update will be set as mandatory automatically, irrespective of whether you used the Minimum or Available fields.
It is now possible for the clients to log in, as follows:
- On a client machine, launch the old Standard ERP client application.
- After choosing the company, you will be told that a newer client is available, and whether the update is mandatory:
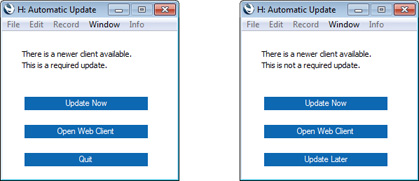
- Click the [Update Now] button. Your client application will be updated, as follows:
- Your client database will be backed up;
- The new client application, "Hob" folder and any other files will be downloaded to your client folder;
- The old client application, "Hob" folder, database and other files will be moved to a folder named "oldver"; and
- The new client application will be launched and the client text back-up imported.
- The [Open Web Client] button will open a new tab in your default browser that will connect to your server. Please refer to the 'Allowing Logging in from a Browser (Web Client)' section on the Program Mode page for more details about the Web Client.
- Log in as normal.
In this process, the new client application will be transferred to the clients via TCP/IP. In some cases (e.g. if the client version is much older than version 7.1), the transfer may fail. If so, an alternative method is to transfer the new client application to the clients through the Web Port. Follow these steps:
- Log in to your main server from a client and change to the Technics module. To do this, you should be working on a client and you should have logged in as a system administrator (i.e. as a Person that has access to the Technics module) as described here.
- Check the Web Port by opening the Program Mode register in the Technics module and going to the 'Web' card. If you need to specify a Web Port on the server or change the one that is there, you will need to restart the server for the change to take effect. Typical Web Ports are 1080 and 8033.
- Create a text file named "serverip.dat" that contains the server's IP address and Web Port in the following format, on a single line:
- IP address:web port
Note: do not place any carriage returns or any other characters after the port.
- Place the "serverip.dat" file in the "Hob" folders on every client.
- Follow steps 1-6 above to create .ha files for the platforms that you need.
- On the server machine, create a folder or directory named "web" in the folder containing the Standard ERP server application.
- Copy the "clients" folder (from step 4) into the "web" folder created in the previous step.
- Follow steps 9-10 above on the server and steps i-iv on each client.
---
In this chapter:
Go back to: