Key Financial Ratios - Example - Adding Columns to the Report
This page describes adding columns to a Key Financial Ratios report. Please refer
here for descriptions of the commands you can include in a Key Ratios report definition.
---
If you have many Key Ratios, listing them with various periods as described in the previous example might result in a long report in which comparison between the various periods is not easy. An alternative is to add column definitions to the report. This will allow you to display information from different periods in columns.
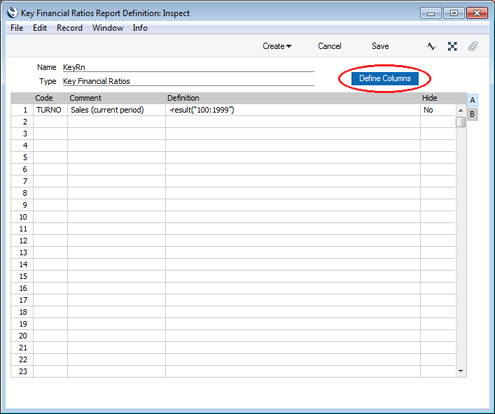
To add column definitions, click the [Define Columns] button in the 'Key Financial Ratios Report Definitions' window (in this illustration we have removed rows 2-4 from the previous example as they are no longer needed):
The 'Column Definition: New' window opens:
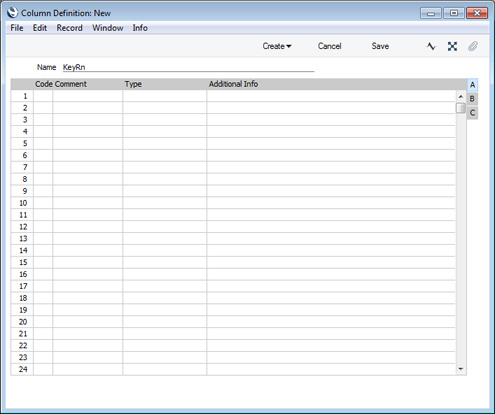
Most of the 'Column Definition: New' window is taken up by a matrix. Each row in the matrix will cause a separate column to be printed in the Key Financial Ratios report.
In its standard form and as shown in the illustrations so far, the Key Ratios report will contain three columns: the Code, Comment and Value columns. When you use the 'Column Definition' window to add columns to the report, you should first add three columns to represent the three that are already there:
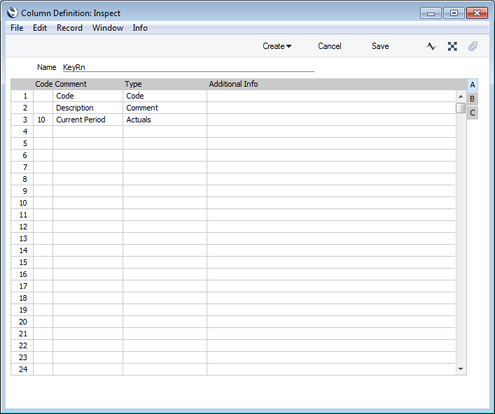
For each column, enter the following information:
- Code
- Enter a Code for each column. There's no need to specify a Code if the Type (below) is "Code" or "Comment", but you must do so otherwise. If the columns in a report all contain the same figures or do not contain any figures at all, the probable reason is that the columns do not have Codes.
- Comment
- Enter the column heading of each column here.
- Type
- Paste Special
Choice of possible entries
The column type will determine what will be printed in the column, as follows:
- Code
- The Key Ratio Code (i.e. the Code in the row in the 'Key Financial Ratios Report Definitions' window) will be printed.
- Comment
- The Key Ratio Comment will be printed.
- Actuals
- Figures calculated using the Key Ratio formula will be printed.
- Columns Sumup
- Allows you to apply mathematical operations to values in previous columns (e.g. to add the values in various columns together, to subtract the value in one column from the value in another, or to express the value in one column as a percentage of the value in another). Enter the mathematical operation in the Additional Info field to the right using the format column("Code") (e.g. column("10")+column("20")+column("30"), column("10")-column("20"), column("10")/column("20")*100).
- Budget
- Budget figures for the Account(s) used in the Key Ratio formula will be printed.
- Revised Budget
- Revised Budget figures for the Account(s) used in the Key Ratio formula will be printed.
- Purchase Order Commitments
- Will print the total value of open Purchase Order rows in which the Purch. A/C is one of the Accounts used in the Key Ratio formula. An open Purchase Order row is one where the Recvd. OK figure is less than the Qty (i.e. you have ordered but not yet received the Items). Only rows in Purchase Orders that have been marked as OK and that are not Closed will be included.
- For example, if the Key Ratio formula is RESULT("820") and there is an open Purchase Order row in which the Purch A/C is 820, the value of this row will be included in the column figure.
- Goods Receipt Accruals
- Will print the total value of uninvoiced Purchase Order rows in which the Purch. A/C is one of the Accounts used in the Key Ratio formula. An uninvoiced Purchase Order row is one where the Invoiced figure is less than the Recvd. OK figure (i.e. you have received the Items but not yet been invoiced for them). Only rows in Purchase Orders that have been marked as OK and that are not Closed will be included.
Some of the Type options will be described in more detail later in this example.
This is the report that will result from the columns shown defined in the previous illustration:
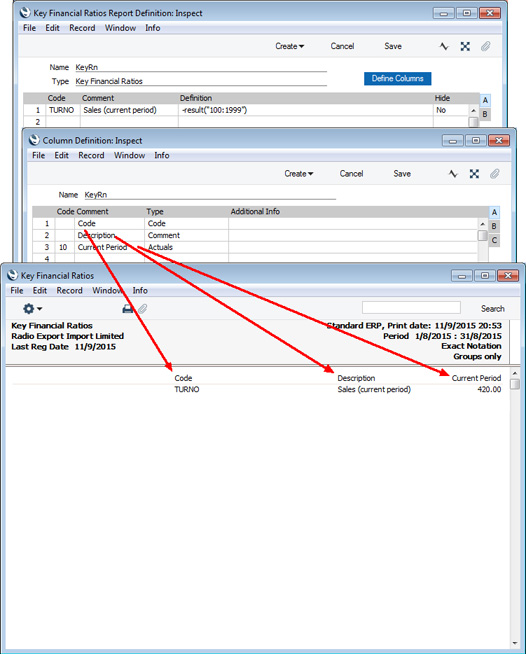
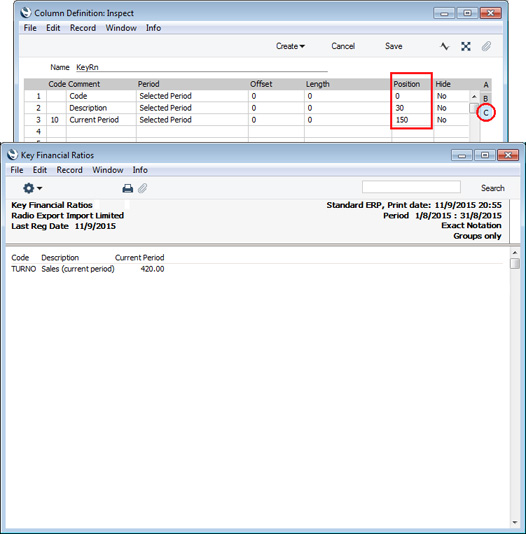
By default, the page will be right-justified, with the last column (row 3 in the example definition) being placed on the right-hand side of the page. To move the columns to the left-hand side of the page and adjust the column widths, go to flip C in the 'Column Definition' window and use the Position field. You can enter the following special values in this field:
- 0
- The column will be placed on the left-hand side of the report.
- 1
- The column will be placed on the right-hand side of the report.
Otherwise, enter a value between 20 and 480 to locate the column precisely in the report.
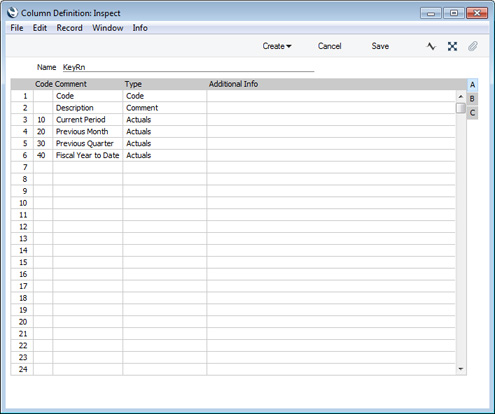
To add more columns, enter a Code and Comment for each new one and choose a Type using 'Paste Special'. In this example we need the report to display sales figures for various periods, so we've set the Type to "Actuals" in each case (meaning that the figures will be calculated using the Key Ratio formula i.e. the formula in the row in the 'Key Financial Ratios Report Definitions' window):
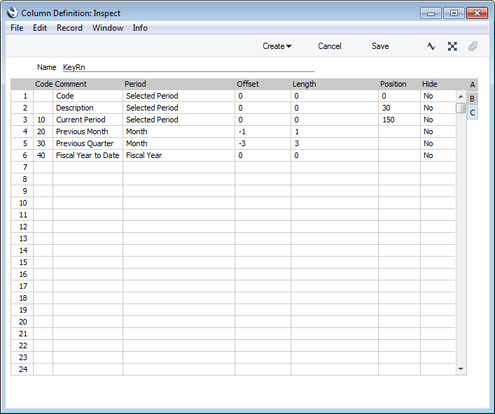
On flip C, use the Period, Offset and Length fields to specify the periods for each column. Use these fields in the same way as the similar fields on flip B of the 'Key Financial Ratios Report Definitions: Inspect' window (described on the
Example page). Again, you can choose the Period using 'Paste Special': the options are the same as previously described, with the exception that the first option is named 'Selected Period'. This means that the period will be taken from the report specification window. Also as in the 'Key Financial Ratios Report Definitions' window, you can hide a particular column if necessary.
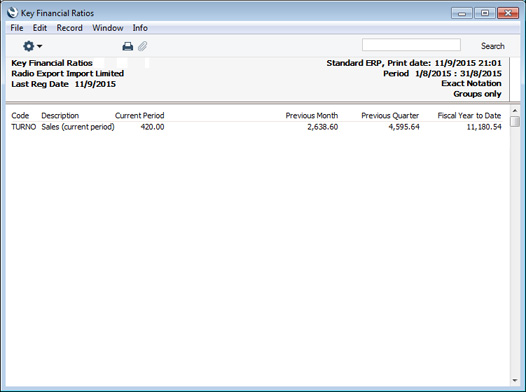
This is the resulting report (in the example we did not use the Position field for the new columns so they are right-justified):
If we now add a second Key Ratio in the 'Key Financial Ratios Report Definitions' window, the columns will be applied to the new Key Ratio automatically:
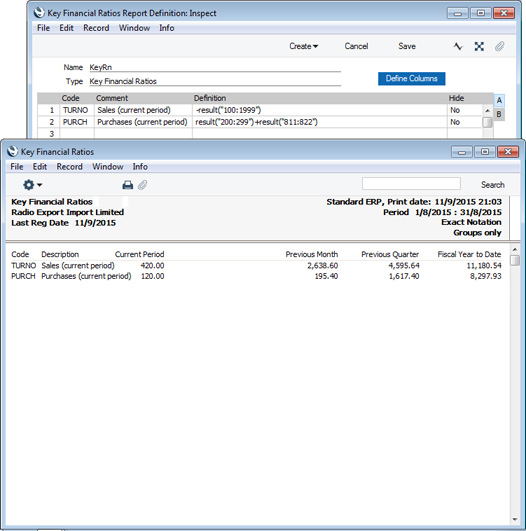
The report now displays actual figures for four different periods. As well as columns displaying actual figures, you can add columns displaying Budget and Revised Budget figures. In the next example, we've added a column in that will display Budget figures (the Type is "Budget"). A column displaying Revised Budget figures would be similar, except the Type would be "Revised Budget".
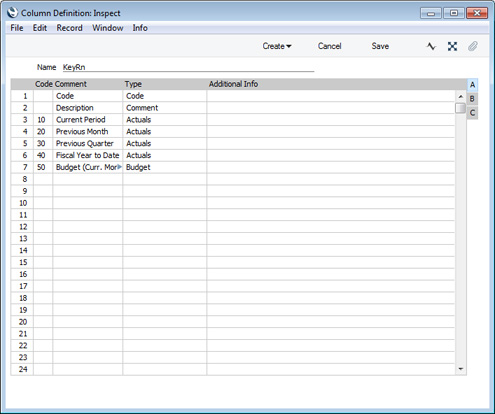
As the first Key Ratio is -RESULT(100:1999), the Budget column will display the total Budgeted amount for all the Accounts in the range 100:1999. For the second Key Ratio, the Budget column will similarly display the total Budgeted amount for Accounts 200:299 and 811:822.
The Period on flip C of the Budget column definition is "Selected Period", so the total Budgeted amounts will be calculated from Budget rows with dates falling in the period in the report specification window. For example:
- If you have monthly Budget figures and the report period is one month, the Budget figure for that month will be included in the report.
- If you have quarterly Budget figures and the report period is one month, a pro rata amount calculated from the Budget figure for the relevant quarter will be included in the report.
You can add columns displaying Budget or Revised Budget figures for different periods, using the Period, Offset and Length fields on flip C as described above.
This is the resulting report:
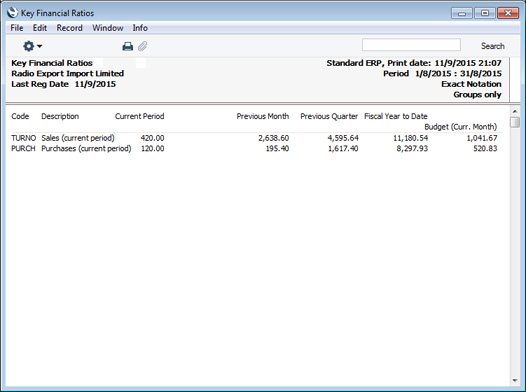
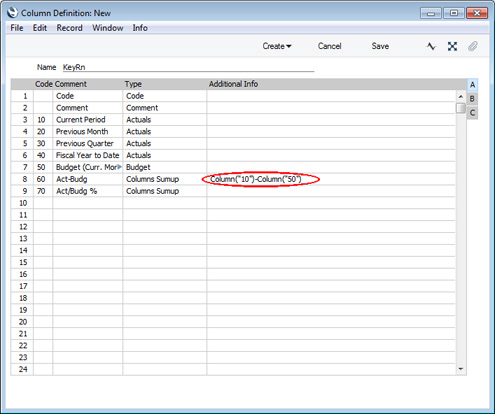
So far, the columns in the example have all printed information extracted from the database. You can also add columns that will display figures calculated from those in previous columns. To do this, add a column in which the Type is "Columns Sumup" and enter the calculation formula in the Additional Info field. In the formula, the syntax for referring to previous columns is COLUMN("CODE"), where "CODE" is the Code of the column you are referring to.
In the example illustrated below, we've added two columns comparing actual and Budget figures. In the first one (row 8), the formula is:
- COLUMN("10")-COLUMN("50")
This will subtract the Budget figure from the actual figure for the current month. The second column will display the actual figure as a percentage of the Budget:
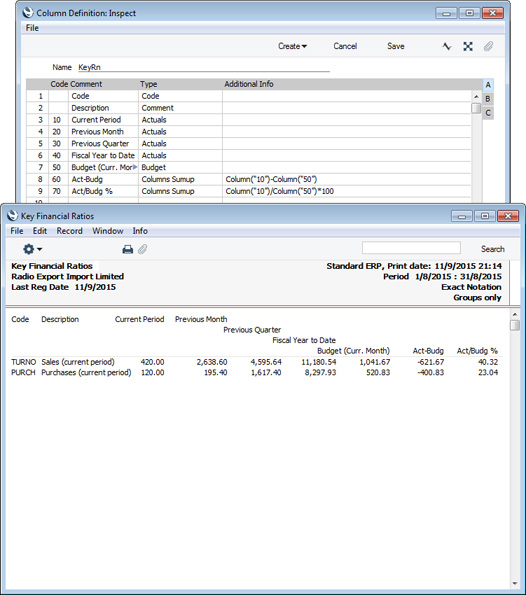
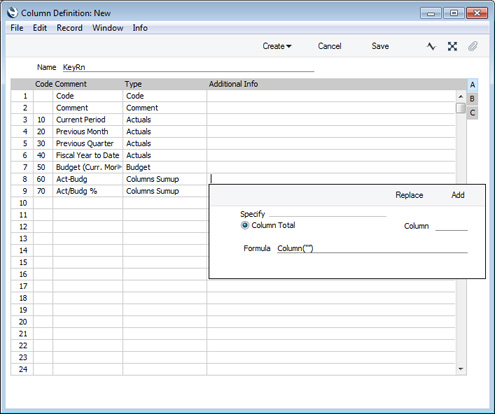
When you need to enter a calculation formula in the Additional Info field, you can type it directly into the field, or you can use the Assisted Formula Entry feature to have the formula constructed for you. This feature will be helpful when you don't remember the correct syntax.
To use the Assisted Formula Entry feature, follow these steps:
- Simply activate 'Paste Special' from the Additional Info field in the relevant row:
- Enter the Code of the previous column in the Column field:
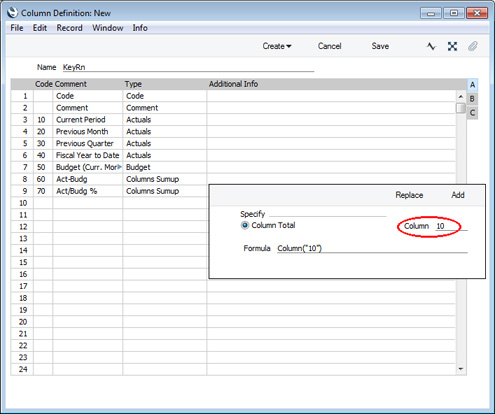
- Then click the [Replace] or [Add] buttons as follows:
- Replace
- The new formula will be placed in the Additional Info field, replacing what was previously there.
- Add
- The new formula will be placed in the Additional Info field, in addition to what is already there.
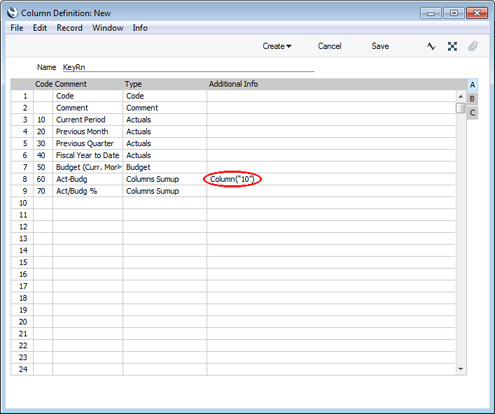
- Type a mathematical operator in the Additional Info field.
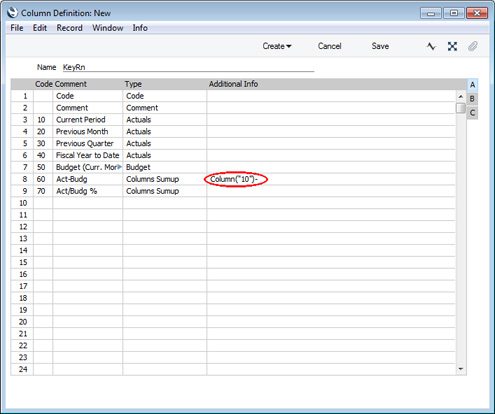
- Type in a second column reference or open 'Paste Special' once again, enter a Column Code and click the [Add] button to have the column reference added to the formula.
Please click the following links for more information about columns in Key Ratio report definitions:
---
Pages describing the Key Financial Ratios report:
---
Reports in the Nominal Ledger:
---
Go back to:
