Leave Transfers
If you are not using the
Automatically Transfer Holiday Balance to next Year option in the
Leave Settings setting, Employees will not be able to transfer any unused holiday allowance to the next year. If an individual Employee needs to transfer some or all of their unused allowance to the next year, they can use the Leave Transfers setting to create a Leave Transfer record, specifying how many days are to be carried forward.
Note that the Leave Transfer record does not have a Leave Type field. The number of days to be carried forward will be applied to all Leave Types in an Employee's Leave Scheme.
To open the Leave Transfers setting, first ensure you are in the Human Resources Management module. Then, if you are using Windows or Mac OS X, click the [Settings] button in the Navigation Centre or use the Ctrl-S/⌘-S keyboard shortcut and then double-click 'Leave Transfers' in the 'Settings' list. If you are using iOS or Android, select 'Settings' from the Tools menu (with 'wrench' icon) and tap 'Leave Transfers' in the 'Settings' list. The 'Leave Schemes: Browse' window will open, listing the Leave Schemes that you have previously entered.
To enter a new Leave Scheme, select 'New' from the Create menu (Windows/Mac OS X) or the + menu (iOS/Android) in the Button Bar. The 'Leave Scheme: New' window appears: complete the record as described below the picture and click [Save] (Windows/Mac OS X) or tap √ (iOS/Android) to save the new record.
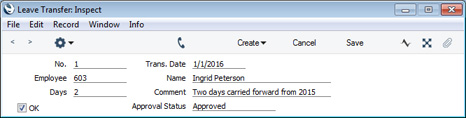
- No.
- Paste Special
Select from another Number Series
- The unique identifying number of the Leave Transfer. The default will be chosen as follows:
- It will be taken from the first valid row in the Number Series - Leave Transfer s setting.
- It will be the next number following on from the last Leave Transfer entered.
You may change the default, but not to a number that has already been used. If you have defined at least one number sequence in the Number Series - Leave Transfers setting, the number you change to must be inside a valid number sequence.
- You will not be able to save a Leave Transfer if the No. does not belong to a valid number sequence. A valid number sequence is one for the period in which the Transaction Date of the Leave Transfer falls and with unused numbers, so this problem will most usually occur at the beginning of a new calendar or financial year.
- If you are working in a multi-user system, the Leave Transfer Number will be assigned when you save the Leave Transfer for the first time, chosen as described above and providing you have not already specified a number yourself.
- Trans. Date
- Paste Special
Choose date
- The date when the Leave Transfer is to take effect. Usually this should be a date at the beginning of the new year, but will default to the date when you saved the Leave Transfer for the first time.
- Employee
- Paste Special
Employees in Employee/Contact register
- Specify here the Employee whose remaining leave is to be carried forward into the next year. Use 'Paste Special' to choose the Employee from the Employee/Contact register.
- Name
- The Employee's Name will be brought in automatically when you enter the Employee Number.
- Days
- Specify the number of days to be carried forward to the next year.
- As the Leave Transfer record does not have a Leave Type field, the number of days that you specify here will be applied to all Leave Types in the Employee's Leave Scheme.
- Comment
- Use this field to record any comment about the Leave Transfer, such as the reason why it was needed.
- Approval Status
- You can use the Approval Rules register in the Business Alerts module to configure an approval process that Leave Transfers must pass through. If you are using such an approval process, this field will display the stage in the process that a particular Leave Transfer has reached.
- If a Leave Transfer needs to pass through an approval process, you will not be able to mark the Leave Transfer as OK until the approval process has been completed.
In brief, the Approval Status of a Leave Transfer can be any of the following:
- Not Required
- The Leave Transfer does not need to pass through an approval process, so the functions listed above will be available immediately.
- Not Requested
- The Leave Transfer does need to pass through an approval process, and you have not yet started that process. To start the process, save any changes and then choose 'Request Approval' from the Operations menu (Windows/Mac OSX) or Tools menu (iOS/Android).
- Pending
- The Leave Transfer has been entered into the approval process, and is waiting to be approved or rejected. If you need to check the progress of the approval process, select 'Leave Transfer Status' from the Operations or Tools menu.
- If the Status of the Leave Transfer is Pending, you will usually not be able to modify it. If you need certain users to be able to modify Pending records, use Access Groups to grant them Full access to the ‘Change Record Header when Approval Status is Pending’ Action.
- Approved
- The approval process has been completed and the Leave Transfer has been approved. You will now be able to mark the Leave Transfer as OK, although this may have been done automatically, depending on how you have configured the approval process.
- Rejected
- The approval process has been completed and the Leave Transfer has been rejected.
Please refer here for full details.
- OK
- When the Leave Transfer has been approved by the Employee's manager, the Employee or the manager should mark it as OK and save. No further changes to the Leave Transfer will be possible.
- You can use Access Groups to prevent certain users from marking Leave Transfers as OK. To do this, deny them access to the 'OK Leave Transfers' Action.
- If you need Leave Transfers to pass through an approval process before you can mark them as OK, you can configure such a process using the Approval Rules register in the Business Alerts module. Please refer to the description of the Approval Status field immediately above for brief details about the approval process and here for full details.
The functions on the Operations menu are described
here.
---
Settings in the Human Resources Management module:
Go back to: