Operations Menu - Payments - Cheque Run
This page describes the 'Cheque Run' function on the
Operations menu in the 'Payments: Browse' window. If you are using iOS or Android, the 'Cheque Run' function is on the Tools menu (with 'wrench' icon). To use this function, you must have activated the Cheques module in your Standard ERP system.
---
The 'Cheque Run' function allows you to connect Payments to unused Own Cheques (in the Own Cheque register in the Cheques module). It will also mark Payments as Ordered and print cheques.
In order to be able to use the 'Cheque Run' function, carry out the following configuration work:
- In the Payment Modes setting, make sure you have at least one Payment Mode for cheque payments. On flip B, the Type must be "Own Cheques".
- In the Banks setting, make sure you have separate records representing each bank where you hold an account.
- Ensure you have designed a Form Template to be used when printing cheques, and that you have connected the Form Template to the Own Cheques form in the Cheques module (using the 'Define Form' function).
Proceed now as follows:
- Remaining the Cheques module, use the 'Create Own Cheques' Maintenance function to create the Own Cheque records to represent the cheques you will issue in payment.
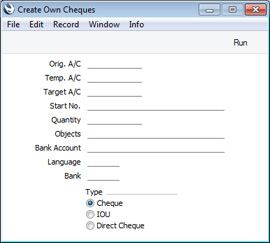
As a minimum, fill in the following fields:
- Target A/C
- Paste Special
Account register, Nominal Ledger/System module
- The Account from where the payments will be issued.
- Start No.
- The Cheque Number to be used in the first Own Cheque.
- Quantity
- The quantity of Own Cheques that you want to create.
- Bank Account
- The account number of your bank account that will issue the cheques.
- Bank
- Paste Special
Banks setting, Purchase Ledger
- The Bank where the account is held.
Press the [Run] button to create the Own Cheque records.
- Create Payment records for the payments that you wish to pay by cheque. Use the Payment Mode from step 1 (i.e. with a Type of "Own Cheques") either in the header of each Payment or on flip C of each Payment row as appropriate. Do not mark the Payments as Ordered or OK.
- Highlight the Payments in the 'Payments: Browse' window and choose 'Cheque Run' from the Operations menu (Windows/Mac OS X) or Tools menu (iOS/Android). If you are using iOS or Android, you can highlight a Payment in the browse window by searching for it. The 'Cheque Run' window will open:
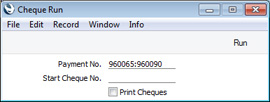
- Payment No.
- Default taken from
Payments highlighted in browse window
- Range Reporting Numeric
- Specify the Payments to which the cheques will be assigned.
- Any Payments in the range that have been marked as Ordered or OK will be ignored by the function.
- Start Cheque No.
- Paste Special
Unused Cheques in the Own Cheque register, Cheques module
- Choose the Cheque Number of the first Own Cheque record to be assigned to a Payment. Note that you should enter a Cheque Number not a Ser. No.
- Print Cheques
- Use this option if you want cheques to be printed immediately.
When you click (Windows/Mac OS X) or tap (iOS/Android) the [Run] button, the following actions will be carried out:
- The Ser. No. of an Own Cheque record will be placed in the Cheque No. field on flip C of each Payment row (providing a Payment Mode of Type "Own Cheques" applies). If a Payment contains more than one row paying the same Supplier, the same cheque will be used. However, if you have used that Supplier again in another Payment, a second cheque will be used.
- Each Payment will be marked as Ordered.
- The Supplier Number, Name and VAT Reg. No., Bank Currency and total Bank Amount will be copied to each Own Cheque record. The Payment Date from the Payment will be copied to the Effect Date field in the Own Cheque.
- If you did not create enough Own Cheques in step 4, some Payments (i.e. those at the end of the range) will not be assigned cheques and will not be marked as Ordered.
- If you selected the Print Cheques option, cheques will be printed using the Form Template assigned to the Own Cheques form.
- If there is a problem printing one of the cheques (for example, there is a paper jam in the printer), open the relevant Payment record and invalidate the affected Payment row(s) (highlight the row number on the left of the matrix and press the Backspace key). When you mark the Payment as OK, the Status of the Own Cheque will be marked as Cancelled, and you can then create a new Payment record to pay the Purchase Invoice again. If you do not want to mark the Payment as OK immediately (because it contains payments to other Suppliers), you can change the Status of the Own Cheque yourself, to remove the risk of using it again (you will need to enter a Reg. Date, change the Status to Issued and save, and then change the Status to Cancelled). If you invalidate the entire Payment (by choosing 'Invalidate' from the Record menu), then the Status of the connected Own Cheque(s) will not be changed to Cancelled because you cannot mark an invalidated Payment as OK. In this case you will need to change the Status of the Own Cheque(s) yourself.
- When you mark each Payment as OK and save it, the Status of the relevant Own Cheques will be changed to Issued (or Cancelled as described in the previous step).
You can use
Access Groups to prevent certain users from marking Payments as Ordered using any method including this function. To do this, deny them access to the 'Order Payments' Action as necessary.
As the function will mark Payments as Ordered and can print cheques, it will ignore any selected Payments that need to pass through an approval process before they can be marked as Ordered and have not yet done so. You can configure approval processes using the Approval Rules register in the Business Alerts module. Please refer to the description of the Approval Status field on the 'Bank' card of the Payment window for brief details about the approval process and here for full details.
---
The Payment register in Standard ERP:
Go back to: