Create Menu - Payment - Email
This page describes the 'Email' function on the
Create menu in the Payment record window. If you are using iOS or Android, the 'Email' function is on the + menu.
---
The 'Email' function allows you to create a Mail containing details of a Payment, which you can send to the Supplier by email.
To create a Mail from a Payment, first open the Payment in a record window and then select 'Email' from the Create menu (Windows/Mac OS X) or + menu (iOS/Android). If the Purchase Invoices being paid in a Payment all have the same Supplier, the following window will appear, allowing you to create a new Mail:
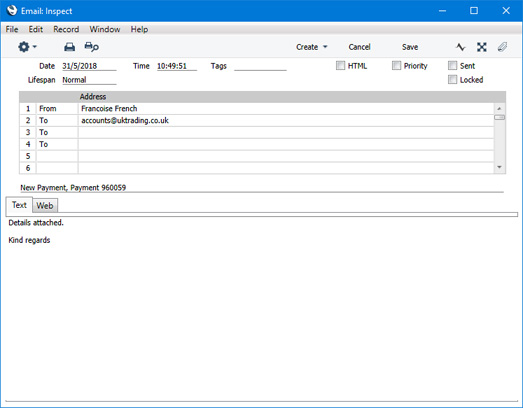
The new Mail will be opened in a window entitled 'Mail: Inspect'. This means that it has already been saved and is being opened for checking. The Mail will be composed as follows:
- The sender of the Mail will be the current user.
- The Recipient of the Mail will be the Email Address specified in the Contact record for the Supplier.
- The Subject and Text of the Mail will be taken from the record in the Mail Texts setting in the Email and Conferences module in which the Form is "Payments", as follows:
- If the Payment does not have a Language, the Subject and Text of the Mail will be taken from the Subject, First Text and Last Text fields in the header of the Mail Text record.
- If the Payment has a Language, the Subject and Text of the Mail will be taken from the Subject, First Text and Last Text fields in the relevant row for the Language in the Mail Text record.
- If the Payment has a Language but there is no row for the Language in the Mail Text record, the Subject and Text of the Mail will be taken from the Subject, First Text and Last Text fields in the header the Mail Text record.
- If there is no record in the Mail Texts setting in which the Form is "Payments", the Subject and Text of the Mail will be blank.
If either Standard TextStandard Text) specified in the Mail Text record is in HTML format, the Mail will be in HTML format as well.
In all cases, the word "Payment" and the Payment Number will be added automatically to the Subject as a suffix.
In the example illustrated above, the text "New Payment, " (with trailing space) was taken from the Subject field in the Mail Texts record. The text "Payment Details attached." in the illustration was determined by the First Text specified in the Mail Texts record, while the following text "Kind regards" was determined by the Last Text specified in the Mail Texts record. Apart from the Payment Number, no details from the Payment will be added to the Mail.
- A PDF version of the Payment Form (i.e. a remittance advice) will be attached to the Mail, accessible through the Document Manager. This requires you to have designed a Form Template to be used by the Payment Form, and to have assigned that Form Template to the Payment Form using the 'Define Form' function. When you design the Form Template, you may need to use Styles that will embed fonts in PDF files (this will depend on the fonts you use). You may also need to choose a code page and page setup, which you can do in the Form Template Properties. Please refer here for details about designing Form Templates, and here for a list of the fields you can include in the Form Template used by the Payment Form.
You can reformat the main body of the Mail to suit your requirements, and change the recipient if necessary, perhaps to the
Mailbox of a member of staff. If you are then ready to send the Mail, tick the Sent box. Finally, save the Mail by clicking the [Save] button (Windows/Mac OS X) or tapping √ (iOS/Android) in the Button Bar. If you are using the
Lock and Send emails Automatically option in the
Mail and Conference Settings setting in the Email and Conferences module and the Mail contains an external email address (i.e. one with the @ sign), it will now be sent automatically. If you are not using this option, select 'Send email' from the Mail's Operations menu (Windows/Mac OS X) or Tools menu (iOS/Android) after you have saved the Mail. Finally, close the Mail using the close box (Windows/Mac OS X) or by tapping < (iOS/Android). You will be returned to the Payment window.
If the function does not create a Mail, the probable causes are:
- The current user does not have a Mailbox.
- The Supplier in the Payment does not have an email address.
- The Payment has not been saved.
If the Payment contains rows paying more than one Supplier, the following window will appear when you select the function. Leave the fields in this window blank to send Mails to every Supplier in the Payment, or specify which of the Suppliers in the Payment will receive Mails as described below the illustration:
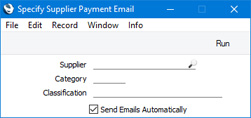
- Supplier
- Paste Special
Suppliers in Contact register
- Specify the Supplier that is to receive a Mail. This will be useful when a Supplier requests that you re-send a Remittance Advice.
- Category
- Paste Special
Supplier Categories setting, Purchase Ledger
- If you enter a Supplier Category here, all Suppliers in the Payment that belong to that Category will be mailed.
- Classification
- Paste Special
Contact Classifications setting, CRM module
- Enter a Classification Code in this field if you want to send payment details by email to the Suppliers in the Payment with a certain Classification. If you enter a number of Classifications separated by commas, payment details will only be sent to those Suppliers featuring all the Classifications listed.
- This field will be useful if you have used Classifications to distinguish Suppliers who accept the sending of payment details by email.
- Send Emails Automatically
- Choose this option if you would like the Mails created by this function to be marked as Sent automatically. If you are using the Lock and Send emails Automatically option in the Mail and Conference Settings setting in the Email and Conferences module, all Mails that are to be sent to external email addresses will be sent to the Email Queue immediately. This might be useful if the function creates many Mails but bear in mind that the Text in the Mails will be brief so you might need to check and update the Mails before sending them. If you are not using the Lock and Send emails Automatically option, the Mails will be marked as Sent, but they will not be sent to the Email Queue. To do this, open each Mail and select ?Send email? from the Operations menu.
When the specification window is complete, click (Windows/Mac OS X) or tap (iOS/Android) the [Run] button to activate the function. The relevant Mails will be created with Remittance Advices attached, to be placed in your Mailbox. The Mails will be composed as described earlier in this section, but they will not be opened for checking. Mails will not be created for Suppliers that do not have email addresses.
If you wish to use this function to send Mails to other members of staff, the intended recipient must have a Mailbox. If you need to send Mails to Suppliers, you must be using the External Gateway module, and you must have configured the Email SMTP Server setting. Please refer here for full details about the mailing features in Standard ERP.
---
The Payment register in Standard ERP:
Row menu Go back to: