Operations Menu - Receipts - Export Direct Debit
This page describes the 'Export Direct Debit' function on the
Operations menu in the 'Receipts: Browse' window. This function can't be used on iOS or Android as it's not possible to save export files.
---
You can use the 'Export Direct Debit' function on the Operations menu of the 'Receipts: Browse' window to create files containing direct debit instructions for your bank.
Before using this function, you must choose a Direct Debit File Format in the Bank Transfer setting in the Purchase Ledger. This will determine the format used in the export files created by this function. At the time of writing, the only format supported for this feature is Australia - ABA.
To include a Receipt in a direct debit export file, simply highlight it in the 'Receipts: Browse' window and select 'Export Direct Debit' from the Operations menu. The 'Specify Direct Debit File Export' window will open:
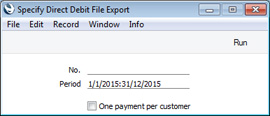
- No.
- Default taken from
Receipts highlighted in browse window
- Range Reporting Numeric
- Specify the Receipt or range of Receipts that you need to be included in the export file.
- Period
- Paste Special
Reporting Periods setting, System module
- Specify the export period: Receipts from the period specified here will be included in the export file.
- One payment per customer
- By default, each row in a Receipt will be exported separately, resulting in separate lines in the export file. Select this option if you would like Receipt rows with the same Customer to be treated as a single direct debit in the export file (i.e. the Receipt rows with the same Customer will be aggregated into a single line in the export file).
dd>If you would like a particular Receipt row to be kept separate from other rows with the same Customer, assign that row a Reference Number on flip G. Receipt rows with different Reference Numbers will be exported separately (Receipt rows with the same Reference Number/Customer combination will be aggregated).
Click the [Run] button in the Button Bar to proceed. Standard ERP will open a dialogue box where you can name the export file and specify where it is to be saved. Enter a name for the file and click [Save] or press the Enter key. The export file will be created and saved.
You should enter the following information in order for it to be included correctly in Direct Debit export files:
Configuration
- In the Banks setting:
- Enter a record for your own Bank.
- Enter your APCA User Number in the Direct Debit field on the 'Banking File' card.
- In the Payment Modes setting:
- Enter your bank account number in the Bank A/C No. field in each Payment Mode that you will use in direct debit Receipts.
- Enter the name of your bank in the Bank Name field.
- Enter the branch identifier or BSB of your bank in the BSB field on flip A. You should include a hyphen as the fourth character.
- Enter your Bank (from step 1) on flip D using 'Paste Special'.
- In the Contact records for each Customer:
- Enter the Customer's bank account number in the Bank Account field.
- Enter the name of the Customer's bank in the Account Operator field.
- Enter the branch identifier or BSB of the Customer's bank in the BSB field. You should include a hyphen as the fourth character.
Receipts
- Add a Reference to each Receipt header.
Exporting
- For a Receipt row to be exported, the Bank Account field in the Contact record for the Customer must not be blank.
---
The Receipt register in Standard ERP:
Go back to: