Entering a Receipt - Matrix Part 1 (Flips A-E)
This page describes the fields on flips A-E of the matrix in the Receipt window. Please click the following links for descriptions of the other cards:
---
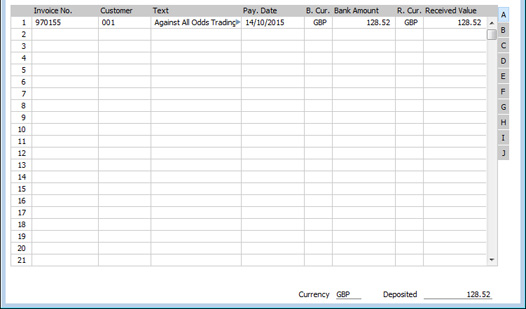
Use the grid area that takes up most of the Receipt window to list the Invoices being paid by the Receipt. You can receive payment against several Invoices in a single Receipt record, and/or receive payments in different Currencies and Payment Modes. The Payment Mode represents the payment method (i.e. cheque, cash or credit card) and also determines the Bank or Cash Account that will be debited with the value of the payments. So, you can record every payment received in a single day in a single Receipt record, irrespective of Currency and of Payment Mode. To facilitate reconciliation with bank statements, it is recommended that you use one Receipt record to represent the monies paid into the bank on a single paying-in slip.
Each record in the Receipt register will generate a single Nominal Ledger Transaction, with bank or other institution as debit Account (taken from the Payment Mode). If a Receipt has several rows, there will usually be a single debit posting, unless you are using the Separate Row per Receipt Row on Bank A/C option in the Account Usage S/L setting.
To add a row to a Receipt, click in any field in the first blank row and enter appropriate text. To remove a row, click on the row number on the left of the row and press the Backspace key. To insert a row, click on the row number where the insertion is to be made and press Return.
You can bring several Invoices into a Receipt at once by opening the 'Invoices: Browse' or 'Paste Special' windows, selecting a range of Invoices by clicking while holding down the Shift key, and then dragging them to the Invoice No field in the first empty Receipt row. You can also copy a list of Invoice Numbers from a spreadsheet or word processor and paste them in the Invoice No field in the first empty row.
Flip A - Invoice No.
- Paste Special
Open Invoices
- The number of the Invoice being paid. This must be an Invoice that has been marked as OK.
- When you enter an Invoice Number, the Open Invoice Value (the amount outstanding) will be brought in to the Received Value field as a default, and this figure will also be shown in the Open Inv. Value field on flip B. The Currency, if any, of the Invoice will be brought in to the Received Currency field.
- If the Invoice qualifies for an early settlement discount, a discount row will be added to the Receipt automatically, together with a suggested discount amount. This will be calculated using the formula specified in the appropriate Payment Term record. If you want to add an ad hoc settlement discount, use the 'Add Settlement Discount' function on the Row menu.
- A message will appear if the Invoice is payable in instalments. If so, go to flip G and enter the instalment being paid in the Instalment field, using 'Paste Special'.
- The 'Paste Special' list will only include open (unpaid) Invoices. If you have saved a Receipt without marking it as OK, the Invoice(s) in that Receipt will continue to be treated as unpaid and so will still be included in the 'Paste Special' list. It is therefore recommended that you do not leave Receipts for too long without marking them as OK, to minimise the risk of quoting Invoices in Receipts more than once.
- If you do not know which Invoices are being paid by a particular Receipt, leave this field blank and enter the Customer Number in the next field instead. After you have entered the value of the payment in the Received Value field, use the 'Distribute Receipt' function on the Row menu to allocate the Receipt to the Customer's outstanding Invoices. Depending on the option you have chosen in the Receipts Setting, the payment will be allocated to Invoices in Invoice Number order (starting with the lowest) or in Due Date order (starting with the oldest).
- You cannot receive payment against an Invoice in a Receipt whose Transaction Date is earlier than the Invoice Date of the Invoice.
- You can receive a payment made by a Customer without reference to a specific Invoice (e.g. a deposit paid by the Customer before you have issued them with an Invoice). Such a Receipt is known as a "Prepayment Receipt" or "On Account Receipt". Leave this field blank when entering Prepayments and On Account Receipts, and specify the Customer as normal in the field to the right. In the case of Prepayments, enter a Prepayment Number on flip D as well. The Customer must be one with a Contact record in which you have selected the On Account option on the 'Terms' card. Please refer to the Prepayments and On Account Receipts page for more details.
- Customer
- Paste Special
Customers in Contact register
- Default taken from Invoice or Sales Order
- The Customer Number will be placed here automatically when you enter an Invoice Number (or when you enter an Order Number on flip D).
- If you are entering an On Account Receipt, choose a Customer using 'Paste Special'.
- Text
- The Customer's Name will appear here when you enter the Invoice or Customer Number. You may change this if you wish.
- Pay. Date
- The date when the payment was made.
If you change the Transaction Date (in the header), the change will usually be copied to this field. If you are not using the Allow Trans. Date Changing option in the Transaction Settings setting in the Nominal Ledger, you will not be able to change this date in any other way. This effectively means that this date will always be the same as the Transaction Date. If you are using the Allow Trans. Date Changing option, you will be able to change this date, allowing the Transaction and Pay. Dates to be different.
- B. Cur.
- Paste Special
Currency register, System module
- Default taken from Account specified in the Payment Mode, or Base Currency 1
- The Currency of the bank account.
- If you have specified a Currency in the bank or cash Account (i.e. the Account specified in the Payment Mode), you can only use that Currency. Otherwise, you can use any Currency.
- If every row in a Receipt uses the same Bank Currency, the total amount received will be shown in the Deposited field in the footer and in the 'Receipts: Browse' window. In smaller companies, this can help maintain a mental picture of the cash flow situation.
- If there are any bank charges attached to a particular Receipt, you should enter them using the 'Add Fee' function on the Row menu, in the Currency specified here.
- Bank Amount
- Default taken from
Received Value
- The amount paid, expressed in the Bank Currency. If you change the Currency, the Bank Amount will be converted using the exchange rate applying on the Transaction Date. Do not use this field to subtract bank fees from the amount paid: the 'Add Fee' function on the Row menu is provided for this purpose.
- In normal circumstances, you should not change the Bank Amount and Currency. If you need to register a partial payment or an overpayment, you should change the Received Value (described below). The Bank Amount will be altered automatically, taking exchange rates into account if necessary.
- If you change the Bank Amount, the Received Value will not be updated automatically. You should only make such an alteration in exceptional circumstances, such as when you know that the exchange rate that will be levied by the bank is different to the rate in Standard ERP, or when you know the exact amount added to your bank account by the Receipt. Changing the Bank Amount is therefore effectively the same as changing the exchange rate in a particular Receipt row. In the resulting Nominal Ledger Transaction, a posting to the value of the difference between the original Bank Amount and your amended figure will be made to the Bank Rate Gain or Loss Accounts specified in the Account Usage S/L setting.
- If you need to change the amount added to your bank account by the Receipt row, but you the difference to be posted to the Rate Gain or Loss Accounts (also as specified in the Account Usage S/L setting), do not change the figure in this field but instead enter the amount in the Bank Amt in Cur. 1 field on flip I.
- R. Cur.
- Paste Special
Currency register, System module
- Default taken from Invoice
- The Receipt Currency: enter the Currency used by the Customer on their payment (for example, the Currency used on the cheque). The default is the Currency used in the Invoice, but you can use any Currency. If you change the Receipt Currency, the Received Value will be converted using the exchange rate applying on the Transaction Date.
- Received Value
- Default taken from
Outstanding amount on Invoice or Sales Order total
- The amount paid, expressed in the Receipt Currency. You can change the default figure in the event of partial payments or overpayments. If you change the Receipt Currency, the Received Value will be converted using the exchange rate applying on the Transaction Date. If you change the amount before changing the Currency, the conversion will apply to the altered amount.
- If you are using the Disallow over-receive Invoice option in the Account Usage S/L setting, you will not be able to enter a Received Value that is greater than the value outstanding on the Invoice. If the Customer has overpaid, you should enter the over-payment in a separate row as an On Account Receipt or Prepayment.
- If you enter an Order Number on flip D, the Order total will appear here.
- You can use Access Groups to prevent the saving of Receipts in which there is at least one row with a negative Received Value. To do this, deny access to the 'Negative Amount on Receipt' Action.
Flip B- I. Cur.
- The Invoice Currency is the Currency used in the Invoice being paid. This field cannot be changed.
- Open Inv. Value
- The outstanding amount of the Invoice being paid, in the Invoice Currency. This value cannot be changed.
- Invoice Value
- The amount being paid, in the Invoice Currency.
Flip C- P. Mode
- Paste Special
Payment Modes setting, Sales/Purchase Ledger
- Enter a Payment Mode, if different from the Payment Mode entered in the header. This allows different payments on the same Receipt to be debited to different Bank Accounts.
- Cheque No.
- Record the number of the cheque used for the payment here.
- If you have specified a Payment Mode whose Type is "Received Cheques" (either in a particular Receipt row or in the Receipt header), this will signify that you will record or have recorded the cheque that was used for the payment in the Open Cheque register in the Cheques module. Enter here the Serial Number (i.e. not the Cheque Number) of the Open Cheque record that you wish to use.
- If you or a bookkeeper have already recorded the cheque that was used for the payment in the Open Cheque register, you can use the following methods to choose the cheque:
- You can use 'Paste Special' from the Cheque Number field to choose the appropriate Cheque. 'Paste Special' is only available from this field if the Type of the Payment Mode is "Received Cheques", and it will only list Open Cheques (i.e. Cheques whose Status is "Registered").
- Click in any field in the row and then open the Row menu by right-clicking (Windows) or ctrl-clicking (Mac OS X) the row number. Select 'Distribute Cheques' from the menu. The cheque number of the earliest Open Cheque with the same Customer will be brought in.
In both cases, if you choose an Open Cheque with an Amount greater than the outstanding value of the Invoice being paid, the cheque number will be copied to any following row(s) with the same Customer until the Cheque Amount is used up. If there is still some of the Cheque Amount remaining, a new row will be added to the Receipt, so that you can register the remainder of the Cheque Amount as an On Account Receipt or a Prepayment. If the Cheque Amount is lower than the outstanding value of the Invoice being paid, the Received Value and Bank Amount will be changed to the Cheque Amount. This allows you to register a partial payment. If the Open Cheque register contains more than one Cheque with the same Customer, the 'Distribute Cheques' function will use as many Cheques as necessary.
- If you have not recorded the cheque that was used for the payment in the Open Cheque register, click in any field in the row and then choose 'Cheque' from the Create menu. A new Cheque record will be opened, already containing the Customer Number and Name, Bank Currency, Transaction and Effect. Dates and Amount. If there are several Receipt rows receiving payments from the same Customer, the total Bank Amount from the row in which you clicked and all later rows will be copied to the Cheque. For example, if there are three Receipt rows receiving payment from the same Customer and you clicked in the second row before selecting the function, the total Bank Amount from the second and third rows will be copied to the Cheque. Enter the Cheque No. and save the Cheque. It will be closed, and the Serial Number of the Cheque record will be copied to the Cheque Number field on flip C of the Receipt row(s).
- In all three cases, if an Invoice is payable in instalments, you should specify the instalment on flip G before entering the cheque number. You should also ensure any settlement discounts are included in the Receipt. This will ensure that when the Cheque Amount is distributed to the Receipt rows, the instalment value or the outstanding value less settlement discount provides the basis of the calculation.
- In Argentina (i.e. if the VAT Law in the Company Info setting is "Argentinean"), you must specify a Cheque Number if the Type of the Payment Mode is "Received Cheques".
- When you mark the Receipt as OK and save, the Status of the relevant Cheques will be changed from "Registered" to "Accepted" (i.e. they will no longer be Open).
- As mentioned above, you must specify an Open Cheque (i.e. a Cheque whose Status is "Registered") in this field. There is one exception to this rule: if the Received Value is negative, you must specify a Cheque whose Status is "Accepted". In this case, when you mark the Receipt as OK and save, the Status of the relevant Cheque will be changed from "Accepted" to "Cancelled"
- If you have specified a Payment Mode whose Type is "Credit Card" (either in a particular Receipt row or in the Receipt header), this will signify that you have received a payment by credit card that you have recorded in the Credit Card Slip register in the Cheques module. In this case, you will be able to choose the Credit Card Slip using 'Paste Special'. As with cheques, the value of the Credit Card Slip will be distributed to the Receipt rows as appropriate. When you mark the Receipt as OK and save, the Status of the relevant Credit Card Slips will be changed from "Received" to "Deposited".
- If the Type of the Payment Mode is not "Received Cheques" or "Credit Card", the 'Paste Special' feature will not be available, and the cheque number that you specify need not refer to a record in the Cheque or Credit Card Slip registers. In this case, you can simply use this field to record the cheque number of the cheque that was used for the payment.
Flip D- Order No.
- Paste Special
Sales Order register
- If the payment is a deposit against a Sales Order (i.e. it is a Prepayment), you can enter the number of the Sales Order to this field or to the Prepayment Number field immediately to the right. If you enter it here, the Customer on flip A will be changed to the one in the Order (or to the Invoice To Customer in the Order if there is one), the Bank Amount and Received Value will be changed to the Order total, and the Order Number will be copied to the Prepayment Number field. Please refer to the description of the Prepayment Number field immediately below for full details.
- You can use Access Groups to ensure that you can only receive Prepayments against Orders that have been marked as OK. To do this, give all users Full access to the 'Disallow Prepayment for not OKed Order' Action. It will then not be possible to save a Receipt if this field contains the Order Number of an Order that has not been marked as OK.
- Prepayment No
- Paste Special
Open Prepayments
- If the payment is a Prepayment (i.e. one where it is not possible to specify an Invoice Number on flip A), you should enter a Prepayment Number here. This can be a number of your own generation, the number allocated to the prepayment by the Customer or, preferably, the number of the Sales Order against which you have received the deposit. If you want to ensure that only Sales Order Numbers can be used, select the Use Sales Order No. for Prepayments option in the Down Payments setting in the Sales Orders module. If you enter a Sales Order Number in the field immediately to the left, it will be copied here.
- When you raise an Invoice to be set against the Prepayment, you can connect the two using the 'Connect to Prepayment' function on the Operations menu of the Invoice window. This is fully described on the Prepayments and On Account Receipts page. If a deposit or prepayment exists without a Prepayment Number, it will not be made available to that function and connecting it to an Invoice will be more difficult. Prepayments that do not have a Prepayment Number will not be shown in the Prepayment History S/L report.
- It is not compulsory to make an entry to this field if the Invoice Number field on flip A is blank. If you would like to make it so, select the Use Prepayments, not On Account option on the 'Debtors' card of the Account Usage S/L setting. This option applies to both the Sales and Purchase Ledgers.
- It is not necessary to enter a unique number to this field. This allows you to receive more than one deposit against an individual Sales Order. However, using a Prepayment Number more than once may make the Prepayment History S/L report difficult to understand, and may make it difficult to link a particular Prepayment to an Invoice using the 'Connect to Prepayment' function. Therefore you may wish to use the Force Unique Prepayment Numbers option, also on the 'Debtors' card of the Account Usage S/L setting. This will mean that once you have used a Prepayment Number in an approved Prepayment, you will not be able to use it again (except when reversing the Prepayment i.e. except when the Received Value is negative).
- You can immediately raise an Invoice to be set against the Prepayment. Please refer to the page describing the 'Down Payment' function on the Create menu for details.
Flip E- V-Cd, VAT Value
- These fields are only used if you are using the Post Receipt VAT and/or Post Prepayment VAT options on the 'VAT / Tax' card of the Account Usage S/L setting. Users of the Cash VAT scheme in the UK will need to use both options, users resident in the Baltic States may only need to use the Post Prepayment VAT option, and users in Poland may only need to use the Post Receipt VAT option.
- If you are using the Post Receipt VAT option, your output VAT liability is calculated from your Receipts, not from your Invoices. In this case, the VAT Code and VAT Value (in the Bank Currency) will be brought in to these fields automatically when you enter an Invoice Number on flip A (separate rows will be added to the Receipt for each VAT Code used in the Invoice). When you mark the Receipt as OK and save, the VAT amount will be moved from the temporary Output VAT Account to the final one (the O/P Account), as specified for each VAT Code in the VAT Codes setting in the Nominal Ledger.
- The Post Receipt VAT option also adds a VAT element to On Account Receipts. Once again, the O/P Account for the VAT Code will be credited and the Output Account for the VAT Code will be debited with the VAT amount.
- Take care with these fields when entering On Account Receipts. As an On Account Receipt does not have an Invoice Number or a Prepayment Number, you must enter a VAT Code manually if you are using the Cash VAT scheme (i.e. if you are using the Post Receipt VAT option). The VAT Value will then be calculated from the Received Value. The Nominal Ledger Transaction resulting from the Receipt will not have a VAT element if the VAT Code or VAT Value is blank.
- If you would like VAT to be posted from Prepayments, you should select the Post Prepayment VAT option on the 'VAT / Tax' card of the Account Usage S/L setting. When you enter a Sales Order Number in the Order No. field on flip D, the VAT Code and VAT Value will be brought in automatically from the Order providing every row in the Order has the same VAT Code (otherwise you will need to specify the VAT Code and Value manually). If you enter a Prepayment that is not connected to an Order (i.e. you leave the Order No. field empty and instead specify a Prepayment No.), you should enter a VAT Code manually. The VAT Value will then be calculated from the Received Value. In both cases, the VAT Value will be debited to the Prepayment VAT Account specified in the Account Usage S/L setting and credited to the O/P Account for the VAT Code.
- In all cases, if a particular VAT Code does not have an O/P Account, the VAT (A/C) Account from the 'VAT / Tax' card of the Account Usage S/L setting will be used instead.
- These fields are also used in Russia where output (sales) VAT is calculated from monies received (i.e. from Receipts). In the case of deposits that have been received for goods or services that are not going to be delivered until the next month, the supporting Invoice may not have been raised yet, so you can use the 'Prepayment Invoice' function on the Create menu to create and print a Prepayment Invoice for filing.
- In the Nominal Ledger Transaction generated from this Receipt, by default this VAT Code will not be assigned to the postings to the VAT Accounts described above. If you want it assigned to these postings, use the Add VAT Code to VAT A/C rows option in the Transaction Settings setting in the Nominal Ledger.
- T-Cd
- Paste Special
Tax Templates setting, Nominal Ledger
- In some countries, Tax Templates are used instead of VAT Codes to determine the rate at which VAT or sales tax will be charged on sales and the Output VAT Account that will be credited with the VAT or sales tax value. VAT Codes should be used where each sales and purchase transaction (e.g. each row in an Invoice) is taxed at a single rate, while Tax Templates should be used where different taxes and/or several tax rates are applied to one transaction (e.g. to one row).
- If you need to use Tax Templates, you should first choose the Use Tax Templates for Tax Calculation option in the Transaction Settings setting in the Nominal Ledger. This option will cause a Tax Template field ("T-Cd") to appear here instead of the VAT Code field ("V-Cd").
- Having done so and if you are also using the Post Receipt VAT option in the Account Usage S/L setting, the Tax Template Code and tax value (in the Bank Currency) will be brought in to the T-Cd and VAT Value fields on flip E of a Receipt row automatically when you enter an Invoice Number on flip A. Separate rows will be added to the Receipt for each Tax Template Code used in the Invoice. When you mark the Receipt as OK and save, the tax value(s) will be moved from the temporary Output VAT Accounts to the final ones (the O/P Accounts), as specified in the VAT Codes setting in the Nominal Ledger for each VAT Code in the Tax Template(s).
- Extra Tax
- This field will be used when Nominal Ledger Transactions from Prepayment Receipts are to include VAT and an Extra Tax element.
- Nominal Ledger Transactions from Prepayment Receipts will include VAT if you are using the Post Prepayment VAT option on the 'VAT / Tax' card of the Account Usage S/L setting. They will also include an Extra Tax element if the VAT Code has a Tax % and Tax A/C specified on flip B.
- When you enter a Sales Order Number in the Order No. field on flip D of a Receipt row, any Extra Tax in the Order will be brought in to this field automatically. The VAT Code and VAT Value will also be brought in automatically from the Order providing every row in the Order has the same VAT Code. Otherwise you will need to specify the VAT Code and VAT Value manually. If you need to change the Received Value (e.g. if the Prepayment is not for the full Order value), check there is a VAT Code in the row first, so that the VAT Value and Extra Tax can be recalculated automatically.
- When you mark the Receipt as OK and save, the Extra Tax amount will be debited to the Tax Accrual Account specified on the 'VAT / Tax' card of the Account Usage S/L setting and credited to the Tax Account for the VAT Code.
- Extra Tax will only be posted from Prepayments, not from On Account Receipts or from Receipts that receive payment against Invoices.
Flips F-J are described in Part 2 here.
---
The Receipt register in Standard ERP:
Go back to:
|