Sending Mail - External Mail
This page describes sending external mail (email) from Standard ERP, specifying the sending address in external mail, attaching Signatures to external mail, and setting up automated replies to incoming external mail.
---
Sending a Mail to an email address (i.e. an address containing @) is a two stage process:
- The Mail is sent to a Queue; and
- Mails in the Queue are sent to the relevant email addresses.
Depending on how you have configured your system, Mail will reach the Queue by one of two routes:
- The Mail will be sent automatically when you mark it as Sent and save it. This will be the case if you are using the Lock and Send emails Automatically option in the Mail and Conference Settings setting. The Mail will also be locked.
- If you are not using the Lock and Send emails Automatically option, you need to select 'Send email' from the Mail's Operations menu (with 'cog' icon, Windows/Mac OS X) or Tools menu (with 'wrench' icon, iOS/Android) after you have saved it. If you do not save changes to the Mail before you use this function, the most recently saved version of the Mail will be sent. The Mail will be sent even if you have not ticked the Sent box, but it is recommended that you do tick Sent, so that you can see at a glance that you have sent the Mail and to remove the 'pencil' icon from the Mail in your Mailbox. The Mail will not be locked.
When the Mail reaches the Queue, it will be processed as follows:
- Multi-user
- Once you have activated the Gateway as described here, it will check the Email Queue periodically. All Mail in the Queue will be sent automatically.
- Single-user
- In a single-user system, you should send email from the Queue manually. To do this, first ensure your computer is connected to the internet and that you are in the Email and Conferences module. Then, run the 'Send and Receive Email' Maintenance function. This function will send all Mail in the Queue. Note: do not use this function from a client machine in a multi-user system.
In both cases, if you have defined any
POP3 Servers, any incoming mail will be downloaded from your POP3 account(s) as well.
If you need to check the contents of the Email Queue, you can do so from a normal client by opening the Email Queue register in the Email and Conferences module. The Email Queue will include both Mails and Customer Letters that will be or have been sent by email: each email address in a Mail and each recipient in a Customer Letter will be represented by a separate record in the Email Queue.
An Email Queue record will not be removed after the email has been sent. If you want to empty the Queue, there are three methods that you can use:
- To delete an individual Email Queue record, open it and choose 'Delete' from the Record menu (which has a 'cog' icon if you are using iOS or Android). The Email Queue record will be deleted.
- You can also open an individual Email Queue record and choose 'Delete this and Related Queue Records' from the Operations menu (with 'cog' icon, Windows/Mac OS X) or Tools menu (with 'wrench' icon, iOS/Android). All Email Queue records created from the same Mail or Customer Letter will be deleted, even if they haven't been sent.
- Use the 'Delete Email Queue' Maintenance function in the Email and Conferences module. Every Email Queue record will be deleted, except those that have not been sent yet.
If the Email Queue stops, you can have a notification text (SMS) message sent automatically to a specified mobile number or an Alarm Activity sent to the
Postmaster. Please refer to the
Internal System Alerts page for details about this feature.
The Sending Address in External Mail
When you send an email, the originating email address (i.e. the email address from which the email will be sent) will be chosen as follows:
- If you have logged in as a Global User, the Email Address in your Global User record will be used. If your Global User record does not have an Email Address, the User Address in the Email SMTP Server setting will be used.
- If you have logged in as a Person, the Email Address in your Person record will be used. If your Person record does not have an Email Address, the User Address in the Email SMTP Server setting will be used.
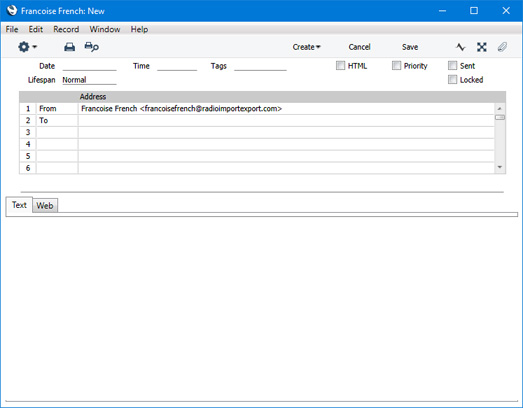
If you need an email to be sent from a particular address, enter it in angled brackets <> after your name as the sender in the Mail:
Attaching a Signature to External Mail
You can attach a Signature to every piece of external mail that you send. This is a short piece of text that will appear at the end of the Mail.
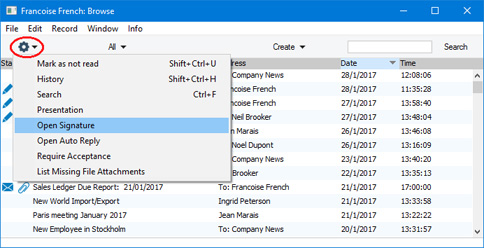
To enter your Signature, open your Mailbox and select 'Open Signature' from the Operations menu (with 'cog' icon as illustrated below) if you are using Windows or Mac OS X or from the Tools menu (with 'wrench' icon) if you are using iOS or Android:
The following window opens:
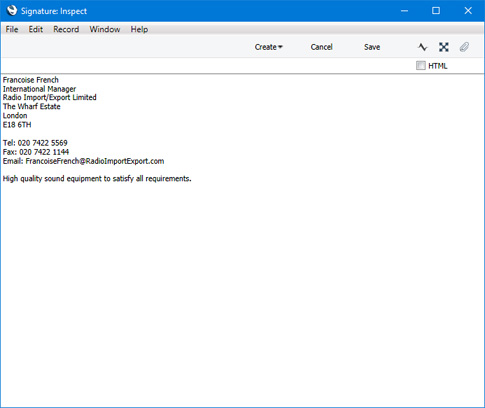
First, tick the
HTML box if you want to use HTML formatting in your Signature. You must be using the
Use HTML Formatting in Mail option in the
Mail and Conference Settings setting to be able to tick the
HTML box. Please refer
here for more details about HTML formatting.
Then, type in your Signature and click the [Save] button (Windows/Mac OS X) or √ (iOS/Android) in the Button Bar to save it and close the window. You can return to your Signature at any time using the same route to change it.
Every Mailbox can have its own Signature. Administrators can examine and edit all the Signatures in the system using the Signatures setting in the Email and Conferences module.
Automatic Replies to External Mails
An automatic reply can be sent in response to every piece of external mail that you receive. This will most often be useful when you are out of the office and want to let your correspondents know when you will be returning. You can also have incoming internal and external mail forwarded to an email address.
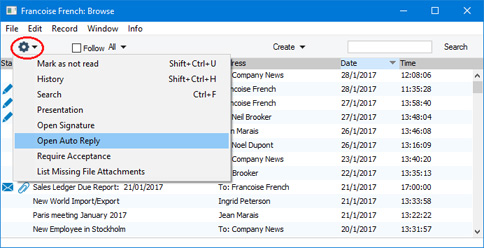
To create an automatic reply, open your Mailbox and select 'Open Auto Reply' from the Operations (Windows/Mac OS X) or Tools (iOS/Android) menu:.
The following window opens:
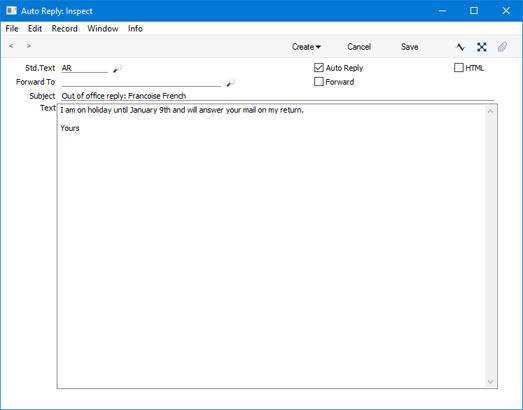
- Std. Text
- Paste Special
Standard Text register, CRM/Email and Conferences module
- Specify here the Code of a record in the Standard Text register in the CRM and Email and Conferences modules. This record will contain the text that will be copied to the Text field below.
- Auto Reply
- Tick this box when you want automatic replies to be sent in response to incoming external mail. For example, you should tick this box when you leave the office, and remove the tick when you return. If you have ticked this box, you will be reminded that you have activated Auto Replies each time you open your Mailbox. Automatic replies will not be sent if you have not ticked this box.
- HTML
- Tick this box if you want to use HTML formatting in your Auto Reply message. You must be using the Use HTML Formatting in Mail option in the Mail and Conference Settings setting to be able to tick the HTML box. Please refer here for more details about HTML formatting.
- Forward To
- Use this field if you want your incoming external mail to be forwarded to an external email address (i.e. an email address containing @). Internal mail will also be forwarded to this email address. You should also tick the Forward box.
- Forward
- Tick this box when you want incoming internal and external mail to be forwarded to the email address specified in the field above. If you have ticked this box, you will be reminded that you have activated Forwarding each time you open your Mailbox.
- Subject
- If you have ticked the Auto Reply box, enter here the short piece of text that is to appear in the Subject line of the automatic response Mail.
- Text
- If you have ticked the Auto Reply box, enter here the main text of the automatic response Mail here. If you entered a Std. Text above, you can modify the default text as appropriate (e.g. to enter the dates when you will be away).
Click the [Save] button (Windows/Mac OS X) or √ (iOS/Android) in the Button Bar to save the Auto Reply and close the window. You can return to your Auto Reply record at any time using the same route to change it.
Once you have entered an Auto Reply record in which you have ticked the Auto Reply box, an automatic reply will be sent in response to every piece of incoming external mail (up to a maximum of three for a particular email address). You will not be able to see these automatic replies in your Mailbox, but the original incoming Mails will be there as usual. Automatic replies will not be sent to Cc addresses or to Internal Mail. If you have ticked the Forward box, each internal and external mail will be forwarded to the specified email address. Again, you won't see this in your Mailbox, but the original incoming Mails will be there as usual.
Every Mailbox can have its own Auto Reply record. Administrators can examine and edit all the Auto Reply records in the system using the Auto Replies setting in the Email and Conferences module. Administrators can also deactivate all Auto Replies using the 'Deactivate Auto Replies' Maintenance function, which will remove the tick from the Auto Reply box in every Auto Reply record.
---
Sending and Receiving Mail in Standard ERP:
Go back to: