Item Turnover History
This page describes the Item Turnover History report in the Sales Ledger.
---
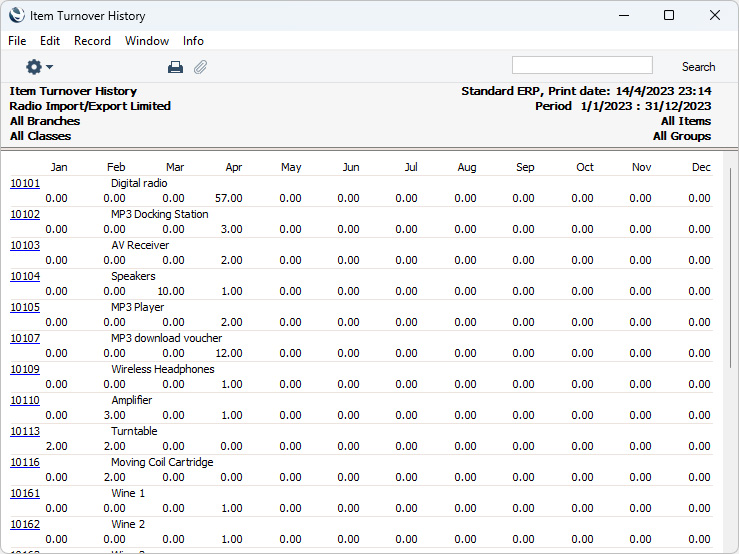
The Item Turnover History report in the Sales Ledger shows monthly sales totals (either quantities or values) for selected Items for a specified period. The figures in the report will be compiled from Invoices, POS Invoices and Bar Tabs.
When printed to screen, the Item Turnover History report has the Standard ERP Drill-down feature. Click (Windows/macOS) or tap (iOS/Android) on any Item Number to open the corresponding Item record.
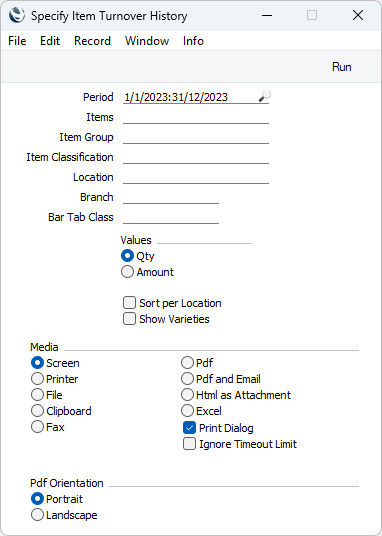
Leave all the fields blank if the report is to cover all the Items in the Item register. Otherwise, use the fields as described below.
- Period
- Paste Special
Reporting Periods setting, System module
- Enter the start and end date of the reporting period.
- The report provides monthly sales statistics for Items sold during the period specified here. It can display up to twelve months If you specify a longer period, only the first twelve months will be displayed.
- The period must consist of a calendar month, or a number of calendar months, otherwise the report will be empty.
- Items
- Paste Special
Item register
- Range Reporting Alpha
- If you need the report to show sales statistics for a particular Item, enter its Item Number here. You can also enter a range of Item Numbers separated by a colon (:).
- Items in the range that have not been sold during the report period will not be included in the report.
- Item Group
- Paste Special
Item Group register, Sales Ledger
- If you need the report to show sales statistics for the Items that belong to a particular Item Group, specify that Item Group here.
- If you specify both an Item Group and a range of Items, the report will only include the Items in the range that are members of the specified Item Group.
- Item Classification
- Paste Special
Item Classifications setting, Sales Ledger
- Enter an Item Classification here if you need the report to list statistics for Items with a particular Classification. You can enter a number of Classifications separated by commas, in which case only Items featuring all the Classifications listed will be shown in the report. If you enter a number of Classifications separated by plus signs (+), Items featuring at least one of the Classifications listed will be included in the report. If you enter a Classification preceded by an exclamation mark (!), all Items featuring any Classification except the one listed will be included.
- For example:
- 1,2
- Lists Items with Classifications 1 and 2 (including Items with Classifications 1, 2 and 3).
- 1+2
- Lists Items with Classifications 1 or 2.
- !2
- Lists all Items except those with Classification 2.
- 1,!2
- Lists Items with Classification 1 but excludes those with Classification 2 (i.e. Items with Classifications 1 and 2 are not shown). Note the comma before the exclamation mark in this example.
- !1,!2
- Lists all Items except those with Classification 1 or 2 or both. Again, note the comma.
- !(1,2)
- Lists all Items except those with Classifications 1 and 2 (Items with Classifications 1, 2 and 3 will not be listed).
- !1+2
- Lists Items without Classification 1 and those with Classification 2 (Items with Classifications 1 and 2 will be listed).
- (1,2)+(3,4)
- Lists Items with Classifications 1 and 2, and those with Classifications 3 and 4.
- 1*
- Lists Items with Classifications beginning with 1 (e.g. 1, 10, 100).
- 1*,!1
- Lists Items with Classifications beginning with 1 but not 1 itself.
- *1
- Lists Items with Classifications ending with 1 (e.g. 1, 01, 001).
- 1*,*1
- Lists Items with Classifications beginning and ending with 1.
- Location
- Paste Special
Locations setting, Stock module
- Range Reporting Alpha
- Specify a Location if you only want the statistics in the report to be compiled from Invoices, POS Invoices and Bar Tabs issued from that Location. You can also enter a range of Locations separated by a colon (:).
- By default, the report will be a list of Items, displaying total figures for the sales of each Item made from all Locations or from all Locations in the range. If you need the report to contain separate sections for each Location, select the Sort per Location option below.
- Branch
- Paste Special
Customers in Contact register
Specify a Branch if you only want the statistics in the report to be compiled from Invoices, POS Invoices and Bar Tabs featuring that Branch. This will be useful if your company has several Branches (e.g. several shops): the Branch where each transaction was created will automatically be recorded (for example, on the 'Del. Terms' card of the Invoice window), taken from the Local Machine setting in the User Settings module.
- Bar Tab Class
- Paste Special
Bar Tab Classes setting, Restaurant module
- Specify a Bar Tab Class if you only want the statistics in the report to be compiled from Bar Tabs featuring that Class. If you specify a Bar Tab Class in the Local Machine setting in the User Settings module on a particular computer or till, it will be copied to all Bar Tabs created on that machine. If you want waiters to be able to change the Class in a particular Bar Tab, add a "Set Tab Class" button to the Bar Tab window.
- Values
- Select one of these options to specify whether the report should show the quantities of each Item sold in each month, or the value of those sales.
- Sort per Location
- If you have not specified a Location or have specified a range of Locations in the field above, the report will display total figures for sales made from all Locations or from all Locations in the range.
- If you select this option, the report will be sorted by Location, with each Location being given a separate section. Within a particular section, statistics for the Items sold from the relevant Location will be shown.
- Show Varieties
- If an Item is one that has Varieties, the report will usually display figures for the Item as a whole. Select this option if you would like it to display figures for each Variety individually.
- This option will be ticked by default if you are using the Default to 'Show Varieties' in all Reports option in the Variety Settings setting in the Stock module.
---
Go back to:
|