Connecting Printers - USB/Wifi Receipt Printers with user-definable print-outs
This page describes connecting USB and Wifi printers to tills and cash machines: for details about serial printers, please refer to the Serial Receipt printer or the Fiscal Printer pages. Among the USB and Wifi printers that can be used are the Epson TM-T88V and Star TSP 113, both of which are supplied with drivers for many operating systems.
To work with USB and Wifi printers, follow these steps:
- Connect USB and Wifi printers to each till and install any necessary drivers.
- Using the tools provided by each till's operating system, specify that the USB or Wifi printer is the default printer.
- Working on a desktop client, change to the System module and use the Form Template register to design the POS Invoice Form. Use the 'Properties' function on the Operations menu to name the Form Template (in this description, we have used the name "POS_INVOICE") and to turn off the Printer Dialog option. Full instructions for using the Form Template register can be found here, while specific instructions for designing till receipts can be found at the end of this page. A full list of the fields you can include in the Template design can be found here.
- Remaining in the System module, open the Auto Actions setting and choose to have POS Invoices printed automatically At OK.
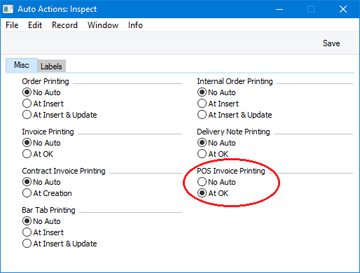
This will ensure that till receipts will be printed automatically from POS Invoices whenever a cashier touches or clicks the "Finish" button.
Note: if you are in Sweden and you are using CleanCash devices, do not carry out this step. Receipts will always be printed automatically as part of the process of sending Invoices to the CleanCash devices.
Click the [Save] button (Windows/Mac OS X) or tap √ (iOS/Android) to save and close the setting.
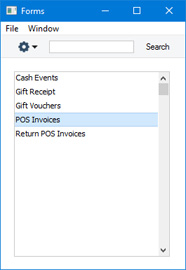
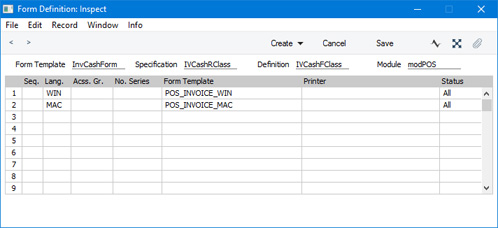
- Change to the Point of Sales module and click or tap the [Forms] button in the Navigation Centre. The 'Forms' list window is opened: highlight 'POS Invoices'.
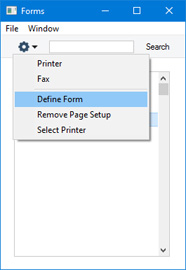
- Select 'Define Form' from the Operations menu (with 'cog' icon):
- In the subsequent 'Form Definition' window, enter "POS_INVOICE" in the Form Template field of the first row (you can use 'Paste Special' to ensure the spelling is correct):
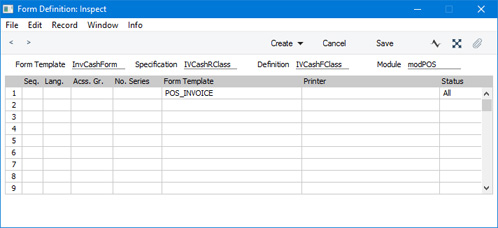
Click [Save] to save the POS Invoice Form definition.
- In a mixed network with tills that use different operating systems, you may need a separate Form Template for each operating system. If so, you can ensure the appropriate Form Template will be printed from each till using Languages. Assign a Language (for example, Mac or Windows) to each cashier (in their Person records) and then enter a row for each Language/operating system in the 'Form Definition' window:
- If you will need cashiers to be able to re-print POS Invoices, add "All Invoices" and "Print Invoice" buttons to the POS Invoice window.
Designing the POS Invoice Form TemplateTo design the POS Invoice Form Template, follow the steps listed below. You can only follow this process using Windows or Mac OS X, not iOS or Android:
- Switch to the System module, click the [Registers] button in the Navigation Centre and double-click 'Form Templates' in the resulting list.
- The 'Form Templates: Browse' window will be opened, listing the Form Templates that you have already entered. To enter a new POS Invoice Form Template, select 'New' from the Create menu; to modify an existing template, double-click it in the list.
- In the case of a new Form Template, select 'Properties' from the Operations menu.
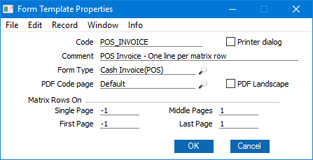
Enter an appropriate Code and, using 'Paste Special' from the Form Type field, classify the Form Template as a Cash Invoice(POS). This will ensure that you will only be able to include fields appropriate to POS Invoices in the Form Template.
As till receipts will be printed from POS Invoices automatically when cashiers click or touch or click the "Finish" button, it will probably not be necessary or desirable for the cashiers to process a printer dialogue every time. So, do not tick the Printer dialog option.
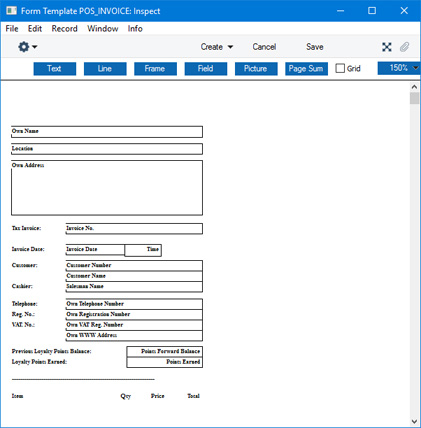
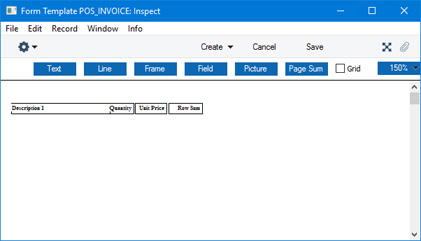
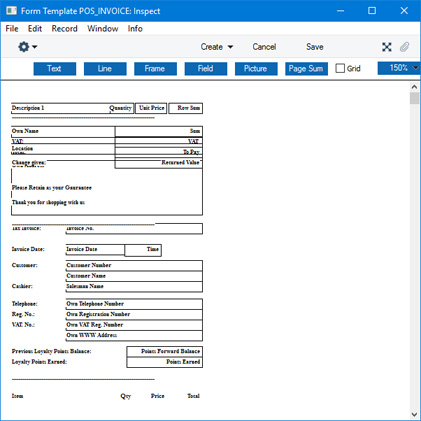
You should now specify how many items will be printed on each page of each till receipt. As a till receipt is usually a long strip of paper that does not have pages in the usual sense, one recommendation (which will depend on the printers you are using) is that you configure the Form Template as shown in the illustration above. In this illustration, we have specified that no Items will be printed on the first page ("-1" has been entered in the Single and First Page fields; do not enter "0"), one Item will be printed on each middle page, and one Item will be printed on the last page. This will mean that every till receipt will be printed using the first page, an appropriate number of middle pages, and the last page. To use this model, you must specify that an Item will be printed on the last page.
- In this step, you will design the First page. Add fields and text elements as described below the illustration, to produce a design similar to the one in the illustration. The First page should contain the fields that you need to be printed at the top of each till receipt.
To add a field to the design, click the [Field] button at the top of the window and then draw a box on the Form Template where the field is to appear. You can move or resize it later if necessary. The 'Field' window opens:
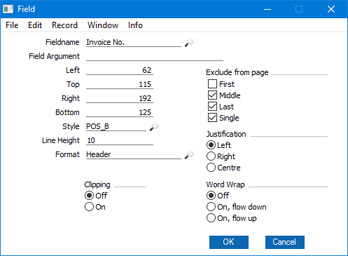
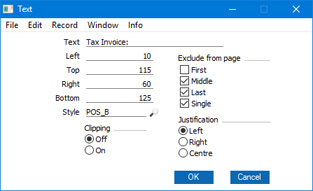
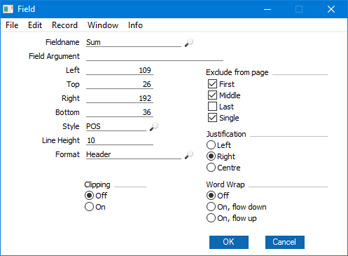
Enter the Field Name (use 'Paste Special' to see all available Field Names for the "Cash Invoice(POS)" Field Type), and paste a type style in the Style field.
Use the Exclude From Page options to specify the pages on which each field will be printed. Tick Middle, Last and Single, to signify that each field will be printed on the First page (i.e. they will be excluded from the Middle, Last and Single pages).
In the case of fields that will be printed over more than one line (e.g. the field that will print your company address), specify the Field Name, and complete the other details as follows:
- Line Height
- Use the Line Height field to specify the vertical spacing between the lines (in pixels) If you leave it at 0 (the default), all the lines of text will be superimposed on each another. In the case of 10 point Times, a Line Height of at least 10 points is recommended.
- Top, Bottom
- Don't forget to enter top and bottom pixel measurements to ensure that the Text field is deep enough to accommodate the required number of lines of text in the specified font.
Click the [OK] button in the dialogue box to save the field specifications, and repeat as necessary until you have added every field to the First page.
You can add text elements to the design in a similar manner, by clicking the [Text] button at the top of the window and then drawing a box on the Form Template where the element is to appear. When the 'Text' window opens, type the text that is to be printed on the Form Template in the Text field. This can be up to 80 characters long, but it is limited to one line. To create a text area with more than one line, use the appropriate number of separate one-line text elements.
As with fields, give all the text elements that are to appear on the First page the same page specification using the Exclude From Page options, as shown:
Click the [OK] button in the dialogue box to save the text element specifications, and repeat as necessary until you have added every text element to the First page. As shown in the example design illustrated above, the text elements at the bottom of the First page should be the column headings for the Item listing.
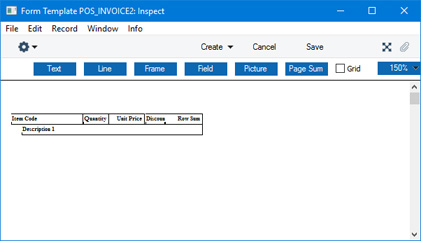
- Now design the Middle page. This should contain the fields that will list the Items on till receipts. To help with the design process, you can hide the elements that you added in step (iv). To do this, select 'Middle Only' from the Operations menu. This displays only those elements that are to be printed on the Middle page. At this stage, there are no such elements, so the window goes blank. Add fields and text elements to the top of the design area, so that the design looks something like this:
This time, use the Exclude From Page options to specify that each element will only be printed on the Middle pages (i.e. they will be excluded from the First, Single and Last pages). You should also set the Format to 1 in each field, to ensure the Items will be listed correctly and neatly:

Note that Clipping has been activated for the "Description 1" field in the illustration. This will mean that long Item Names will be truncated, so that they do not extend over the Quantity, Unit Price and Row Sum.
If you need more space for long Item Names, you can place the "Description 1" field above or below the fields that will print the Item Number, quantity and price information.
If you do this and you specified that more than one matrix row will be printed on each middle page, you will need to double the Line Height in each field.
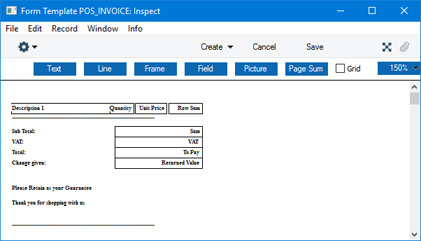
- Finally, design the Last page. This should contain the fields that you need to be printed at the end of each till receipt (e.g. totals). To help with the design process, hide the elements that you added in the previous steps by selecting 'Last Only' from the Operations menu. Again place the fields and text elements at the top of the design area. As you must print at least one Item on the Last page, add the fields that will list the Items once again, to match the arrangement that you used for the Middle page (i.e. placing the "Description 1" field under the other fields if necessary):
Use the Exclude From Page options to specify that each element will only be printed on the Last page (i.e. they will be excluded from the First, Middle and Single pages):
- Now, choose 'View All' from the Operations menu. Every elements from every page will be displayed. This allows you to confirm that the elements on all pages are correctly aligned with each other:
- If any element is not aligned correctly, drag it into position using the mouse, or double-click it to open its specification window and type in the correct co-ordinates.
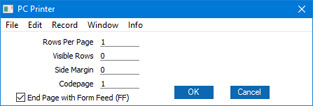
- Depending on the printer you are using, you may need to select 'PC Printer' from the Operations menu, enter "1" in the Rows Per Page field and tick the End Page with Form Feed (FF) option, as well as specifying a Codepage.
- As mentioned in step (iii), the Form Template described above will cause every till receipt to be printed using the first page, an appropriate number of middle pages, and the last page. Possible alternatives that may be more suitable depending on the printer you are using are:
- An essentially similar design, but with more than one Item being printed on each Middle page. Simply change the Middle Page figure in step (iii). Depending on the printer, you may also need to change the Rows per Page specification in the ‘PC Printer’ window (step ix).
- A more complicated design that incorporates a Single page that will be printed if an Invoice only contains a single Item. This design requires the following amendments:
- Change the Single Page and First Page figures in step (iii) from -1 to 1.
- For each element in step (iv), tick the Middle and Last options, so that the elements will be printed on the Single and First pages.
- To the end of the First page design in step (iv), add the fields and text elements that will print the Item and footer information. In these additional elements, tick the First, Middle and Last options so that they will only be printed on the Single page.
- When the design is complete, click the [Save] button in the Button Bar to save the Form Template.
- Now you should specify that the Form Template you have just designed is to be used when printing till receipts. For details, please refer to steps 5-7 at the beginning of this section.
---
Configuring the POS Invoice Window:
Go back to:
|