The Production Time Entry Interface
The Production Time Entry interface allows you to register the time spent working on Productions in a simple manner that does not require you to search for Productions or Production Orders. As you complete each Production, it will be marked as Finished automatically, thus updating stock levels and the stock valuation in the Nominal Ledger. Activities will also be created and marked as Done automatically: these will record the various running costs incurred in completing each Production.
The Production Time Entry interface reduces the time spent administering Productions, thus increasing efficiency. It is designed for use in environments where there is a Production Manager who will administer Production Orders (entering them, choosing the Recipe and Machine, and managing the queues), and where Production Operatives working on each Production only need to record the times they begin and end work and the quantities they produce.
To configure the Production Time Entry interface, follow these steps:
- The first step is to specify that the Production Time Entry interface should be used when particular members of staff log in to your HansaWorld Enterprise system. Change to the User Settings module and open the Login Shortcuts register:
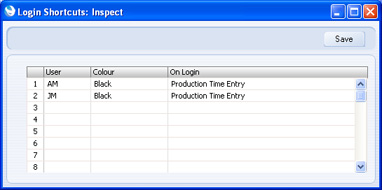
Specify each Person in the first column using 'Paste Special' if necessary, and enter "Production Time Entry" in the third column, again using 'Paste Special' if necessary. The third column determines the window each Person will see when they first log in. Any Person not listed will see the standard Master Control panel.
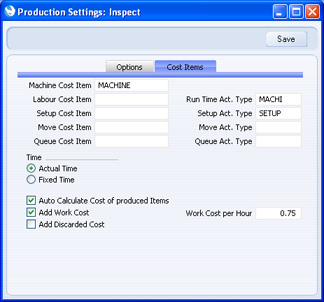
- If you are using the Production Time Entry interface, the time spent working on Productions will be recorded in Activities. These Activities will be created automatically. The next step is to specify the Activity Types that are to be used in these Activities. Open the Production Settings setting and go to the 'Cost Items' card:

Each automatic Activity will be assigned one of two Activity Types. The first Type will be used in Activities recording the time spent working on each Production. These are "Run Time" Activities, and they will use the Run Time Activity Type that you specify in this setting. Run Time Activities will always be created, because they are used to control the operation of the Production Time Entry interface.
The second Type will be used in Activities that record the time spent preparing for each Production (e.g. time required to calibrate the Machine). These are "Setup" Activities, and they will use the Setup Time Activity Type that you specify in this setting. Setup Activities are optional: if you want Setup Activities to be created, check the Add Work Cost box.
As well as causing Setup Activities to be created, the Add Work Cost option will also cause a Work Cost to be added to each Production, for the Run Time and the Setup Time. The total time will be calculated from the two Activities, and the cost will be the Work Cost per Hour in the Production Settings setting.
- The configuration work is now complete. If you are a Production Operative and it has been specified in the Login Shortcuts register that you will use the Production Time Entry interface when you log in (step 1), the first window that you will see when you do so will be the 'Register Time' window:
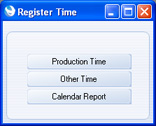
- When you start working on a Production Order, click the [Production Time] button. The 'Production Time' window opens:
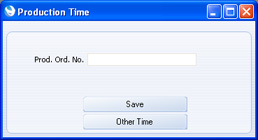
- As a Production Operative, enter the Production Order Number supplied by your Production Manager and click the [Save] button. The 'To be Produced' window appears, showing you the Item that the Production Order requires you to produce, the Production Order Number, the quantity required by the Production Order, the quantity produced so far, and the quantity remaining to be produced:
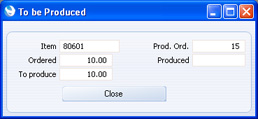
These fields are not enterable, and simply provide you with a reminder of the current Production job.
- When you have finished work on the Production, click the [Close] button to close the 'To be Produced' window. The 'Register Time' window illustrated in step 3 appears. Click the [Production Time] button again. The 'Specify Produced Quantities' window opens:
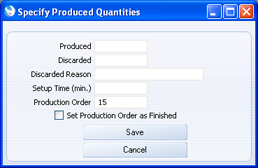
Complete the window as described below, then click the [Save] button.
- Produced
- Enter the quantity you have produced.
- Discarded
- If you produced and then discarded any final Items, enter the quantity discarded.
- For example, if you produced ten final Items, of which nine were good and one had to be discarded, enter "9" in the Produced field above and "1" in the Discarded field.
- Discarded Reason
- Paste Special
Standard Problems setting, Production/Service Orders module
- If you discarded any final Items, you must enter a Reason before you can close the window.
- Setup Time (min.)
- The Setup Time is the time required to configure a Machine or work station before you can begin work (e.g. calibration, replenishing fluids). Enter the Setup Time here.
- Production Order
- This field provides a reminder of the Production Order you are working on.
- Set Production Order as Finished
- Check this box if you want to mark the Production Order as Finished. You should do this if you have produced all the Items required in the Production Order, and there is no more work required.
- When you click the [Save] button, the 'Specify Produced Quantities' window closes, to be replaced by the 'Register Time' window illustrated in step 3. Click the [Production Time] button again as described in step 4 to begin work on the next Production Order.
- If you quit HansaWorld Enterprise between steps 5 and 6, the Production Order will remain open in your name. When you next log in and click the [Production Time] button in the 'Register Time' window, you will be taken immediately to the 'Specify Produced Quantities' window described in step 6.
- If you need to work on a Project instead of a Production Order, click the [Other Time] button in the 'Register Time' or 'Production Time' windows.
If you are already working on a Production Order, the 'Specify Produced Quantities' window illustrated in step 6 will appear. Complete this window as described in that step and click the [Save] button. The Production Order will no longer be open in your name. When the 'Register Time' window appears, click the [Other Time] button again.
The 'Other Time' window will appear:
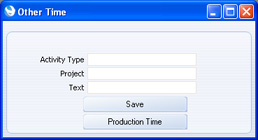
Use this window to create an Activity that will record your work on the Project. Complete it as described below, then click the [Save] button.
- Activity Type
- Paste Special
Activity Types setting, CRM module
- Enter the Activity Type, which represents a specific job or task (e.g. cabling, training, analysis).
- Project
- Paste Special
Project register, Job Costing module
- Specify the Project that you are working on. You must enter a Project before you can save.
- Text
- Enter some text to be copied to the Activity, perhaps describing the task.
When you click [Save], an Activity will be created, with the current time as the Start Time. It will not have an End Time, meaning it is regarded as "in progress".
When you finish working on the Project, you need to end the Project Activity. Click the [Production Time] or [Other Time] buttons in the 'Register Time' window:
- If you click the [Production Time] button, the 'Production Time' window illustrated in step 4 will appear. When you enter a Production Order Number and click save, the End Time in the Project Activity will be updated and the Activity will be marked as Done. The Activity will therefore be closed. The Production Order will be opened in your name, as described in step 5.
- If you click the [Other Time] button, the 'Other Time' window will appear. Enter the details of the next Project you will work on, and click [Save]. In fact, this will only close the first Project Activity. The 'Other Time' window will appear again. Enter the details of the next Project again, and click [Save]. This time a new Activity will be created, for the second Project. This two-stage process allows you to stop working on a Project, to take a break or because it is the end of the day.
In both cases, when the Project Activity is closed, an appropriate Project Transaction will be created automatically, if the Activity Type belongs to an Activity Class whose Create Project Transaction box is checked.
When a Production Operative specifies a Production Order Number in the 'Production Time' window (step 4 above) and saves, the consequences in the Production Order, Production and Activity registers are as follows:
- The Production Order will be marked as Started automatically.
- If the Production Order is Cancelled or Finished, the Production Operative will be told 'Check Production Order Status', meaning that no more work can be carried out against the selected Production Order, and the Production Operative should specify another one.
The Production Order must also have been assigned to a Machine. If this is not the case, the Production Operative will be told 'Check Production Order Machine', and again no work on the Production Order will be possible.
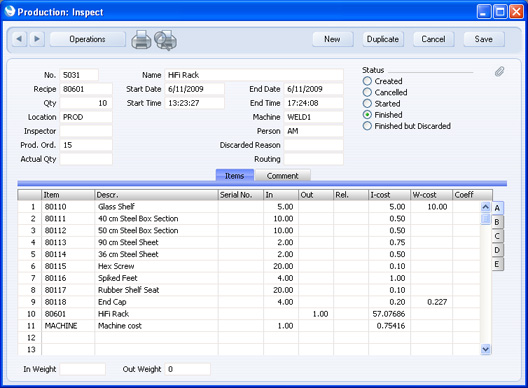
A new Production will be created from the Production Order automatically. The Status of this Production will be Started:

Note that the Qty in the header of this Production is the entire quantity needed to fulfil the Production Order. The Standard Batch size from the Recipe is not used.
As Production Manager, do not create this Production in advance. If your Production Operatives are using the Production Time Entry interface, this Production must be created automatically from that interface. If you create this Production in advance, the Activity described in point d below will not be created, and therefore the time spent by the Operative working on the Production will not be recorded properly. So, if you need to use the Operations menu of the Production to create a Stock Movement to move the components to the Production Location (e.g. workshop) you must wait for the Operative to create the Production. If you need to enter the Stock Movement in advance, enter it directly to the Stock Movement register.
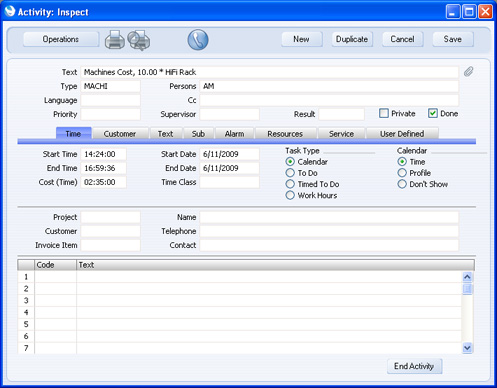
- A "Run Time" Activity will be created, to record the time spent working on the Production. The Activity Type in this Activity will be the Run Time Activity Type specified in the Production Settings setting, and the Start Time and Date will be the current time and date. The Text of the Activity will be taken from the Activity Type, the Recipe and the quantity of the Production:
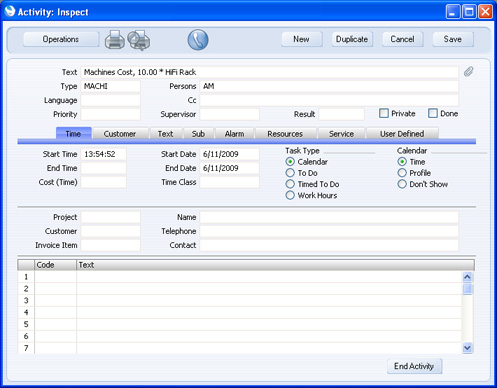
The Production Number will be copied to the Production field on the 'Service' card of the Activity.
As mentioned in step 8 above, if the Production Operative quits HansaWorld Enterprise between steps 5 and 6, the Production Order will remain open in their name. This is because this Activity exists (and it is not marked as Done) and because the Production illustrated in point c is marked as Started and contains the Operative's signature in its Person field.
When the Production Operative completes the 'Specify Produced Quantities' window (step 5 above), the consequences are as follows:
- If the operator chose the Set Production Order as Finished option, the Production Order will be marked as Finished (irrespective of whether the required Quantity has been produced).
- The End Time and Date in the Run Time Activity (from point d above) will be updated, and the Activity will be marked as Done. This will free the operator to work on another Production Order.
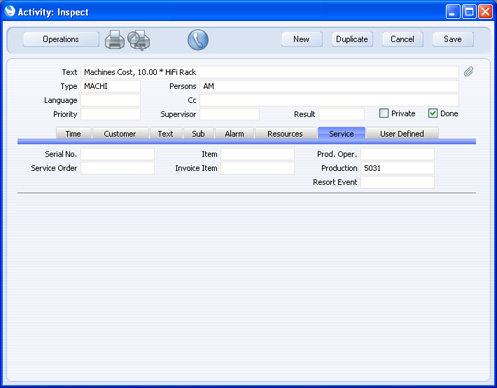
- If the operator entered a Setup Time in the 'Specify Produced Quantities' window and if you are using the Add Work Cost option in the Production Settings setting, a second Activity will be created, to record the Setup Time (a "Setup Activity"). The Text of the Activity will be taken from the Activity Type, the Recipe and the quantity of the Production. This Activity will be marked as Done:

The Production Number will be copied to the Production field on the 'Service' card of the Activity.
The Setup Time is assumed to occur at the beginning of the time spent working on the Production. For example, if work starts at 12:00, the Run Time Activity will be created with a Start Time of 12:00 (point d above). When work ends at 15:00, an End Time of 15:00 will be added to this Activity (point f). If the operator specifies a Setup Time of 20 minutes, the Start Time in this Activity will be changed to 12:20 and a Setup Activity will be created, running from 12:00 to 12:20.
- If you are using the Add Work Cost option in the Production Settings setting, a Work Cost will be added to the Production, calculated using the total Cost (Time) of the labour and Setup Time Activities and the Work Cost per Hour specified in the Production Settings setting.
In this case, the various calculations are:| Work Cost (from the Recipe) per unit | 10.00 | | | | Set Up Cost (30 minutes @ 0.75 per hour from Production Settings) | 0.375 | | Run Time Cost (2 hrs 31 mins @ 0.75 per hour) per unit | 0.189 | | Total | 0.564 | | | | Machine Cost (3 hrs 01 mins @ 2.50 per hour from the Asset) per unit | 0.75416 |
- The Production will be marked as Finished automatically, stock levels of the components and the final Item will be adjusted, and a Nominal Ledger Transaction will be created, to adjust the stock valuation in the Nominal Ledger. For more details about this Transaction, please refer to the Nominal Ledger Transactions from Production Records page.
- As noted in point c above, when the Production is created, the Qty in the header will be the entire quantity needed to fulfil the Production Order. The Operative may not produce this Qty, and therefore will enter a lower Produced quantity in the 'Specify Produced Quantities' window. This quantity will be copied to the Qty field in the Production, overwriting what was previously there. The Run Time and Setup Activities will be updated and the Work Cost they represent will be transferred to the Production as described in points points f - h above, and the Production will then be marked as Finished as described in point i.
For example, if the Qty in the Production Order is ten, then the Qty in the Production will also be ten at first. If the Operative produces two units, then the Qty in the Production will be updated to two before it is marked as Finished. When work on the Production Order restarts, a new Production will be created with a Qty of eight. The 'To be Produced' window will show that ten were ordered, two have been produced already, and eight are still required.
- If the Operative entered both Produced and Discarded quantities in the 'Specify Produced Quantities' window, the Production will be updated with the Produced quantity before being marked as Finished, as described in point j above. A second Production will be created for the Discarded quantity. This second Production will be marked as Finished but Discarded, thus removing the components from stock and updating the stock valuation in the Nominal Ledger. The two Productions will be connected to each other through the Attachments facility. The second Production will usually not add any final Items to stock. However, if you are using the Create Stock Depreciation from Discarded Production option in the Production Settings setting, the Discarded final Items will be added to stock, and an automatic Stock Depreciation will then remove them. If you are using the Add Discarded Cost option in the Production Settings setting, the value of the second (Discarded) Production will be added to the first (Finished) Production as a Work Cost, and therefore this value will be included in the stock value of the "good" Items.
- If the Operative only enters a Discarded quantity in the 'Specify Produced Quantities' window (i.e. if everything produced during a shift was discarded), a second Production will be created for the Discarded quantity, in all respects as described in point k. However, the original Production will remain untouched (i.e. the Qty in the header will not be updated and the Status will remain Started), and the Run Time Activity will not be updated as described in point f. In other words, the original Production will remain "in progress", the assumption being that the Operative will return to that Production and attempt to produce the quantity required. If this assumption is not correct, please refer to steps i - vi below for details about closing the Production and freeing the Operative to work on another job (if you need to account for the Work Costs of the discarded work, you will need to do so by creating a Nominal Ledger Transaction yourself).
It may be that the Production Operative enters the wrong Production Order Number in the 'Production Time' window in step 3. If so, you (or the Production Operative, depending on access rights) should proceed as follows:
- Locate the Run Time Activity that was created when the Production Operative entered the wrong Production Order Number (point d above). You can do this from the Production Operative's computer by clicking the [Calendar Report] button in the 'Register Time' window, or from any computer by opening the Calendar, entering the Production Operative's signature and clicking the [Report] button towards the top right-hand corner.
- Open the Activity by clicking its Comment in the report, and go to the 'Service' card.
- Note the Production Number in the Production field.
- Delete the Activity.
- Locate the Production in the Production register and open it. Mark it as Cancelled and save. You can also remove the Production Operative's signature from the Person field, although this is not essential.
- The Production Operative can now click the [Production Time] button in the 'Register Time' window and enter the correct Production Order Number.
Usually, a Production Operative can only work on one Production Order at a time. The Operative will choose the Production Order at the moment they start working (step 4 above), and enter the quantity they produce when they finish (step 6 above). The Operative will then repeat the cycle for the next Production Order. If a particular Operative needs to work on more than one Production Order at a time, grant that Operative access to the 'Allow Multiple Active Productions' Action in their Access Group. If you are such an Operative, replace steps 4-6 in the earlier sequence with these steps:
- On signing in, the 'Register Time' window will appear. Click the [Production Time] button and enter the first Production Order Number. After clicking the [Save] button, the 'To be produced' window will appear as already described. Click the [Close] button as usual: the 'Register Time' window will re-appear.
- Click the [Production Time] button again and enter the second Production Order Number. After clicking the [Save] button, you will be asked to confirm:
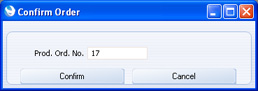
- Click the [Confirm] button to confirm that you want to begin work on the second Production Order (or [Cancel] if the Number is not correct). The 'To be produced' window will appear as normal. Click the [Close] button to return to the 'Register Time' window.
- Repeat steps 11 and 12 as required.
- When you have finished work, click the [Production Time] button in the 'Register Time' window again. When the 'Production Time' window appears, enter the Production Order Number from step 10 and click [Save]. You must enter the Production Order Number from step 10 (i.e. the first Production Order Number that you registered), not one from step 11. Repeating the Production Order Number from step 10 signals to HansaWorld Enterprise that you are no longer entering the Production Orders on which you are starting work, and are now recording that you have finished work.
- Complete the 'Specify Produced Quantities' window as already described and click [Save].
- The 'Specify Produced Quantities' window will re-appear, with the second Production Order Number already entered. Complete the window as appropriate for this Production Order and click [Save].
- Step 16 will be repeated for each Production Order.
- When you have completed step 16 for each Production Order, you be returned to the 'Register Time' window so that you can repeat the cycle.
---
In this chapter:
See also:
Go back to:
|