Point of Sales Workflow - POS Invoices
This page describes the process of entering a POS Invoice using the touch-screen interface.
---
You can enter a POS Invoice using one of two methods:
- You can use the conventional method (open the POS Invoice register and select 'New' or 'Duplicate' from the Create menu (Windows/Mac OS X) or + menu (iOS/Android) in the 'POS Invoices: Browse' window);
- You can have a new POS Invoice open automatically when you log in to Standard ERP. This is controlled using the Login Shortcuts register in the User Settings module.
Whichever method you use, the touch screen interface appears, as shown below:
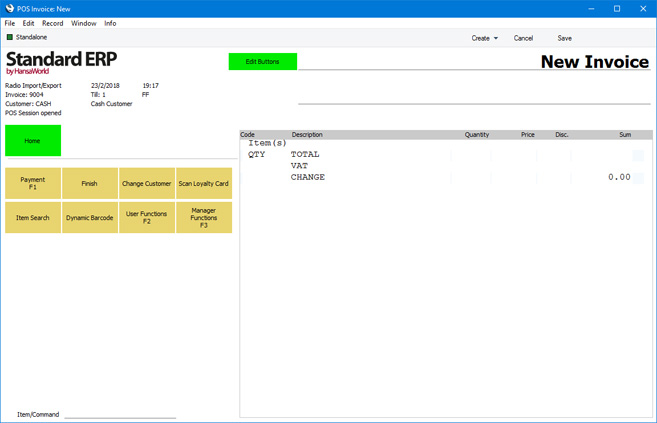
The buttons on the left of the window in the illustration are fully customisable: the buttons on your screen are likely to be different to those illustrated, and they may also be placed on the right-hand side of the window. Some of these buttons are described below but for full details about using and configuring them please refer
here.
The 'POS Invoice: New' window has been designed to make operation by touch and in real time quick and easy. The features of this window are now described.
Opening a Work Session
If you have not done so already, you can open a work session from a POS Invoice. This requires the POS Invoice window to contain an "Open Session" button. The first time you click or touch this button on a particular till a window will open where you should specify the till's Drawer. Thereafter, clicking or touching this button will open work sessions "in the background" with no intervention required from the cashier. Please refer for more details about work sessions.
Specifying a Customer
If you have specified a Default Customer, this will be shown in the top left-hand corner of every new POS Invoice.
Specifying a Default Customer will be useful in a retail business where Customers' names are usually not known and sales are assigned to a generic Customer such as 'Cash Sale'. You can specify an overall Default Customer in the POS Settings setting, and you can specify a Default Customer for a particular till in the Local Machine setting on that till.
You can change the Customer in a particular POS Invoice using the methods listed below:
- If the POS Invoice contains a "Customer Search" button, click or touch this button to search for and choose a different Customer.
- Entering or scanning a Customer's Loyalty Card will add that Customer to the POS Invoice. This requires that the POS Invoice contains a "Loyalty Card" button and/or that a POS Command has been configured that will add a Loyalty Card to a POS Invoice.
Adding Items to a POS Invoice
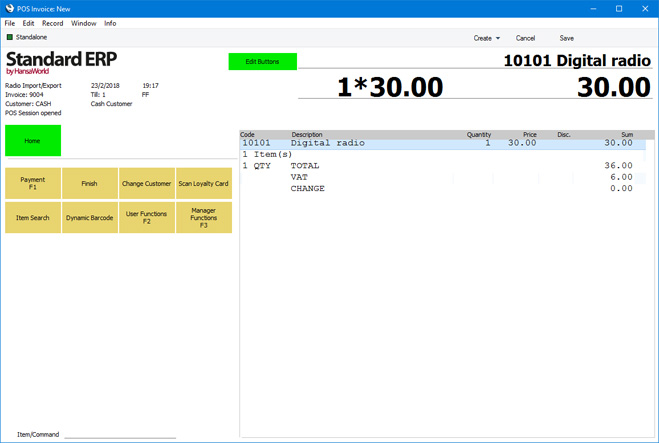
When you open a new POS Invoice, the insertion point will be in the Item/Command field at the bottom of the window To add an Item to the Invoice, simply type its Item Number, Alternative Code or Barcode and press the Enter or Return key, or scan the Item's barcode. The Item will be added to the POS Invoice with quantity 1, and the Invoice will immediately be ready for you to add the next Item:
If you add an Item that is Serial Numbered at the Batch or Unit level, you will usually be asked immediately to scan or input the Serial Number. The exception is when the Item is Serial Numbered at the Batch level and the
Do not Require Batch No. on POS Invoice option in the
Item record has been selected.
Depending on how you have configured your POS Commands, you may be able to use a single keystroke to change the quantity in the POS Invoice row. Several POS Commands are available that will change the quantity, and you can do so before or after entering the Item Number or scanning the Item's barcode. These commands are described briefly in the 'Entering Commands' section immediately below and in more detail here.
Entering Commands
The Item/Command field is the only field in the POS Invoice where you can enter information. As well as using it to enter or scan an Item Number, you can also enter a POS Command in this field. Depending on how these commands have been configured in your system, you could type a single character followed by the Enter or Return key to enact the following:
- increase the quantity of the last Item added to the POS Invoice by one;
- reduce the quantity of the last Item added to the POS Invoice by one; and
- print, approve and close the POS Invoice, open the till drawer, and open a new POS Invoice.
You could also type a single character and a number followed by the Enter or Return key to enact the following:
- change the quantity of the last Item added to the POS Invoice;
- add a discount to the last Item added to the POS Invoice;
- add a Loyalty Card to the POS Invoice; and
- remove a particular row from the POS Invoice (subject to access rights).
Finally, after typing a single character and a quantity, you could scan an Item to add that Item with the specified quantity to the Invoice.
The commands that you can enter are fully customisable: please refer here for details about configuring them and herefor a full list of the available functions.
Supervisor Log-In
Some POS Buttons have a supervisor log-in feature. Using Access Groups, you can control which members of staff can use these buttons. Typically, you may not allow cashiers to use them, but you will allow supervisors to use them.
The buttons that have this feature together with their protecting Access Group Actions are the following:
| Button | Access Group Action |
| |
| Amend Line | Amend Lines on Touch Screen Invoice/Bar Tab |
| Delete Row | Delete Items on Touch Screen Invoice |
| Invalidate Invoice | Invalidate Touch Screen Invoice |
| Loyalty Bonus Points | Loyalty Bonus Points on Touch Screen Invoice |
| Loyalty Points Payment | Allow Loyalty Payment on Touch Screen Invoice |
| Reprint Receipt | Reprint Touch Screen Invoice |
| Split Item | Split Item on Touch Screen Invoice |
| Transfer to Invoice | Transfer POS Invoice to Sales Ledger Invoice |
| Transfer to Quotation | Transfer POS Invoice to Quotation |
| Transfer to Sales Ledger | Transfer POS Invoice to Sales Ledger |
| Transfer to Sales Order | Transfer POS Invoice to Sales Order |
| Void Item | Void Touch Screen Invoice rows |
We will describe the supervisor log-in feature using the "Amend Line" button as an example. Follow these steps:
- Assign cashiers to an Access Group in which you have denied access to the 'Amend Lines on Touch Screen Invoice/Bar Tab' Action, and assign supervisors to an Access Group in which you have granted access to the same action.
- When a cashier highlights an Item in a POS Invoice and presses the "Amend Line" button, a log-in window will appear:
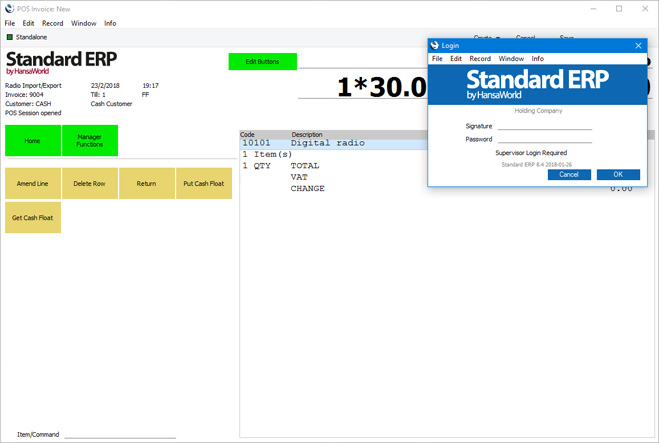
- The supervisor should log in. The 'Amend Line' window will appear:
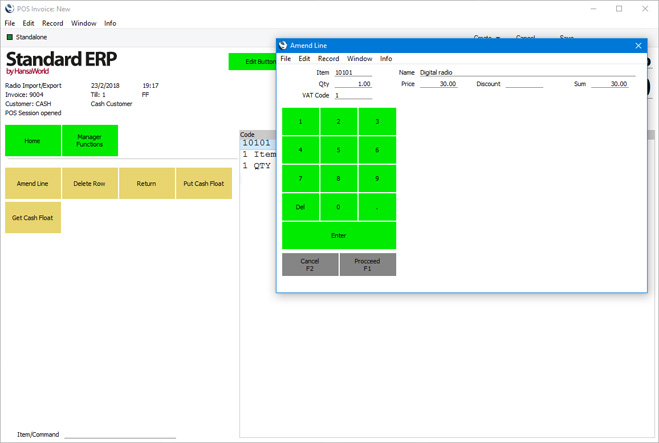
- The supervisor should enter the new quantity, price or discount.
- The supervisor should click or touch the [Proceed] button in the 'Amend Line' window to commit the amendment to the POS Invoice or [Cancel] to return to the POS Invoice without amending it.
- Control of the till will be passed back to the cashier.
- If the supervisor is not available when the log-in window appears in step 2, the cashier should click or touch the [Cancel] button and continue with the remainder of the POS Invoice.
Payment
When you have added the Items to the POS Invoice, you should receive payment from the Customer. To do this, you can either click or touch the relevant button that represents the payment method used by the Customer (e.g. the "Cash" or "Credit Card" buttons), or you click or touch the "Pay" or "Pay (one Mode)" buttons (if the Customer pays using more than one payment method).
Please refer to the following pages for details about each payment method:
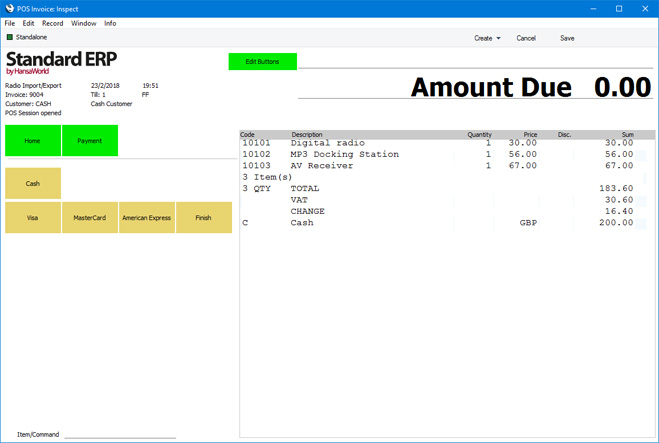
When you add a payment to a POS Invoice, it will be listed after the Items and the totals. In the example illustrated below, the Customer paid using cash, and was due some change: this is shown in the line above the payment line. The Amount Due figure at the top of the Invoice shows that it is fully paid:
If the Customer cannot pay, you can proceed as follows:
- If you have not saved the POS Invoice, you can discard it by pressing the [Cancel] button. This method may not be suitable if you are using the Incremental Receipt Printing option on the till, because a receipt will already have been printed for the Items.
- You can cancel or void the POS Invoice. This is known as "Invalidating" the POS Invoice. The POS Invoice will remain in your system, but it will not update stock, cash balances or the Nominal Ledger. If you print a receipt, it will be marked "Cancelled". Use the "Invalidate Invoice" button to invalidate a POS Invoice. This button has the supervisor log-in feature.
- If you will allow the Customer to pay later, you can transfer the POS Invoice to the Sales Ledger. Details will be copied from the POS Invoice to a Sales Ledger Invoice, which will then enter your usual debt management process. If your till has a live-sync connection to the server, you must use the "Transfer to Sales Ledger" button. If your till has a live connection to the server, you can use the "Transfer to Sales Ledger" button or the "Transfer to Invoice" button. Both buttons have the supervisor log-in feature. Be sure to use the "Customer Search" button to change the Customer in the POS Invoice before using the "Transfer to Sales Ledger" or "Transfer to Invoice" buttons.
Closing (Finishing) a POS Invoice
After receiving payment, you should print the receipt, open the Till Drawer, close the POS Invoice and open a new one ready for the next Customer. To do this, simply click or touch the
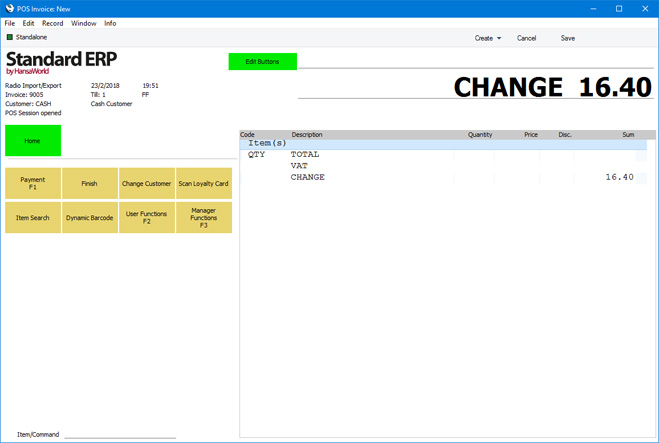
"Finish" button and all these tasks will be carried out. If you needed to give change to the Customer, the amount will be shown at the top of the next POS Invoice as a reminder until you start adding Items:
Returns
It will sometimes be necessary to reverse a previous POS Invoice, because the Customer returns the Items or because the Invoice contained an error. Two methods are available:
- On tills with live connections to the server, open the POS Invoice register using the "All Invoices" button. Find the POS Invoice to be credited and open it. Click or touch the "Return" button. A new POS Invoice will be created and opened, with negative quantities and containing the Invoice Number of the original POS Invoice.
You cannot use this method if you are using a till with a live-sync connection to the server. On such a till, the POS Invoice register will only contain the POS Invoices entered on the particular till, which will probably not include the POS Invoice being reversed.
- Create a new POS Invoice and enter the Items being returned. Then, click or touch the "Return" button. The quantities will be changed to negative figures. Use the "Return Invoice No." button if you want to add a reference to the Invoice Number of the original POS Invoice.
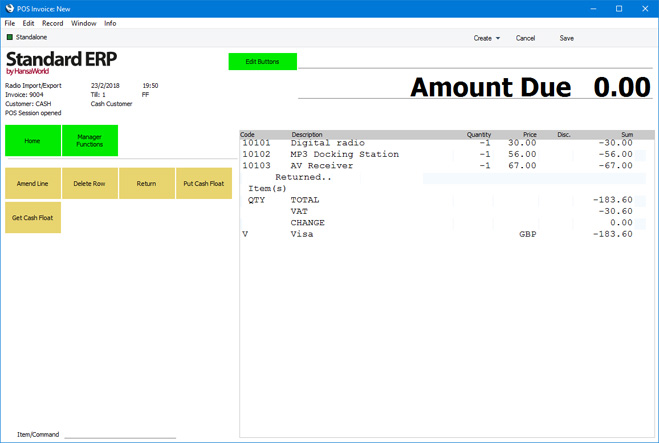
In both cases, you can now process the Return as if it were a normal POS Invoice.
Changing Cashiers
If the POS Invoice window contains a
"Change User" button, click or touch this button to change cashiers. The current Invoice will be saved and closed. The saved Invoice will be re-opened for the new user.
Parking Invoices
It can happen that a cashier scans a Customer's Items and the Customer then realises that they have forgotten something. The cashier can save (or "park') the Invoice, serve the next Customer while the first one is away, and then return to the first Invoice when the Customer is ready. To be able to park an Invoice, the POS Invoice window must include a
"Pause Sales" or a
"Suspend Invoice" button, and to be able to return to a parked Invoice, the POS Invoice window must include an
"All Invoices", an
"Open Unfinished Invoices" or a
"Resume Sales" button. Follow these steps:
- Add a Customer's Items to a POS Invoice.
- At any time, click or touch the "Pause Sales" or "Suspend Invoice" button. The POS Invoice currently on screen will be saved and closed and an empty new Invoice will be opened in its place.
- While the first Customer is away, process the next Customer.
- When the first Customer returns, click or touch the "All Invoices", the "Open Unfinished Invoices" or the "Resume Sales" button. A list of Invoices will open, where you can choose the one that you wish to return to. In this context, it is probably preferable to use "Open Unfinished Invoices" or "Resume Sales" because the resulting selection list will only include Invoices that have not been Finished yet, so it will be much easier to find the Invoice that you need.
- Double-click or touch the POS Invoice that you need to open. The Invoice will be opened, and you will be able to continue working with it.
---
Point of Sales workflow in Standard ERP:
Go back to:
